Welcome to No Limit Sound Productions

Company Founded
2005
Overview

Our services include Sound Engineering, Audio Post-Production, System Upgrades and Equipment Consulting.
Mission
Our mission is to provide excellent quality and service to our customers. We do customized service.

Wednesday, August 16, 2023

Understanding Audio Files In Cubase

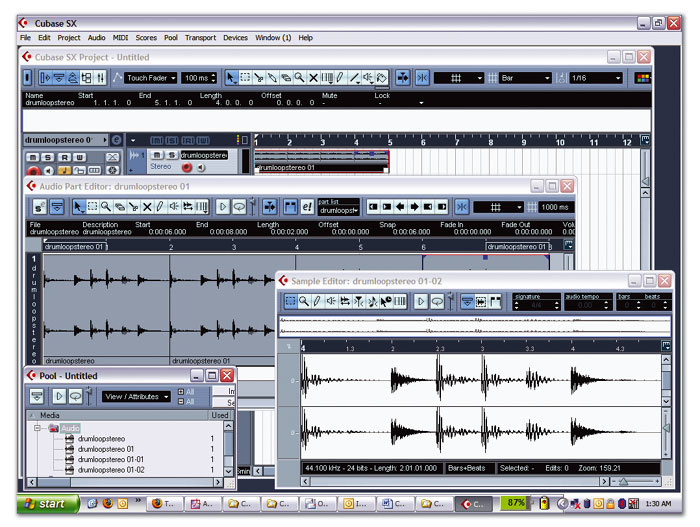
The hierarchy of audio clips, events and parts. In the Project window is a part containing four events. The Audio Part Editor shows those events, and in the Sample Editor one of them is ready for editing. The Pool shows that each clip is used by an event once in the Project.The hierarchy of audio clips, events and parts. In the Project window is a part containing four events. The Audio Part Editor shows those events, and in the Sample Editor one of them is ready for editing. The Pool shows that each clip is used by an event once in the Project.

We take a look at the concepts of audio files, clips, events, parts and regions in Cubase, and explain how you can manage these objects in the Pool window.

In April's Cubase Notes we looked at processing audio offline in Cubase SX/SL, including the use of the Offline Process History feature for undoing processing carried out on audio files. When you're doing this kind of work, it's important to understand exactly how audio is handled within Cubase — so if you're not sure about the differences between files, clips, events, parts and regions, this should be the workshop to clear up any misunderstandings.

Of Files & Clips

Audio that you record or import into Cubase is stored as a regular file on your hard disk. You'll notice that recorded audio is automatically stored in the Audio folder inside a Project folder, and when you import an audio file into a Project, Cubase always gives you the option of copying that file into the Project folder, so that you can keep all the files pertaining to a given Project in the one Project folder.

However, under the bonnet, rather than representing audio files within the Project Folder as a series of files in the Project itself, Cubase references every audio file used in a Project as an audio clip. The reason for this higher level reference is because of how the Offline Process History works. When you process a section of audio in Cubase, the processed section is stored in a completely different file (in the Edits folder of the Project folder) so that the original audio file isn't actually touched.

The relevant clip is updated so that playback is seamless between the unprocessed and processed files — and because Cubase only presents clips to the user, this whole mechanism for creating extra files for edits is completely transparent and is something you'll rarely need to think about. Basically, you can think of a clip as a playlist of audio files.

When you add audio to the Project window, either by recording it or by importing it, Cubase creates an audio event (which is represented by a rectangular box, as you'll have seen) that essentially triggers the playback of a clip. An audio event doesn't necessarily need to play the full clip — it's possible for the event to start and finish at any point within the clip — and you can even have multiple audio events on different tracks playing from the same clip simultaneously.

In the same way that a MIDI part contains MIDI events, an audio part is a collection of audio events. You can put a group of audio events in a track into an audio part by selecting the appropriate events and choosing Audio / Events to Part. This can be useful when you want to group a series of events into one object for moving and copying, ensuring that everything stays together in the correct positions. For example, say you create a four-bar pattern from four one-bar events and want to duplicate the four-bar pattern several times. Grouping the four Events into a Part makes this easier to manage.

Double-clicking an audio part opens the Audio Part Editor, which allows you to work with the events inside the part just as you would in the Project window. Double-clicking an audio event in the Audio Part Editor opens that event in the Sample Editor, exactly as it would if you double-clicked an audio event in the Project window. To break an audio part back into audio events again, select the relevant part and choose Audio / Dissolve Part.

Regional Variations

The Cubase manual describes a region as a section within a clip, and you can basically think of it as a kind of bookmark or internal reference point within a clip. Clips can contain many regions, and once a region has been created you can make a selection in the Sample Editor based on its start and end points, drag it to the Project window to create a new audio event, or save it to disk as a new audio file.

One instance where regions can be useful is drum tracks, where you might want to define parts of an audio event that contain a good snare drum hit, bass drum hit, or some section of audio you might need to use later on to patch up weaker areas of the same drum track with better hits. You could also apply this same example to any recording, of course, using regions to index bass guitar or vocal notes as well.

You can define regions in the Sample Editor as reference points within an audio event. Notice how any regions defined in an event are also listed in the Pool.You can define regions in the Sample Editor as reference points within an audio event. Notice how any regions defined in an event are also listed in the Pool.

There are many ways to create regions in Cubase, including manually in the Sample Editor. To do this, open the Sample Editor by double-clicking an audio event in either the Project window or Audio Part Editor (double-clicking an audio part in the Project window always opens the Audio Part Editor).

The Sample Editor always shows the complete clip that an audio event is taken from, but the parts of the clip not used by the audio event you're editing are always greyed out. You can see the list of regions for the clip being displayed in the Sample Editor by enabling the Show Regions button on the Sample Editor's toolbar. This is the second button in, to the right of the pop-up menus.

To create a new region, simply mark up the area you'd like to define as a region, select Audio / Create Region (or click the Add button in the Region List), type in a name for the region and press Return. Once the Region List is visible, you can select a region by clicking in the unlabelled column to the far left of the list.

Clicking in the Description column renames a region, and clicking in either the Start or End columns allows you to change these values by typing in new positions. The currently selected region is always shown by default in the Sample Editor and you can remove a selected region in the list by clicking Remove, or select the area in the Sample Editor defined by a region by clicking Select.

When a region is selected, you can resize it graphically by dragging the Region Start and End flags in the Sample Edit window, just as you can change the start and end points of the audio event you're editing by dragging the Event Start and End flags.

Once you've defined regions, such as drum hits, notes, or other useful sections, you can use them in your Project by dragging the region from the unlabelled column in the Region List to the Project or Audio Part Editor windows, which creates a new audio event based on that region. As a side note, regions can be automatically created when using Cycle Record Mode, to indicate different takes of the same recording if you record those takes without stopping in between each take, as discussed in November 2002's Cubase Notes.

Organising The Pool With Sub-folders

It's easy to organise clips and events in the Pool into folders and sub-folders, although these exist only in the Pool and don't affect how the audio files are organised on disk.It's easy to organise clips and events in the Pool into folders and sub-folders, although these exist only in the Pool and don't affect how the audio files are organised on disk.The Audio folder in the Pool can soon fill up with hundreds (and thousands) of audio clips, so in order to keep things nice and tidy you can create sub-folders inside the Audio folder to organise the list of clips. For example, you might want to organise all your imported drum loops into one folder, use another folder for newly recorded audio, and an additional folder for files you imported from another musician you're collaborating with.

To create a sub-folder:

  • Select the folder in which you want to create a sub-folder.
  • Choose Pool / Create Folder, type in a name for the folder and press Return.
  • You can later rename a folder as you would a clip, by simply double-clicking it, typing in the new name and pressing Return. It should be noted that these sub-folders only appear in the Pool and aren't created in the Audio folder inside the Project Folder on your disk, so the files that the clips reference are unaffected.

Once you've created a sub-folder, it's possible to place clips in it by simply dragging them on to that sub-folder. Newly recorded clips are always automatically placed inside the Pool's Record Folder (indicated by the word Record in the Status column), which is the root Audio folder by default. When you import audio, however, the new clip is created within the currently selected folder. To change the Pool's Record Folder, simply select the folder you would like to define as the Record Folder and choose Pool / Set Pool Record Folder.

Dive In If You Want To Know

To help you manage the audio clips and associated regions used in a Project, Cubase provides the now somewhat infamous Pool, which is basically a catalogue that lists every audio clip you've recorded or imported into the Project, along with any regions you might have created within those clips. Open the Pool by selecting Project / Pool or using Control/Apple-P. By the way, it's worth noting that you can import files into the Pool without having to place them in the Project window, by clicking the Import button on the Pool's toolbar or selecting Pool / Import Medium. This is great if you have a whole set of drum loops that you might want to use in a Project, for example, but you're not sure which ones you're actually going to use. Importing all the possible loops into the Pool allows you to organise and audition them, dragging the loops to the Project window if you hear something you want to use. This saves you having to create multiple tracks in the Project window, enabling and disabling the mutes to audition the audio.

The Pool contains three folders, labelled Audio, Video and Trash. Audio clips are placed into the Audio folder, video clips are placed into the Video folder (for when you're working with desktop video files), and the Trash folder works much like the Trash or Recycle bin on the Mac or Windows desktops. Expand or collapse a folder in the Pool by clicking that folder's expand ('+') or collapse ('-') button, or collapse and expand all the folders in the Pool by clicking the Expand or Collapse All buttons on the Pool's toolbar.
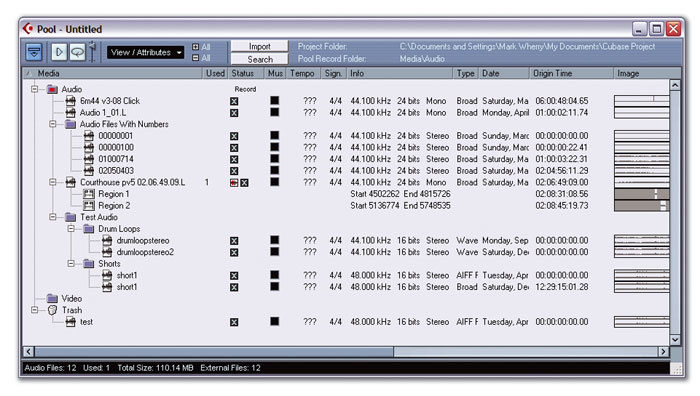
The Pool keeps track of all the audio files, clips, events and regions used in a Project, and also provides a Trash folder to help you manage deleting files from a project, in addition to keeping track of any video files and clips.The Pool keeps track of all the audio files, clips, events and regions used in a Project, and also provides a Trash folder to help you manage deleting files from a project, in addition to keeping track of any video files and clips.

Because regions are references within audio clips, the Pool also keeps track of the regions that have been created and groups them with the relevant clips, allowing you to work with regions in almost exactly the same way you'd work with the original clips themselves. If a clip has an expand button, you can click this to see the list of regions that have been created within that clip.

You can place a clip or region from the Pool as an event on the Project window by simply dragging it, and Cubase will create an audio track for you automatically if one doesn't already exist. Alternatively, place the selected clip or region on the selected track in the Project window (at the current location of the Project cursor) by selecting Pool / Insert into Project / At Cursor. It's also possible to use the Pool / Insert Into Project / At Origin command to place a clip back into the Project window at the point it was originally recorded.

Sometimes you might want to update the Origin Time for a clip, however. Say you've recorded something but you came in slightly early. Moving the audio event that plays the relevant clip forward a little in the Project window, so that everything is in time is, of course, very easy, but doesn't update the Origin Time recorded for that clip. In other words, inserting this clip as an event in the Project window at the Origin Time will always insert it in the original, slightly early position. So to update the Origin Time of a clip or region to the current location of the Project Cursor, select the appropriate clip or region in the Pool and select Pool / Update Origin.

To save a region as a new clip (which also means as a new audio file on your disk), first select in the Pool the region that you want to save as a new clip. Now select Audio / Bounce Selection (this command is also available from the Quick Menu) and choose a destination folder in the file selector that appears (you'll probably want to select the Audio folder inside the Project Folder). A new clip is created in the Pool, referencing the new file that's been created in the Project Folder based on the region you selected. Note that the region's name is used for the clip by default, although you can change this if you wish.

Creating new clips (and so files) from regions in this way is useful when you want to make modifications to a region but you don't want to affect the clip from which the region is derived. For example, say you have a region containing one snare drum that you want to duplicate in the Project window and apply an effect to: you don't want this effect to be heard when the original clip is played back. Bouncing the region to a clip/file, as described above, and then applying the effect to the newly created clip will leave the original clip intact.

You can audition a clip or region in the Pool by selecting it and clicking the Play button on the Pool's toolbar. Clicking the Play button again while the clip or region is playing will stop the playback. If you also have the Loop button activated on the Pool's toolbar, the selected clip or region will be looped when you press the Play button, until you either press the Play button again or deactivate the Loop button. It's worth noting that the Play and Loop buttons on the Pool's toolbar are completely independent of the transport controls for the Project.

A Guide To The Pool's Columns

Media

This column is always visible and lists the name of the clips and regions used in a Project.

Used (Use Count)

The number of times an event in the Project references a clip.

Status

There are four possible icons, which can indicate whether:

  • [~] The clip has been processed, and therefore plays back from multiple files.
  • [?] The file references by the clip can't be found. (See the main text for info about renaming and deleting files in a Project to avoid this situation!)
  • [X] The file referenced by the clip is stored externally and isn't located in the Project folder. The total number of external files is detailed in the Infoline at the bottom of the Pool when the Show Info button is active on the Pool's toolbar.
  • [R] The Clip has been recorded since you last opened the Project, which is handy for seeing recently recorded clips at a casual glance.

In addition to these four icons, the word 'Record' is used to indicate the folder that newly recorded clips will be placed into.Understanding Audio Files In Cubase SX
Musical Mode

This checkbox allows you to enable and disable Musical Mode (automatic, real-time timestretching) for a clip, rather than doing it in the Sample Editor, which is actually rather helpful when you're working with a large number of clips in Musical Mode, since it saves you from opening, closing and re-opening the Sample Editor multiple times. The only catch is that before you can enable Musical Mode a tempo must already have been specified: if not, Cubase will prompt you to enter a tempo before enabling the mode.

Tempo

The tempo of the clip, used by Musical Mode (see above). It's possible to change this value by clicking on it, typing a new value and pressing Return. Unless you import an Acid-format Wave file, the tempo of the audio will be unknown to Cubase and displayed as question marks.

Signature

The time signature of the clip, which is 4/4 by default (unless specified in an imported Acid-format WAV file) and can be changed in the same way as the Tempo value.

Info

Where the original file that the clip references is stored on your disk.

Type

The file format used to store the clip — for example, WAV or AIFF.

Date

The date and time when the clip was created.

Origin Time

The location in the Project at which the clip was originally created. When you're importing audio files, note that only Broadcast WAV files (not regular WAV or AIFF files) contain time-stamps to fill the Origin Time field.

Image

A visual representation of the clip or region's waveform. You can also click on this image to audition the clip or region, onwards from the point at which you clicked.

Path

The full path-name of the file, allowing you to see exactly where on your disk the file is stored. This is particularly useful when dealing with files that are external to the Project folder.

Reel Name

This field is filled only when audio files are imported from OMF files and contain a reference to a Reel Name, useful if you're importing OMF from Avid, for example, where you want to keep track of what video/film reel the clips originally came from.

Pool Management

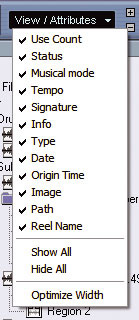
Like the list-style view for navigating computer disks and folders on your desktop, the Pool consists of a number of columns that give you different information about clips (see the screen on page 264). You can choose which columns are displayed by toggling the options in the View pop-up menu on the Pool's toolbar, and you'll notice that there are also Show and Hide All commands available from this menu, so you can show or hide all the available columns with just one mouse-click. Optimise the width of the columns to the smallest width that's useful by selecting Optimize Width from the View pop-up menu. Should you want to, you can also change the order of the columns horizontally, by simply dragging their titles to a new position.

It's possible to organise how the list of clips appears in the Pool by clicking on the column titles, just as you might on Mac or PC desktop windows. By default, the clips are listed in alphabetical order according to clip name, which is indicated by the upwards arrow in the Media column. However, you can click on any of the other column titles to list the clips according to the data represented in that column. A second click in the same column reverses the order of the list.

As mentioned earlier, the Pool exists as a way for you to manage and keep track of the clips and regions used in a Project, so it stands to reason that there are many useful facilities available for keeping the Pool nice and tidy. To begin with, there's a handy Show Info button on the Pool's toolbar that toggles the appearance of an Infoline at the bottom of the Pool, to give an overview of the clips used. From left to right, the Infoline details the number of audio files in the Pool, the number of files used by events in the Project, the total size of the audio files used for clips in the Pool, and the number of external files referenced by clips in the Pool (external files are ones not inside the Project folder).

Renaming & Deleting

A clip always takes the same name as the file it references in the Project folder. If, for some reason, you want to rename either clip or file, you should never rename it in the Project folder in the same way you might normally rename files on your computer. If you do, Cubase will no longer be able to find the renamed audio files and recognise them as part of your Project. Instead, to rename a clip (and the actual audio file), double-click the name of the clip in the Pool's Media column, type in a new name and press Return. You'll notice that both the clip and the file on disk are updated to take on the new name, and it's worth noting that where you have a clip that references multiple audio files the first, or original source, file is the one that is renamed. Regions can be renamed in the same way, although this has no effect on the name of the associated clip or any of the files that are stored on your disk.

In the same way that you shouldn't rename audio files used in a Project from your computer's desktop, you absolutely shouldn't delete audio files from a Project Folder as you'd normally delete other computer files. Use the features within the Pool to do this instead. The Pool has a two-stage process for deleting clips (and so files) that works in much the same way as you'd delete files on your computer normally — first dragging them to the Trash or Recycle bin, then 'emptying' it.

  • Select the clip (or clips) you want to delete and press Backspace. If you're trying to delete a clip that's used by an event in the Project, Cubase will warn you that the clip is still being used and ask whether you want to delete all occurrences of events that use the clip in the Project. If you do, click Remove; otherwise, click Cancel, which aborts the deleting process.
  • Cubase will prompt you to specify whether you want to move these clips to the Trash folder (for deleting) or just remove them from the Pool. If you want to delete the actual audio files from the disk, in addition to removing the references to the clip (or clips) from the Pool, click Trash. If you just want to remove the clip (or clips) from the Pool, without deleting the audio files on disk, click Remove from Pool. (If your intention was always to move these clips to the Trash folder, you can also simply drag the required clips to the Trash folder.)
  • Once you have some clips in the Trash folder that you want to delete, simply select Pool / Empty Trash, and Cubase will ask you again whether you want to delete the files from disk or simply remove the references from the Pool. If you want to delete the files permanently, click Erase. To simply remove the clips from the Pool, click Remove from Pool.

If you delete all the events from the Project window that reference audio clips recorded since you last opened the Project (any flagged with the 'R' record icon in the Status window), an interesting behaviour to note is that Cubase will automatically move the clips to the Trash folder for you. You can later remove them from the Pool or delete the file altogether by following the last step above. 


Published June 2005

Monday, August 14, 2023

DSD Support In Cubase?

By Mark WherryWe look at the possibility of DSD higher-quality audio support in Cubase, a plug-in to help you write ringtones for Nokia phones, and a new patch for Windows users of Cubase SX/SL 3.02.

While there was no major news for Cubase users at this year's Frankfurt Musikmesse, Steinberg showed a couple of new products, such as The Grand 2 (featuring a second, brand-new acoustic piano), and some interesting new technology. ASIO (Audio Streaming Input Output) has been the technology for getting audio into and out of Cubase for nine years now and it was originally invented as a way of dealing with multi-channel PCM (Pulse Code Modulation) audio at relatively low latencies. At the Musikmesse this year, Steinberg introduced ASIO 2.1, a small, yet significant update to the ASIO 2 technology introduced at the Winter NAMM show in 1999 that adds support for DSD (Direct Stream Digital) audio, of which the best commercial example of usage is currently in Super Audio CDs (SACDs).

Very briefly, DSD is a different way of representing digital audio, compared to PCM (Pulse Code Modulation). With PCM, the exact level of the audio is sampled and represented with the available bit resolution (24 bits, for example) a specified number of times per second, according to the sampling rate (44100 times per second at a rate of 44.1kHz). DSD is similar in that the signal is sampled a specified number of times per second, but the samples store whether the signal rose or fell since the last sample. The sampling rate used for DSD is significantly higher than the highest we might consider working with in PCM: 2.8224Mhz, 64 times higher than 44.1kHz.

At Musikmesse, Sony showed a Windows workstation featuring a prototype, ASIO 2.1-based audio device developed by Sony that supported the recording and playback of DSD and PCM digital audio. While the debate continues as to which is the 'better' high-resolution audio format between 192kHz/24-bit PCM (for applications such as DVD-Audio) and DSD (for SACD), DSD has the advantage of having both a wide dynamic range and a high bandwidth, which is easier to balance than with PCM. Although DSD requires a fundamentally different approach to working with digital audio data than PCM, the fact that there will be a low-cost, ASIO-based platform for working with high-quality DSD audio in the near future is great news, since it will open up DSD development and could eventually lead to a DSD-capable version of Cubase or Nuendo.

A Patch For Cubase SX/SL 3.02

In last month's Cubase Notes we mentioned the 3.02 (build 622) update to Cubase SX/SL. Since this was released, a performance-related problem has emerged that has affected some users (including users of Nuendo versions with the same build number). As has been noted by various people on the web forums, working with certain user-interface elements, performing actions such as opening and closing of windows or zooming, has caused disk dropouts during recording and playback of audio.

The good news is that not all users are affected by this problem: it doesn't seem to be an issue for Mac users, or for Windows users with reasonably high-spec machines, especially dual-processor models. The better news is that the fix is only a small patch, which updates Cubase to v3.02 build 623. Windows users of Cubase SX/SL 3.02 can download it from ftp://ftp.steinberg.net/Download/.

Connecting People

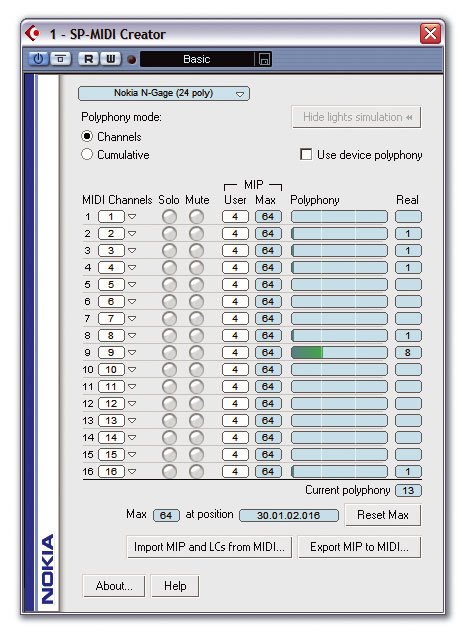
With Nokia's SP-MIDI Creator VST Instrument, you can use Cubase to make better ringtones for Nokia mobile phones. Imagine the creative possibilities...With Nokia's SP-MIDI Creator VST Instrument, you can use Cubase to make better ringtones for Nokia mobile phones. Imagine the creative possibilities...At the other end of the fidelity spectrum, no-one could argue that mobile phone ringtones do anything but enrich our musical culture — could they? To aid in their composition, Nokia have released an update to the Nokia Audio Suite of tools, which Steinberg were including in their 'World of VST' discussions at Frankfurt. The main part of the suite is the combination of SP-MIDI Creator, a VST Instrument that simulates the sound and behaviour of the built-in sound engines and capabilities of most Nokia phones, and Auralisation Tool, a VST effect that simulates their acoustics and DSP.

SP-MIDI Creator (SP stands for Scalable Polyphony) is an extension to a standard MIDI file, brought forward by the MIDI Manufacturers Association, that specifies how a given file should be played on devices with differing polyphony capabilities, and was conceived as a solution to creating a single MIDI file that could be played back on different 3G and similar mobile devices. Nokia's SP-MIDI Creator allows composers to use Cubase to preview how a piece of music will sound on different Nokia phones, and add the appropriate commands to that MIDI file. (You must export the file from Cubase before adding the commands from within the plug-in.)

Aside from the obvious application of creating ringtones, you could also use the plug-ins creatively — or even in a practical way for post-production people who need to create sound effects for phones and so on. Nokia Audio Suite is a free download, although you have to be a member of Nokia's Developer's Resources Forum first (also free to join). Visit www.forum.nokia.com for more information. 


Published June 2005

Friday, August 11, 2023

Customising The Workspace In Cubase SX

The Project window 'before' a tidy-up...The Project window 'before' a tidy-up...

When you come over all creative or are facing a tight deadline, a lean, mean music-recording machine is a definite advantage. The tools for customising the Cubase SX work environment may not sound very sexy, but they can certainly help your workflow.

Way back in the September 2003 Cubase Notes column, when Cubase SX was still at v1, Mark Wherry provided an introduction to using Window Layouts in SX. As Mark acknowledged, this feature might not be the most significant consideration when you're parting with your hard-earned cash for a top-of-the-range MIDI + Audio sequencer. However, if you need to work efficiently with Cubase, getting to grips with the tools for customising the appearance of the program, with Window Layouts — or 'Workspaces', as they are referred to in SX 3 — and with some of the other customisation options ought to be very near the top of your to-do list. So let's explore some of the features that can help keep the SX interface as streamlined as possible.

Cut The Clutter

Whatever software you are using, be it a word-processor, photo editor or music application, the less clutter you have in the user interface, the more space there is for useful stuff, so it makes sense to spend a little time tweaking the interface. This is particularly true if you're using SX with a single-monitor system and screen space is at a premium.

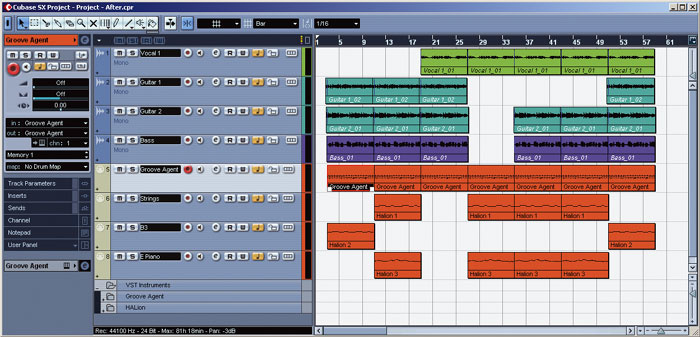
The Project window is where most users will spend the greatest proportion of their time. There are a number of elements in this window that can be customised, and these include features that, while very useful in some circumstances, may not be required in routine operation. As an example of how a little tidy-up can both save space and make it easier to focus on the controls you use the most often, have a look at the 'Before' and 'After' screen shots of the Project window.

The Project window 'after' a tidy-up.The Project window 'after' a tidy-up.

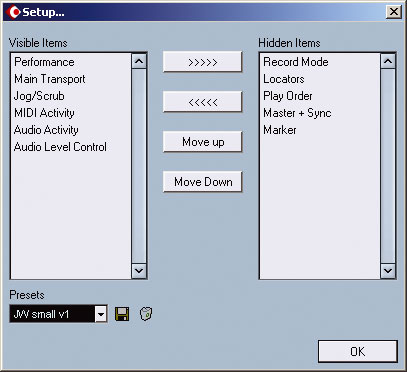
The differences are small but they do clean things up somewhat. First, some elements have been removed from the Project window toolbar. Right-clicking (PC) or Ctrl-clicking (Mac) anywhere within the Toolbar area opens a pop-up menu. From here, individual elements can be toggled on or off. For further control, the 'Setup' option from this pop-up opens a dialogue that not only allows elements to be switched on or off, but also allows their positions to be adjusted via the Move Up and Move Down buttons. As can be seen in the 'Before' and 'After' screens below, I've only left the View Switches, Tool Buttons, Autoscroll and Snap/Quantize buttons active, as these are the options I regularly use.The Setup dialogue for the Project window Toolbar.The Setup dialogue for the Project window Toolbar.

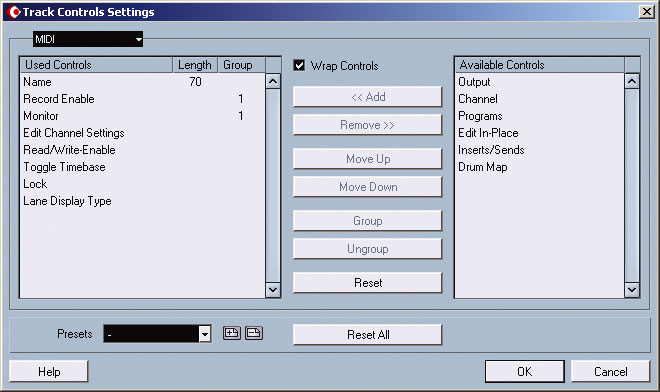
The second difference between the 'Before' and 'After' screen shots is the selection of buttons displayed for each track. Again, right-clicking (PC) or Ctrl-clicking (Mac) on an individual track opens a pop-up menu from which the Track Control Settings option can be selected (see screen below). The dialogue that opens reflects the type of track currently selected, but the drop-down menu positioned at top left allows the settings for other track types to be edited too. In the example shown here, I've customised the MIDI and Audio track buttons to provide identical layouts, so whether I'm working with a MIDI track or an audio track, the controls are the same and appear in the same position. I've also removed one or two controls I don't use often (for example, the Insert/EQs/Sends buttons, as I tend to use the Inspector to access these for an individual track). Third, and most simply, I've switched off the Event Info line and the Overview line. While these are very useful on occasions, most of the time I'd rather have the extra space for other things.

The Track Controls Settings dialogue.The Track Controls Settings dialogue.

Steamy Windows

As Mark Wherry described back in September 2003, one of the seemingly least exciting features of SX — the ability to define screen layouts for instant recall — is actually one that can bring some of the greatest improvements in workflow. An SX Workspace is simply a particular arrangement of windows. For many users, the two obvious candidates would be a full screen 'Project window' layout and a full-screen 'Mixer window' layout. Once fine-tuned to suit your needs and then stored as Workspaces, they can be recalled via a Key Command.

Depending upon how you work, a number of other preset Workspaces could also be useful. For example, Workspaces could be configured to access key VST instruments or effects more quickly, or to access MIDI or audio editors. A particular Workspace can be stored in a Project Template (so it would be available for any Project based on that Template) or saved globally. In the case of the latter, Workspaces can either be made automatically available to all new Projects or activated in a new project after the Project has been created.

This Workspace includes both Project and Sample Editor windows. If the 'Link Editors' option is ticked in the SX Preferences window, whenever this Workspace is recalled the currently selected audio event will automatically appear in the Sample Editor. A similar Workspace could be defined for MIDI editing.This Workspace includes both Project and Sample Editor windows. If the 'Link Editors' option is ticked in the SX Preferences window, whenever this Workspace is recalled the currently selected audio event will automatically appear in the Sample Editor. A similar Workspace could be defined for MIDI editing.

Before getting into these details, let's remind ourselves of the basics: how to create a series of Workspaces and then navigate between them.

  • Even if you have not created any of your own Workspaces, by default a new SX Project contains a single Workspace named 'Main', so first open a new Project.
  • Arrange whatever combination of windows you require on screen (see example above).
  • Now go Window / Workspaces and choose the 'New Workspace' menu option (or use the Key Command: on the PC it's Ctrl+NumPad 0). A small dialogue then appears, allowing a suitable name to be entered for the Workspace.

Having spent a little time creating a screen layout that's ideal for a particular task (be it recording, editing, mixing or whatever), it would be a shame to accidentally disturb it. The 'Window / Workspaces / Lock Workspace' menu option (or Alt+NumPad 0) will lock the Workspace so that even if you do change an element of the layout or open a further window or two, when the preset Workspace is recalled again everything will be returned to its original place. However, locking does have a downside. For example, if you change the Project window track heights or the horizontal or vertical zoom from their original settings within a locked Workspace, when that same Workspace is recalled later, the original track heights/zoom are restored. In an unlocked Workspace, the edited track heights and zoom settings would be retained.

Total Recall

Once you've created the necessary Workspaces and locked them, recalling them for use can be done in a number of ways. If you find it difficult to let go of your mouse, the 'Window / Workspaces' menu option will display a list of the available Workspaces to select from. (A small detail worth noting here: the Window menu at the top of the SX screen contains a number in brackets beside it. The number refers to the currently selected Workspace number — more on these in a moment — and if a full stop appears beside this number it indicates that the Workspace is locked.)

Workspaces can be selected via the Windows menu.Workspaces can be selected via the Windows menu.

However, while a mouse is an excellent tool for some jobs, given that the main reason for creating and using Workspaces is to improve the speed with which the creative stuff can be done, perhaps the best way to move between the different Workspaces is via Key Commands. By default, the first nine Workspaces (which, for the majority of users, is likely to be plenty) are available via Alt+Num1-9 on the PC (and the equivalent on the Mac). This key combination does, of course, involve two hands (unless you have a very large span from thumb to pinky!) but the default key combination can be edited within the Key Commands window if you want something that's a bit less of a stretch.

Colour Me Good

If you want SX to match your décor, pick your own colour scheme.If you want SX to match your décor, pick your own colour scheme.With complex SX projects, it can eventually become difficult to keep tabs on what's going on in the Project window and, in particular, which track or event contains which musical part. This can become a real problem if you return to a complex Project after some time away from it. SX offers all sorts of useful tools to alleviate confusion, with Folder Tracks, the Notepad associated with each track and the ability to name tracks and individual events all being helpful in keeping things organised.

A further simple memory jog can be provided by colour-coding tracks and/or events using some sort of simple convention (for example, blue = bass, green = vocal, red = guitar). SX allows colour to be defined at both track level and event level. Track colour can be defined from the pop-up available in the Inspector that offers a choice of 16 default colours. Once a colour is selected it is automatically applied to any new events recorded on that track. Track colour is also displayed at the base of the Mixer Window.

Track colours can be selected via the Inspector.Track colours can be selected via the Inspector.

Event colouring can be done via the Colour Tool in the Project Window Toolbar (that is, if you haven't removed it as part of your clutter-free work environment!). The same set of 16 default colours is offered as for tracks. If an event-level colour is applied, this takes precedence over any general colour selected for the track. If, like me, you find the SX default colours a little bland, the Colour Selector tool (also available via the Project Window Toolbar) can be used to select something a little more individual in place of default colours.

Event colours can be set via the Colour Tool.Event colours can be set via the Colour Tool.

Get Organised

If you regularly work on projects of a similar type, storing the required Workspaces in a Project Template or globally (so that they can be available to all Projects) offers considerable advantages. Selecting the 'Windows / Workspaces / Organize' menu option opens the Organize Workspaces dialogue and, amongst other things, this is where Global Workspace Presets can be created.

On the left-hand side of this dialogue is a list of the Workspaces in the current Project. Clicking on the Workspace name allows you to edit it, as well as setting locked/unlocked status. The New and Remove buttons are fairly self explanatory, while the Activate button recalls the Workspace selected in the list. This Workspace layout is then seen behind the dialogue — useful if you need to confirm what elements a particular Workspace contains. The Use IDs tickbox effectively allows the Workspaces to be re-numbered; a drop-down menu lets you specify a number for each.

The Organize Workspaces dialogue.The Organize Workspaces dialogue.

If the Show Project Preset button is left unticked, the right-hand side of the dialogue displays a list of Global Workspace Presets. This is empty by default, but if you've created some suitable Workspaces in a Project and would like them to be available to all Projects, the arrow buttons between the two lists can be used to copy a current Workspace into the Global Preset list. If the Auto Instantiate Presets box is then ticked, all the Global Workspace Presets will automatically be available when a new Project is created. If you would rather this wasn't the default behaviour, leave the box unticked. In a new Project, any selection of the Global Workspace Presets you do require can then be copied from the Global list to the current Project via the Organize Workspaces dialogue, by using the left arrow button between the two lists.

And Here's One I Made Earlier

While Global Workspace Presets can be very useful, many SX users often find their Projects fall into a number of different types, each with its own way of working. For example, I might identify ' SX audio + Acid Pro for drum loops' and ' SX MIDI Orchestral' as a couple of my common Project formats. Users who find their Projects can be placed into such groups could create a dummy Project for each of their different musical tasks, with possible settings, track configurations and VST effects or instruments pre-loaded. The 'Save As Template' option can then be used to turn this pre-configured blank Project into an SX Project Template, cutting down start-up time for new Projects. Usefully, any Workspaces created in a Project are also included when the 'Save As Template' option is executed. This is particularly helpful if your Template includes specific VST plug-ins, as a Workspace can be defined that will provide instant access to its key controls.

While the operations I've covered involve a certain amount of up-front preparation, it's worth the effort, because when the creative impulse does strike you've got the best chance of being able to catch the moment if a fully-configured SX Project is up and running as quickly as possible.

Restricted Transport

Particular configurations of the Transport Panel can also be saved in a Workspace and this can be useful if, in some Workspaces, you simply need more space for other things and can configure a minimalist Transport Panel. That said, the Transport Panel's Setup dialogue also features its own preset system, located bottom right. These presets are global in nature: if you create a particular Transport Panel configuration and save it as a preset, it will be available to all Projects. Any such presets also appear as a list in the Transport Panel's pop-menu, so they can be quickly selected when required.

The Transport Panel Setup dialogue.The Transport Panel Setup dialogue.

The Transport Panel in SX certainly has a lot of options on offer, but if you have a single-monitor system the full Transport panel takes up a lot of space — and how many of the options do you actually use on a routine basis? Fortunately, SX allows it to be customised: right-click (PC) or Ctrl-click (Mac) anywhere in the Panel to display a pop-up menu where certain elements can be toggled on/off or the Setup option can be selected for further control. I find I can generally manage with a fairly minimal set of Transport controls for most tasks.


 Published July 2005

Wednesday, August 9, 2023

Automating Tasks In Cubase

While it's a little more daunting than applications such as Quickeys, Windows users who like to dabble in writing their own scripts might find Macro Scheduler a useful tool for enhancing workflow in Cubase.While it's a little more daunting than applications such as Quickeys, Windows users who like to dabble in writing their own scripts might find Macro Scheduler a useful tool for enhancing workflow in Cubase.

We investigate an interesting script for exporting audio and look at the various options for automating tedious tasks in Cubase.

While trawling through Cubase.net this month, I came across an interesting post (www.Cubase.net/phpbb2/viewtopic.php?t=15100) from a user who's created a stand-alone script that can automate the process of bouncing multiple tracks in Cubase. Say you have 10 tracks and you want to export each one as an individual audio file, with all the effects processing for that track. Normally, you'd have to solo the first track, export the audio file, wait, solo the next track, export the... you get the idea!

With the snappily-named SX Unattended Audio Export Tool, you set everything up as if you were going to export audio in the usual way. Indeed, the first track you'll still need to bounce manually. The reason for this is so that you can set up the export parameters that will be used for all the other files and the path to where the exported file will be stored, since the Export Audio window always defaults to the last-used settings. Once you've bounced the first file, select the track containing the next chunk of audio and run the tool.

After a couple of explanatory messages, you'll be prompted for the number of tracks to export and a base file-name: the tool will use this plus an automatically incremented number for the file-names. The script will then run by enabling solo on the selected Track, exporting the file, disabling solo, moving to the next track down and repeating this process the number of times required.

Tiger & Cubase

You'll find information this month concerning Cubase and Tiger compatibility in both Apple Notes (starting page 278) and the 'Tiger for Musicians' article (starting page 136). Generally speaking, the latest version of Cubase seems to work fairly well with Tiger, but one Cubase and Tiger problem not mentioned in the other articles is an issue with the installer for Cubase SE/LE v1.0.7, which basically doesn't work.

Steinberg are preparing an update and recommend that SE users contact their local Steinberg distributor, while LE users should contact the distributor of the hardware device they bought that had Cubase LE as part of the bundle. Otherwise, SE/LE 1.0.7 users should make sure to install their software before upgrading to Tiger, if possible. Interestingly, anyone who received Cubase SE v1.0.6 as part of Steinberg's Studio Case bundle should have no problem installing this software under Mac OS 10.4.

Tales From The Script

Although Cubase has a macro facility for creating Key Commands that are made up from a sequence of individual Key Commands, this feature is unfortunately too basic at the moment to allow something like the Unattended Export Tool to work: there's no option for user interaction, or the ability to wait for one process to finish before issuing the next command. However, by using a separate, more generic utility that can issue user-interface commands to applications running on your system, such as Cubase, and that provides a certain amount of programmable logic, you can create more elaborate macros than Cubase would otherwise allow.

This concept isn't new, of course. Users have been creating custom Key Commands and sequences of commands for many years with utilities such as Quickeys, which allow you to either record or program a sequence of events and play them back via a keyboard shortcut. Quickeys (www.quickeys.com) is now sold through Startly Technologies and is available for both Mac OS X (including a new, Tiger-compatible version) and Windows, priced at $99 for a single-user license that can be purchased online. A cheaper alternative Mac OS X users might like to check out is Script Software's iKey (www.scriptsoftware.com/ikey), and the application used to create the SX Unattended Audio Export Tool is MJT Net's Windows-only Macro Scheduler (www.mjtnet.com). The latter enables you to record and edit scripts using a scripting language, rather than graphical building-block elements like more user-friendly utilities such as Quickeys and iKey. However, while it takes a little more time and programming experience to learn, Macro Scheduler is a powerful way to automate workflows in Cubase.

Macro Scheduler is available in both a Standard and a Pro version, which you can purchase online from MJT Net's website for $75 and $175 respectively. The Pro version allows you to compile your script into a stand-alone application, which is great if you want to run scripts without Macro Scheduler installed and share your scripts with other users. 


Published July 2005