Welcome to No Limit Sound Productions

Company Founded
2005
Overview

Our services include Sound Engineering, Audio Post-Production, System Upgrades and Equipment Consulting.
Mission
Our mission is to provide excellent quality and service to our customers. We do customized service.

Wednesday, June 7, 2023

Designing Cubase Synth Pads

A simple pad sound created using a single oscillator in Embracer.A simple pad sound created using a single oscillator in Embracer.

Creating your own synth patches is one way to add a unique element to your music projects. This month we look at how can you can get started designing your own pad sounds using the VST Instruments supplied with Cubase.

Given that Cubase users now have access to some very capable software synths straight out of the box, it is a shame not to make good use of them. While the Steinberg documentation includes a Plug-In Reference manual (supplied as a PDF), this provides a technical description of the VST Instruments and their various controls but is perhaps not a very effective introduction to programming your own sounds. So how can the synth programming novice get started with the Cubase VST Instruments? Let's introduce this topic by looking at the creation of synth pad sounds (which can have a place in a wide range of musical styles) in one of the Cubase virtual synths. For two reasons, Embracer provides an excellent starting point for this; first, it is available to the many users who have not, as yet, upgraded to Cubase 4, and second, as virtual synths go, it is not so complicated that DIY programming requires a PhD in sound design!

Audio Files

You can follow the step-by-step process John used to create his final pad sound by listening to the example audio files on the SOS web site at www.soundonsound.com/feb07/articles/cubasetechnique.htm

1. Audio icon screenshot1.mp3
The first basic patch described in the article — a very dark pad.

2. Audio icon screenshot2.mp3
A similar dark sound, with attack time linked to velocity.

3. Audio icon screenshot2andwidth.mp3
The same sound with added width, controlled using the modulation wheel.

4. Audio icon screenshot3andlevels.mp3
The settings shown in the screenshot opposite (top), combining two oscillators and level controls to add movement.

5. Audio icon screenshot3andtonic.mp3
The same patch, with Tonic added to provide extra movement.

6. Audio icon screenshot3withautomation.mp3
The final patch, still with Tonic, but now using automation of various parameters to create a 'finished' pad.

Gentle Embrace

In fact, Embracer is designed with pad sounds in mind and, despite its relative simplicity, it is capable of some excellent results. There is little point in describing all of Embracer 's controls in detail, as this information is available in the Plug-in Reference PDF supplied with Cubase, but I'll run over the basics. Embracer is a synth that can be used in stereo (which we will concentrate upon here) or surround projects and its range of sounds are, in essence, controlled by the user's choice of waveforms for the two Oscillators. Twelve different waveform types are available and these range from the subtle (for example, Carpet, Soft Wave or Digi Pad) through to more obviously synthetic or metallic (for example, Submerged or Metal Phase).

Using a negative Attack Velocity in Steinberg's Embracer VST Instrument creates longer attacks for high-velocity notes.Using a negative Attack Velocity in Steinberg's Embracer VST Instrument creates longer attacks for high-velocity notes.Pads can often be 'big' sounds, filling a lot of musical space, but sometimes a smaller sound works better for a particular task or musical mood. Creating a more subtle pad sound is also the best place to begin when creating your own sounds in Embracer as it means just using a single Oscillator. As an example, configure an instance of Embracer as shown in the screenshot above. This uses the Carpet waveform for Oscillator 1, and has Oscillator 2 switched off. Playing a single low note on your keyboard produces a fairly soft drone-like sound, and by tweaking the Tone control (which acts as a combined high-pass/low-pass filter, depending upon which way you move it relative to the 12 o'clock position) it is possible to introduce a sense of tonal movement into the sound. There is nothing too dramatic here and, if anything, more extreme Tone settings simply make the sound more subtle, by narrowing the range of frequencies generated. As with any individual sound, bigger is not always better, and in certain musical contexts (for example, music being used under a dramatic film sequence, where the mood requires just a hint of tension, or in a busy mix, where a full, complex pad sound might crowd out other details), a more constrained pad sound is exactly what is required.

Of course, it is very easy to add a little further expression to this subtle pad. For example, setting both the Attack and the Attack Velocity controls to around 3 o'clock means that notes fade in quite slowly, with longer fades for higher velocities — and adjusting the Tone control during this fade-in again gives a sense of the sound evolving. Experimenting with the Attack and Level controls can produce some further interesting effects. For example, set up an instance of Embracer as shown in the second screen shot, right, then play a low note with high velocity. The high Level and Level Velocity settings mean that, eventually, the note will become quite loud. However, the negative Attack Velocity setting (float the mouse over this control and you can see the exact value appear in the small information line beneath the Steinberg logo) creates longer Attack phases for high-velocity notes. This can be very effective if a single, low-pitched, high-velocity note is held underneath some higher-pitched, low-velocity notes. The latter fade in much more quickly (perhaps playing some menacing chords or a subtle melodic phrase), while the lower note gradually increases in volume to add a further sense of foreboding. Stick this kind of thing under a suitable film scene and the audience will just know something horrific is about to happen, or you might use it as a short introduction to lull your listener into a particular mood before you hit them full-on with wall-to-wall nu-metal guitars...

In the two examples above, the Width control has been set to zero, which confines the pad sound to the centre of the stereo panorama. By increasing the Width control you can spread a sound across the stereo image, and if you then select the modulation wheel from the drop down menu under the Width Control setting, adjusting the mod wheel while playing can add further 'movement' to the sound — from a subtle, small sound that occupies the centre ground to a 'bigger' sound that fills more of the stereo space.

Wot, No Direct X?

DX-to-VST wrapper plug-ins provide a workaround solution for those wanting to use Direct X plug-ins in Cubase 4. VB-Audio's FFX4 (above) is one of a small number of freeware  solutions out there.DX-to-VST wrapper plug-ins provide a workaround solution for those wanting to use Direct X plug-ins in Cubase 4. VB-Audio's FFX4 (above) is one of a small number of freeware solutions out there.I've read several comments on the SOS and Steinberg forums that suggest that many SX3 users have been put off the upgrade to Cubase 4 because of Steinberg's decision to drop support for Direct X plug-ins. Martin Walker's PC Notes column in last month's SOS ran through a few DX-to-VST wrappers that work with Cubase 4 and, given the confusion still out there, it is worth me repeating his key points. Steinberg are recommending VB-Audio's FFX4 (www.vb-audio.com), a cut-down freeware version of their FFX16 Direct X 'wrapper' plug-in. There are alternatives, including Acon Digital's freeware Effect Chainer (www.acondigital.com), and Console (www.console.jp/eng/en_about.html), which is shareware. FFX4 looks to be the simplest solution and, though there are some reports of problems by some Cubase users, I've not experienced any and it allowed me to run most Direct X plug-ins, including Waves Gold Bundle, without any problems.

Matt Houghton

It Takes Two

Activating the second oscillator provides additional options. By combining the two oscillators and shifting the emphasis of the sound between the two as a note or chord is held, you can open up plenty of possibilities for developing evolving pad sounds. The choice of oscillator waveforms controls how dramatic those shifts might be: if a subtle approach is required, then combining something like the Sing Sing and Soft Wave waveforms can work well; in contrast, when more extreme sound shifts are required, something like Sing Sing can be combined with the more metallic Phase Strings.

Combining two similar oscillator waveforms can creates the potential for greater movement within your pad sounds while still keeping things subtle.Combining two similar oscillator waveforms can creates the potential for greater movement within your pad sounds while still keeping things subtle.With both oscillators active, the possible options for sound shifting are increased. The two Level controls can, of course, be automated. But you can also design sounds that evolve on their own, using different Attack times or opposite Velocity responses for Attack times. This can work really well, as the sounds from the two oscillators will fade in at different rates. Clearly, the other suggestions described above for a single oscillator — automating the Tone and Width controls — can be effective here as well.

The final option, with both oscillators working, is to use the Coarse and Fine tuning controls provided with Oscillator 2 to detune the two sound sources. The Coarse tuning control provides ± two octaves, which is great for letting one oscillator add either low-end rumble or high-end sparkle, whereas the Fine tuning control can be used to slightly detune the two oscillators, creating a fatter sound.

Automated Embrace

When it comes to generating automation data for a VSTi, many users would rather use a hardware controller than attempt to adjust controls on screen via a mouse or by drawing automation envelopes. All of Embracer 's controls respond to MIDI CC numbers and, while Steinberg don't include these in the documentation, pressing the Shift key while hovering the mouse over a particular control will cause its MIDI CC number to be displayed in the Embracer information line (this same method works for MonologueSX3 's other main VSTi). Provided you have access to a hardware controller that allows you to configure its knobs to specific MIDI CC numbers, automation of your evolving pad sounds can easily be recorded as part of your performance.

Tonic For The Troops

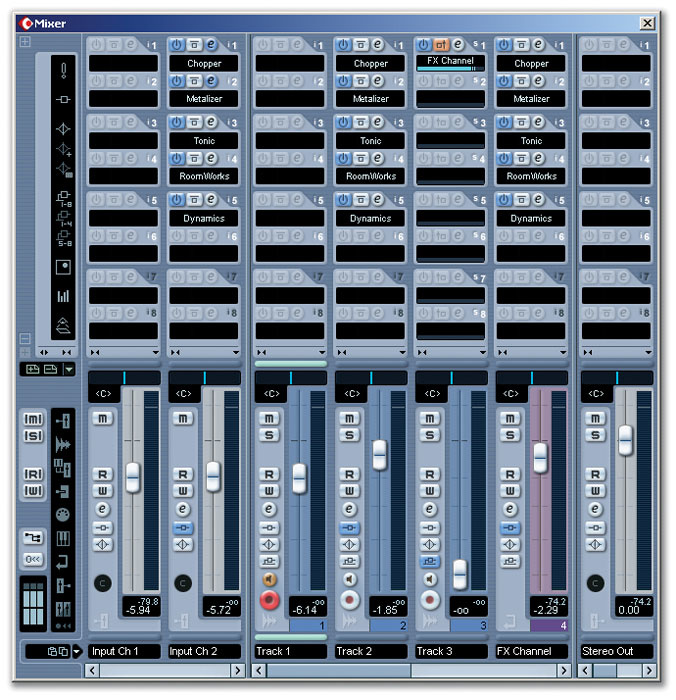
Of course, if you want to explore some further possibilities to your Embracer pad sounds, it is always possible to apply some additional processing using VST effect plug-ins. An obvious candidate for this is Cubase 's filter plug-in Tonic. Once you are familiar with Embracer itself, an interesting next step is to return Embracer to a simple one-oscillator-type pad and then insert an instance of Tonic into the Embracer audio channel within the Mixer. Tonic is a great plug-in, and would justify a 'techniques' column all on its own, but it is worth offering a few basic pointers here, as it is particularly effective at adding an extra dimension to your pad sounds.

The Tonic filter provides further options for adding movement to an Embracer pad sound. Try these settings over a low droning pad from created in Embracer.The Tonic filter provides further options for adding movement to an Embracer pad sound. Try these settings over a low droning pad from created in Embracer.As a simple example of what can be done, play a single low-note drone via a basic Embracer pad sound, with the Tonic controls set as shown in the screen shot to the right. This introduces some further movement to the sound. The key settings to note here are that the Tonic filter is operating in band-pass mode and that the band is being swept by the LFO at a fairly slow Rate setting. How extreme the effect is depends upon a combination of the LFO Depth setting (which controls the amount off LFO modulation of the filter cutoff level) and the filter Mix control (which controls the balance between the 'dry' signal from Embracer and the 'wet' signal processed by Tonic). If the Mix control is set at 100 percent, then at high Depth settings, the change in the sound will be quite dramatic. However, more subtle effects can be achieved by lower Depth settings or lower Mix settings. It is worth experimenting with both, as the results are somewhat different.

As indicated at the start of this column, Embracer is a not a complex synth to program. This has its positives (Embracer is easy to get to grips with) and its negatives (more demanding users may feel their creative options are a little limited). The new VST Instruments included with Cubase 4, however, provide more detailed control of filter settings, which gives you additional creative options when designing evolving pad sounds. This might provide a suitable topic for us to return to in another Cubase Techniques column, when a few more SOS readers have taken the plunge and upgraded to Cubase 4. Until then, happy padding! 

Out Of Control

I'm sure it won't have escaped your attention that there's very little mention of the three new VST Instrument synths in Cubase 4 (PrologueSpector and Mystic) in the main text of this column, and this is not without good reason. Don't get me wrong — they all sound absolutely fabulous, as Sam Inglis mentioned in his Cubase 4 review. I'm sure lots of users are already making very good use of them in their own projects, too. But I am a but puzzled by a couple of things in relation to these synths. For example, Steinberg have not published a list of MIDI CC numbers (or provided a way of displaying them, as you can in Embracer) for each synth's controls and, as yet, I haven't been able to track down such a list — so if you do know of one, then please let me know via SOS HQ. It also seems rather strange that, when finally, through a process of trial and error, you stumble across which MIDI CC number controls a particular feature on these synths,moving a suitably programmed hardware controller does not produce a response in the equivalent on-screen control: although the sound changes as you would expect, there is no corresponding movement or change of position for the associated virtual knob — most odd.

On a more general level, I'm sure a lot of users would appreciate the introduction of a MIDI Learn facility within the Cubase VST Instruments. This feature is fast becoming the de facto standard for providing easy control of software synths, and I find it difficult to see why Steinberg have not adopted what is now a well-established and popular method of achieving this.

It is, of course, possible to configure the Generic Remote Device to control all the new synths, and the on-screen knobs do respond to control via this route. However, this can seem like a rather long-winded process in comparison with other solutions out there, when all you want to do is grab a couple of virtual knobs for some quick automation. Perhaps this is another candidate for a future 'Cubase Techniques' column. 


Published February 2007

Monday, June 5, 2023

Cubase's Play Order Track

 By Matt Houghton

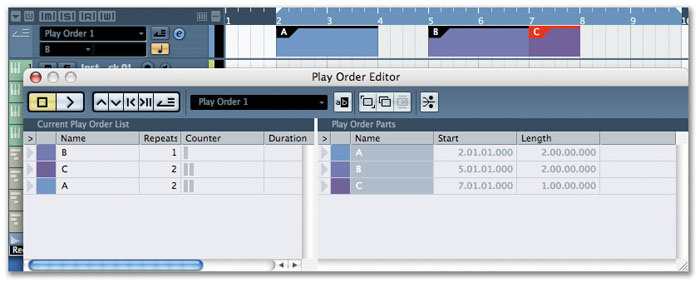
The Play Order Editor window gives you plenty of control over your alternative song arrangements.The Play Order Editor window gives you plenty of control over your alternative song arrangements.

Cubase 's Play Order Track is a powerful, but often overlooked, facility that is a Godsend for songwriters, composers and remixers alike.

Until the arrival of Cubase SX3 a couple of years ago, I'd long been frustrated by the songwriting process in Cubase. In fact, the same frustration applied to all the major sequencers that adopted the now-ubiquitous graphical arrange page model, with a timeline running left to right. Though the arrange page model offers some obvious benefits, and is fairly intuitive to those who learned to ply their trade on reel-to-reel tape and splicing blocks, it omits some of the excellent functionality that evolved in the earlier days of electronic and computer music: functionality that, until recently, was terribly missed!

Pattern-based Sequencing

Anyone who has ever used Reason, or one of the myriad groovebox emulations, will be familiar with pattern-based sequencing. But these all attempt to recreate hardware sequencers, along with many of their inherent limitations. While eight-, 16- or 32-step sequences can be great for constructing loops and grooves, they can be pretty limiting for full-scale remixing and songwriting.

It wasn't always this way. Way back in the year dot, when I started computer recording (for MIDI — audio at that time was limited to bounces on my four-track Tascam Porta 05), my sequencer of choice was Prism by Magnetic Music, who seem to have long since disappeared from the music-tech radar. Like Notator, Vision, and several other of the early MIDI sequencers, it was pattern-based. There was no timeline, no timeline-based looping of selections, and no arrange page. In fact, the approach was more akin to a relational database than a modern computer sequencer. You programmed your various parts, comprising your rhythms, chords and melodies, then programmed the order and number of repetitions of each of these parts to form your song. There was some flexibility: for each play of each section, you could mute, solo or transpose different tracks. The reasons for moving to a timeline-based approach when technology allowed are obvious, but it was a surprise to see the pattern-based functionality all but disappear with this move.

Logic allowed some flexibility with its folder tracks, but none of these solutions was anything like as elegant as the earlier attempts. Cubase VST allowed you to experiment with different Arrangements of your song within the same project, but to the user, these effectively appeared to be separate songs, and this option disappeared with the introduction of Cubase SX1.

Play Order Track

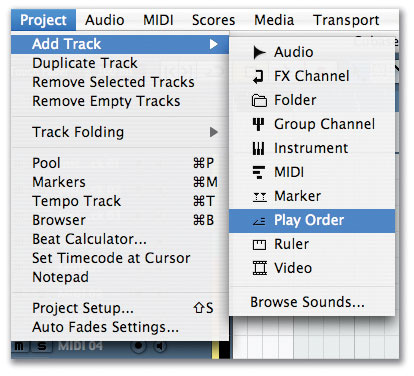
To add a Play Order Track to your project, simply select Project / Add Track / Play Order Track.To add a Play Order Track to your project, simply select Project / Add Track / Play Order Track.OK, enough reminiscing and lamenting: the Cubase Play Order Track, introduced in Cubase SX3 (and retained in Cubase 4) righted the wrongs. It is an elegant reintroduction of the pattern-based concept, but this time, running within the modern timeline-based sequencer. Although there are still a few features I wish Steinberg had had the sense to include or improve (see the 'Wouldn't It Be Nice' box) it is nonetheless the best such solution I'm aware of, by quite a distance.

Getting Started

Let's start with the basics: how do you use the Play Order Track, and to what uses can you put it?

Before you start, it is worth saving your project under a new name. There's no destructive editing of audio files involved in using the Play Order Track, but it is easy to hit Save and overwrite your project, so this is a worthwhile safeguard. Next you need to add a Play Order Track: to do this, go to Project / Add Track / Play Order Track. The empty Play Order Track should show beneath the currently selected track. When you select the new Play Order Track, the Track Inspector displays its various options allowing you to determine the order and repeats of the parts you create. Alternatively, if you prefer a floating window, you can click on the track's 'e' icon to access the same functions in the Play Order Editor.

We'll come back to the editing shortly, but you'll first need to create the parts that you are going to sequence. Creating these parts is easy, but it is easier still if you have the Play Order Track positioned next to the timeline, so I find it is best either to drag the Play Order Track to the top, or create a ruler track above or below the Play Order Track. When you've decided on the sections of your song that you want to create parts from (I suggest keeping things simple to start with, and limiting yourself to a few parts), you draw a part onto the Play Order Track using the pencil tool. This is rather like drawing multiple loops on the timeline and, as with the timeline, you may want to make sure that the pencil is snapping to the bar, beat or grid before you do this.

Parts are drawn into the Play Order Track using the pencil tool, just as you can with any other parts on other tracks.Parts are drawn into the Play Order Track using the pencil tool, just as you can with any other parts on other tracks.

By default, the new parts in the track will be labelled A, B, C and so on. You'll also see them appear in the Inspector or the Play Order Editor. It's a good idea to rename the parts, as the A, B and C labels otherwise quickly become about as helpful as air-con in the Arctic. I didn't find this an intuitive process: the usual click, wait and click again to select the text for editing doesn't work, and double-clicking does something else, as we'll see later. In fact, you have to hold down the Alt or Option key and double-click (to be fair, it does mention that in the manual, but why the departure from convention, I don't know).

Creating your arrangement is much more intuitive. If you double-click one of the parts, it will appear in a list in the left half of the Play Order Editor or the top part of the Inspector. Click it again and you'll see the number next to it go up incrementally: this determines how many times this loop will play. Alternatively, you can type the amount of repeats into the box. If you want to add additional parts to the arrangement, you can either keep double-clicking (which is why this doesn't work for renaming the part) or you can drag and drop the part into the list at the desired position. Sequencing the patterns really couldn't be simpler.

Auditioning

The bright orange icon switches Play Order mode on and off. When it is greyed out, Cubase remains in its default mode.The bright orange icon switches Play Order mode on and off. When it is greyed out, Cubase remains in its default mode.To hear the effect your new Play Order has on the arrangement, you need to activate Play Order mode by clicking on the button, either in the Play Order Track itself, in the Editor, or on the Transport Bar. When this mode is activated, you'll notice the project cursor running in the cycles you have programmed in the Play Order Editor, rather than along the timeline as is usual. There are also basic transport tools which allow you to skip to the next part and so on.

Multiple Arrangements

Although you can only have one Play Order Track, you can create multiple Play Orders within it, either by creating a new one, or by duplicating the current one as a starting point. This facility should appeal to anyone who used to use multiple Arrangements in Cubase VST, as this effectively means you can have multiple arrangements within one project.

Cubase News

Steinberg have announced via their www.cubase.net forum that they will not, after all, be issuing the long-awaited 3.1.2 update for Cubase SX3. The announcement comes despite several reported bugs remaining unfixed in the program, and it has not surprisingly been ill received by many users. Steinberg had previously promised this final update to resolve the bugs, but have now admitted that they underestimated the effort it would take to adapt Cubase 4 to run on 64-bit systems. As a result, they have decided to divert the SX3 development resources to meet that requirement. While it is not uncommon for software developers to retire older products and focus on development of newer products, it is nonetheless common practice to issue a final fix to ensure that the product is fully functional. Let's hope the sacrifice is worth it!

Flattening

By clicking on the Play Order Track name, you get a drop-down menu that offers the option to 'flatten' your Play Order, which effectively creates a traditional linear Cubase arrangement based on your Play Order.By clicking on the Play Order Track name, you get a drop-down menu that offers the option to 'flatten' your Play Order, which effectively creates a traditional linear Cubase arrangement based on your Play Order.When you're happy with the arrangement, you are able to flatten the Play Order to create a standard, linear version in the Arrange page, as you would normally have in Cubase (you just select 'Flatten Play Order' from the drop-down menu as shown on the next page). But beware! Although this process isn't destructive to your audio files, it can be destructive to your arrangement, as flattening the Play Order will remove any sections that are not in the Play Order (including any alternative Play Orders you might have created). Though it's reversible via Undo, it is a good idea to back up the project before flattening and, if you want to keep it, to save it as a new version after flattening.

Recording

Recording is possible in Play Order mode, but isn't fully integrated with the idea. While the cursor will happily skip from one part to the next on playback, any audio files that you record are recorded as single files and appear as continuous parts in the timeline in the usual way. In other words, the audio you record doesn't line up on screen with what is in the Play Order. I suppose this makes sense, given that you would otherwise have to record audio over itself where you repeated parts, but if Steinberg are reading this, they should note that there is potential here for a very powerful addition to the Play Order facility.

But What Can I Do With It?

OK, so we have pattern-based sequencing in a modern MIDI + Audio sequencer, and a great tool it is, but what can it do for the creative process?

There are some obvious uses, not least creating multiple arrangements as mentioned above, or creating and sequencing parts to create a basic remix. But there are a number of alternative uses that work well. It is great as an initial sketchpad while you are writing or composing: while you'll probably want to add more variety later on, you can get the basic structure of intro, verse, chorus and so on, and then flatten it to give you the basic track to work on. For the same reason, it can make a great time-saving tool if you are working with a band in the studio, as you can rearrange guide tracks on the fly and still record along in linear fashion in the project.

You can also use it for loop creation — for remixing short drum parts, for example — though, for some reason I can't discern, you can only draw Play Order parts as small as an eighth of a bar, so the options here are a little limited. Alternatively, extending the guide-track idea, it is easy to create a drum guide track and then jam along to the rhythm, using your keyboard or drum pads to humanise the rhythm, and adding fills along the way. This works particularly well if you have a sample library with individual hits as well as loops, as you get both the sound you're after and the feel, but you can create your own variations on the loop; I suppose there's nothing to stop you doing this anyway, but I find it much easier using the Play Order Track, rather than copying and pasting or repeating loops that I'd later need to delete.

If you've ever found yourself needing to insert bars for an additional section in the midst of a complex arrangement (as I have many times!), it becomes much easier with the Play Order Track, particularly if you need to insert more than one such section. It also enables you to work in a different way with the timeline: I sometimes find it more convenient to work on loops as individual sections, separated by silence on the Arrange page, as I find this makes for ease of editing and navigation. With the the Play Order facility, working in this way is much improved.

Tidying Up

When you 'flatten' the Play Order Track, Cubase naturally cuts the audio as if you were cutting out a loop. Consequently, you get the same pops and clicks as you normally do when editing, so it is worth making sure that Cubase 's 'Snap to Zero Crossing' box (Cubase / Preferences / Editing / Audio) is ticked before flattening the Play Order. This will make the transitions as smooth as possible.

'Snap to Zero Crossing' can be useful to avoid nasty pops when you flatten your re-ordered track.'Snap to Zero Crossing' can be useful to avoid nasty pops when you flatten your re-ordered track.You'll also probably find that there are Events that start before, or finish after, the edit points, and you'll need to go into the flattened track to do a little fine-tuning. For example, if you have any transitional sounds, such as sustained notes that overlap the end/start of different sections, or slow pads that climax after the edit point, the Play Order will chop them short. And if you have MIDI notes that are played slightly ahead of the bar, these will also disappear. Thankfully, the editing task isn't massive: it's just a case of going back in and dragging the Events to the size they need to be to allow these notes to sound properly.

Variety!

One risk with using the Play Order Track (as with any loop-based composition process) is the ease with which you can produce mind-numbingly repetitive music. So it is probably a good idea to think of the Play Order as one step in a longer process. It really is worth going into the flattened track and adding back in a bit more variety, particularly with things such as volume and panning automation, or filters on audio, and with timing and velocity on MIDI parts. This way you get a fantastic 16-bar loop instead of four of the same four bars, which will help to keep interest in your track! 

Wouldn't It Be Nice...

Wonderful as the Play Order Track is, I'd still like to see some improvements...

  • First, something that harks back to Prism and the other early pattern-based MIDI sequencers: the ability to edit the MIDI information for each instance of each part, or at least basic elements such as transposition, program changes, mutes and so on.
  • It would also be helpful to have more recording options in Play Order mode. If you record audio in the Play Order mode, it records as a single continuous file. I'd like to see it able to create regions alongside the Play Order parts. There are good design reasons for doing the continuous recording, and such a change might be complicated to implement, but it should be possible: and this would potentially provide a very powerful facility.
  • Flatten Play Order is destructive: it doesn't affect your audio files, but you do lose your old arrangement completely. While you can always click Undo, it would be nice to have the option of flitting between your different arrangements, rather like you could do in Cubase VST, even after things have been flattened.
  • A 'retain full MIDI note length' function would be useful. This would avoid the need for some of the editing you need to do to tidy things up after flattening things. At present, MIDI notes that sustain beyond the end of the looped part are cut off at the transition, but you often want them to keep going until they reach their natural end.
  • As Mark Wherry noted in his review of Cubase SX3 back in SOS November 2004, you can start to run into problems when working with video: when the project cursor is leaping all over the place it doesn't do wonders for synchronisation! It would be nice to see an elegant solution developed to address this.


Published March 2007

Friday, June 2, 2023

Multi-band Compression

Dynamics processing plays an important part in almost all modern music production. We look at some practical examples using Cubase 4 's built-in dynamics plug-ins.

For Cubase 4, Steinberg reworked a number of the familiar Cubase SX audio plug-ins (some would say not before time), including the plug-ins that appear under the dynamics heading. Indeed, the number of plug-ins in this broad category now stands at nine in the top-of-the-range version of Cubase 4CompressorEnvelope ShaperExpanderGateLimiterMaximiserMultiband CompressorVintage Compressor and VST Dynamics. Perhaps the most confusing of these plug-ins for new users are the various compressors and, more specifically, the differences between them.

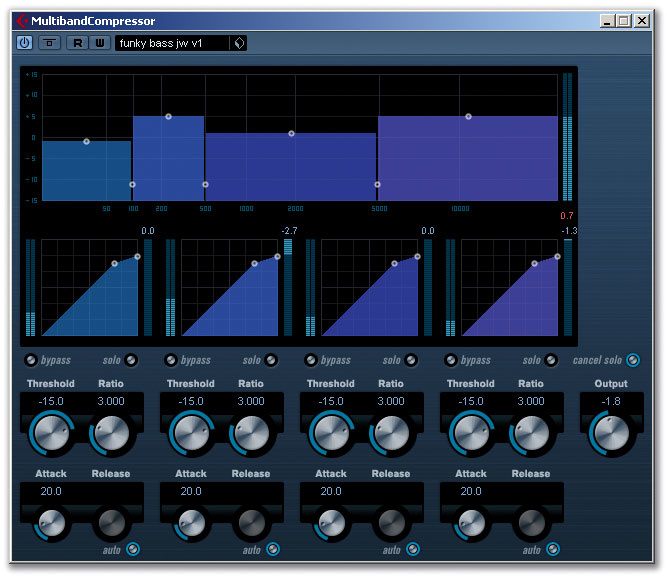
Multiband Compressor, shown here with the settings used to achieve the final bass guitar sound.Multiband Compressor, shown here with the settings used to achieve the final bass guitar sound.

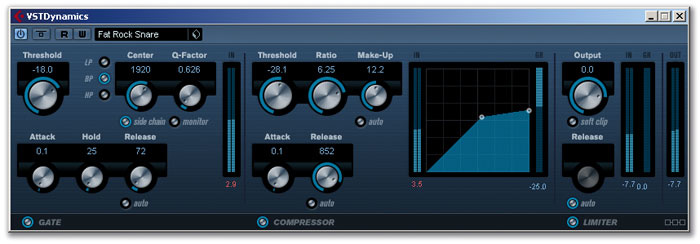
The controls found in the individual GateCompressor and Limiter plug-ins are very similar to those within the VST Dynamics plug-in. Given that each module of VST Dynamics can be toggled on/off and the order of the processing chain adjusted (by clicking on the 'routing' icon located at the bottom right of the plug-in window), there is probably very little difference between combining the individual plug-ins and using VST Dynamics — although the Compressor plug-in does have a couple of controls that are not present in VST Dynamics (including a Soft Knee button).

Compared with the transparent results that can be obtained with the standard Compressor, the Vintage Compressor attempts to add a little more character. It also features a more limited control set (including the appealingly named 'Punch' button). That said, for me, Steinberg's Magneto — which Cubase SX users will already be familiar with — would be a better bet if you wanted something with added character (unfortunately, though — and I'm not sure why — while you will have a copy of Magneto if you already owned SX, and it will work in Cubase 4, newcomers to Cubase will find that it doesn't come included with Cubase 4 itself).

Battle Of The Bands

The big daddy of the Cubase dynamics group is the Multiband Compressor, which has been overhauled since Cubase SX. The SX version featured a variable number of bands, up to a maximum of five. In contrast, the Cubase 4 version is fixed at four bands, although the reworked user interface is much easier to use, as both the controls and a graphical view of the compression settings are always displayed for all four bands. As before, the upper portion of the window provides handles for adjusting the gain and frequency range for each band. While bands cannot be totally removed (as they could in the SX version), it is possible to make the upper and lower bands fairly narrow at the extremes of the audio frequency range. For most sounds, this would dramatically reduce the influence of that compression band.

Multi-band compression can be used on any audio signal but, given the extra complexity and extra CPU load of a multi-band compressor plug-in, it makes sense to only use multi-band compression when absolutely needed. Multi-band compression comes into its own when the source material contains a wide range of frequencies. Obvious examples can include bass guitar, a full drum kit or, as would be the case at the mastering stage, a complete mix. Sounds dominated by a narrower frequency range (for example, lead vocals, backing vocals or a solo lead instrument) can be effectively controlled by full-bandwidth compression.

Bass, Man

Although some bass sounds can be confined to lower frequencies (particularly some synth bass sounds), there can sometimes be a surprising amount of energy in the mid and upper frequencies, especially if the player likes to get a little funky and adds pops and slaps as elements of the performance. These elements of the sound add a tremendous amount of character, but if the entire part is processed through a full-bandwidth compressor they can get a little lost, when the high energy of the lower fundamental frequencies of a note force the compressor into action and lower the level of all the frequencies present in the sound.

The VST Dynamics plug-in combines most of the features of the separate Gate, Compressor and Limiter plug-ins.The VST Dynamics plug-in combines most of the features of the separate Gate, Compressor and Limiter plug-ins.Consider the screenshot (top, overleaf) showing the 'Funky Bass' preset I've created for Multiband Compressor. In terms of the Threshold and Ratio settings for each band, there is nothing too drastic here. Thresholds of -15dB mean that the compressor will be working much of the time, but the 3.0 Ratio settings mean that the compression itself is not squashing the life out of the sound. The settings are similar for each band and, for simplicity, I've set auto Release times for each band also. It is best to avoid really short Attack times, however, as these will rob the sound of some of its impact (this is even more true for drums). What is more interesting in this case is the frequency ranges set for each band and the relative gain settings used. For bass, I find it provides considerable flexibility if the lower frequencies (below about 500 Hz) are split into two bands, while the other two bands are set to cover the mid and high frequencies respectively. I've set the split point here at 5kHz but some people would use a higher frequency than this (perhaps up to 10kHz). Whatever the exact frequency ranges used, the advantage of this approach is that the gain controls of the two upper bands can be used to bring out all those percussive elements while the gain of the two lower bands, and the frequency split between them, can be adjusted so that the bass sound doesn't occupy exactly the same frequency range as the kick drum.

I started with the unprocessed audio, then engaged the plug-in, using the settings shown in the screenshot as a starting point, but with all band gain controls set at zero. With the funky bass riff solo'd, I then adjusted the gain controls, using the compressor almost as an intelligent EQ control. If you listen to the files, you can hear the same bass riff in context with a drum loop. I then changed the gain and frequency split-point of the two lower bands so that the bass and kick sounds didn't step on one another.

Drum Major

When you're mixing a multitrack recording of a drum kit, a separate full-bandwidth compressor can be used on each of the tracks. However, if you're working with a pre-mixed drum track or from stereo drum loops, the Multiband Compressor can be a very useful tool. The centre screenshot overleaf shows some example settings. These are not that different to those used in the bass guitar example, but note the slightly longer Attack times and the lower Threshold for the highest band. The Attack times ensure that the compression doesn't squash the impact of the initial part of the drum sound, while the lower Threshold setting simply reflects that the hi-hat in the performance used in the audio example was played quite dynamically — I wanted to get the playing a little tighter by making the compressor work a bit harder.

The slightly odd, but very useful Envelope Shaper (see 'Throwing Shapes' box).The slightly odd, but very useful Envelope Shaper (see 'Throwing Shapes' box).As with the bass guitar example, it's best to start with some relatively modest settings. It can then be quite interesting to experiment with the frequency bandwidths and gain for each band, to adjust the tonal character of the sound. The Solo button for each band can be useful for this, as it allows you to hear which parts of the kit are falling into a particular band as you adjust the frequency-band widths. In this example, I've tried to place the kick drum in the lower two bands, while the crack of the snare is in the third band (although elements of the snare also appear in the second band). The hi-hat dominates the upper band. At its simplest, what you now have is a means of slightly rebalancing the drum mix — for example, adding a little more kick or snare as required. As above, adjusting the gain of the lower two bands can be used to place the emphasis of the kick and bass guitar in slightly different frequency ranges, so that they complement each other better. I used the Multiband Compressor not only to produce a more punchy drum sound, but also a crisper sound, with a little bit of the lower-middle frequency 'mud' scooped out of the overall sound. This could, of course, also be achieved with some multi-band EQ but the Multiband Compressor does provide a nice result using a single (and easy to use) tool.

Master Of The Music

The settings used for the stereo drum track.The settings used for the stereo drum track.When mastering, lower Threshold and Ratio values produce a more gentle overall compression.When mastering, lower Threshold and Ratio values produce a more gentle overall compression.Multi-band compression is a tool commonly used as part of the mastering process, and while using Cubase 4 's Multiband Compressor plug-in on your own mixes will not replace a top-notch mastering engineer, it can add some extra punch and overall level to a mix. The bottom screenshot on the left shows some example settings that might serve as a starting point. The key things to note here are the lower Threshold settings and the very low Ratios. The low Thresholds mean that compression is likely to be taking place much of the time but, with low Ratios, the overall amount of compression will also be low. The result is a very gentle compression, rather than the aggressive treatment that might be used to add character to an individual instrument within a mix.

Setting Attack values too low can start to kill the impact of any drums, so values between 20ms and 50ms make a safe starting point. I've used auto Release times again here, but it is worth experimenting and 100ms provides a suitable place to begin. Too fast a release can lead to 'pumping', while too long a release can result in a 'flat' sound with little dynamics.

Setting the frequency bands is perhaps less straight forward for mastering than when dealing with a single instrument. I've gone for four bands here, again splitting the frequencies below 500Hz into two for more control on the low and low-mid, but three bands with splits at 120Hz and 5kHz can be easier to manage (simply drag the upper band to the extreme right of the Multiband Compressor window, so that it has little or no influence on the overall sound). Once these splits are set, the Gain controls can again be used to shape the overall tonal qualities of the mix. There are creative considerations here and the final sound required is going to be a matter of personal taste. In this case, I've gone for adding at the bottom and top of the frequency range and scooping out a little in the lower-mid band.

It is worth repeating that mastering ought to be a subtle process — the art of making a good mix even better and of making several mixes fit together side by side in a play order. Unfortunately, it is easy to go past adding some subtle punch and sparkle and into the realm of mix destruction. If you find yourself straying too far from the subtle starting-point settings, it's probably worth thinking about remixing rather than getting more extreme with your mastering. 

Throwing Shapes

The real oddity amongst the Cubase 4 dynamics options is the Envelope Shaper. In essence, this forces an amplitude (volume) envelope onto the transients of any audio signal, and the controls allow the attack and release stages of the sound to be adjusted. This is shown graphically — for example, by how 'spiky' the initial part of the envelope appears in the plug-in window (or, for negative values of Attack, it shows a fade-in during the attack phase). The Release control changes how rapidly the volume envelope reduces, with lower (negative) values more quickly cutting the sound off.

The most obvious applications of this plug-in are with drums or rhythmic guitar playing. Of course, what is right in one musical context may be wrong in another but, in this case the processing adds emphasis to the rhythmic element of the guitar playing, while for the drums it creates a much tighter snare and kick-drum sound — very funky! On a more corrective front, the Release control can be used as an alternative to a noise gate to reduce the amount of ring or room ambience, cleaning up the overall drum sound. 


Published April 2007