Welcome to No Limit Sound Productions

Company Founded
2005
Overview

Our services include Sound Engineering, Audio Post-Production, System Upgrades and Equipment Consulting.
Mission
Our mission is to provide excellent quality and service to our customers. We do customized service.

Monday, December 20, 2021

Using Plug-ins In A Surround Mix

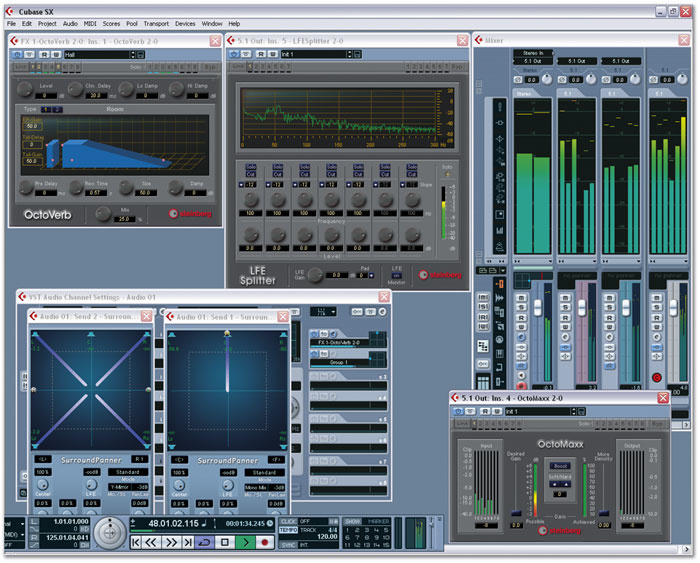
Cubase SX 2 in all its surround glory. Here, a stereo Audio channel is routed to a 5.1 output buss, with two sends routed to a 5.1 FX channel with OctoVerb and a Group Channel, respectively. LFE Splitter and OctoMaxx plug-ins are used on the 5.1 output buss as master effects.Cubase SX 2 in all its surround glory. Here, a stereo Audio channel is routed to a 5.1 output buss, with two sends routed to a 5.1 FX channel with OctoVerb and a Group Channel, respectively. LFE Splitter and OctoMaxx plug-ins are used on the 5.1 output buss as master effects.

Continuing our exploration of surround sound in Cubase SX 2, this month we turn to using stereo and multi-channel

plug-ins in a surround mix.

Mixing in surround is quite a novelty to many musicians, but once one gets over the initial interest of being able to pan sources within a surround sound stage, one's attention will probably turn back to practicalities such as how to mix and process mixes with plug-in effects. The VST plug-in format has supported multiple channels from version 2.0 of the specification, because a plug-in format capable of supporting more than two channels, to implement surround audio processes, was required for the earliest versions of Nuendo. However, compared to the number of VST plug-ins available, the number of surround-capable VST plug-ins is still relatively small.

All Aboard The Multi-channel Buss

Multi-channel plug-ins can be used on any configuration of audio channel (stereo or multi-channel), although it obviously makes sense to use them on multi-channel audio channels. As discussed last month, the VST 2.3 mixer architecture in SX 2 supports up to six streams in all the audio paths, and this extends to FX channels, meaning that you can have a six-channel send from an audio-based channel to a 5.1 FX or Group channel.

If you're sending from a 5.1 audio-based channel, you won't have any control over how the signal is sent to the destination channel — the level of the send will simply set the overall level for the six channels across the send buss. However, if you're sending to a 5.1 FX or Group channel from a mono or stereo audio-based channel, switching the Send Display mode to 'Routing', in that channel's Settings window, will display a surround panner for each send. This makes it possible to pan the signal before it's sent along the send buss, in exactly the same way as you would pan an audio-based channel being sent to a 5.1 output buss. In fact, the functionality of the surround panner on the send buss is identical to the surround panner on a channel's controls, meaning that you can double-click it to open a more feature-rich panning editor — as described in last month's column.

So what of the multi-channel plug-ins you might want to use on audio-based channels? Possibly the most important effect to have if you're doing a surround mix is a true surround reverb, and here you have a few choices, such as Steinberg's own OctoVerb, included in the Nuendo Surround Edition. Although this bundle was originally intended for Nuendo, it seems to work fine in Cubase SX, and while the Octo prefix refers to the fact that the plug-in can work with up to eight channels, OctoVerb works just fine with the six-channel-wide architecture available in SX: Nuendo users need to do 5.1 mixes, after all! Steinberg also distribute TC Electronic's (www.tcelectronic.com) Surroundverb, which is available for both native and PowerCore platforms, and Voxengo (www.voxengo.com) recently released the eight-channel Pristine Space convolution processor for Windows users — a demo version can be downloaded from the company's web site.

Steinberg's Surround Edition bundle also includes six other plug-ins: OctoComp, an eight-channel single-band compressor; OctoQ, a seven-band surround equaliser; OctoMaxx, an eight-channel version of Steinberg's Loudness Maximizer plug-in; and LFE Combiner and Splitter, two plug-ins for working with the LFE channel. Combiner allows you to create an LFE signal from the other speaker channels, while Splitter does the opposite and allows you to mix some of the LFE channel into the other channels.

The surround plug-ins I would personally like to be able to use on the VST platform are those included in Waves' surround (360 Toolkit) bundle, which are only available for TDM systems at the time of writing. This bundle comprises nine plug-ins, including tools for surround management, a panner, a compressor, a reverb, and multi-channel versions of the popular L2 and IDR plug-ins.

Tempo Tantrums

This month I encountered possibly the most annoying Cubase (and Nuendo) bug imaginable. The problem is that if you're copying MIDI Parts to or from a section of the song that contains Tempo Events, the start time of all but the first Part you have selected will become distorted as you drag the Parts to a new area of the Event Display. For example, if you have four two-bar Parts between bars one and eight, and you also have a tempo ramp over the same range, when you copy these four Parts to a new section of the Project, they will become spread out, so you have to manually drag the Parts back to the correct, intended location.

The reason for this timing error is fairly obvious, and has been confirmed by Steinberg. It is that since Cubase (like Nuendo) is internally based on a linear time base, rather than a musical (bars and beats) time base, only relative time positions are kept when dragging parts, instead of relative musical positions. This works great for Audio Parts, of course, where the length doesn't change regardless of the tempo; but for MIDI Parts, which can become longer or shorter in terms of time, depending on the tempo, the start times need to be recalculated to fall on musically correct positions.

Steinberg are aware of this problem and the developers are currently working on a new maintenance release to fix it and other issues. On the plus side, though, there is a workaround, which is to temporarily disable the Tempo Track when dragging MIDI Parts around the Project window, and enable it again once you've finished. Not exactly elegant, but it works.

Stereo Plugs In A Surround World

Using Plug-ins In A Surround MixThe default routing for three stereo insert effects on a 5.1 channel (top), where only the left and right channels are processed, and the adjusted routing (bottom), where each effect processes one of the three stereo pairs of the 5.1 Audio channel.The default routing for three stereo insert effects on a 5.1 channel (top), where only the left and right channels are processed, and the adjusted routing (bottom), where each effect processes one of the three stereo pairs of the 5.1 Audio channel.Since the selection of multi-channel VST plug-ins is currently limited, the workaround is, as in SX 1, chaining three stereo plug-ins within a single surround audio channel, so that all six streams in a 5.1 signal are processed. This isn't as bad a solution as you might think: it's mostly only plug-ins that deal with the surround sound stage that need to be able to process multiple channels in one algorithm, such as a reverb. For the most part, a 'surround' EQ or dynamics processor is just multiple channels of a given algorithm, where the advantage is being able to link settings between channels, rather than having to copy and paste them between multiple instances of a single- or two-channel plug-in.

Say we wanted to put the Waves L2 Ultramaximiser across all six channels of the 5.1 output buss. To do this, open the Channel Settings window for the output buss, switch the Insert Display Mode to Routing and notice how the insert view changes to show the signal path through the insert slots. Clicking in the darker region, to the left of a slot, allows you to choose a plug-in as normal; so in this case, I'm going to set the first three slots to be the L2. Each L2 plug-in is stereo, so we need three instances to process six channels.

After you've added the L2 s, the routing diagram shows that only the first two channels are processed, while the other four pass through the plug-in unchanged. Notice that the input and output points to and from the plug-in are illustrated by nodes. What we need to do is set these so that the first plug-in processes channels one and two, the second plug-in processes three and four, and so on. For this, we use Cubase 's Routing Editor: open this now for the second plug-in by double-clicking in the lighter part of the slot, to the right, where the routing is actually shown.

The Routing Editor is fairly straightforward. Upper nodes select which channels go into a plug-in, while lower nodes select which channels the output of a-plug-in are routed to. In this way it's possible for a plug-in to process the left and right channels of the incoming signal, and output the result to the left and right surround channels. The input nodes can be set with the upper set of left and right buttons, while the output nodes can be set with the lower set. You'll notice that, by default, the upper and lower modes are linked (with the Link toggle active) to prevent you from using more esoteric routing patterns by mistake.
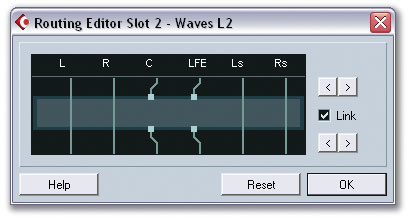
The SX Routing Editor.The SX Routing Editor.For this example, click twice on one of the right buttons so that the routing nodes move to the Centre and LFE channels. Click OK and repeat the process so that the third plug-in processes the left and right surround channels, and voila! Six-channel processing with three stereo plug-ins!

For reference, it's worth noting that the Routing Editor doesn't have a 'cancel' button, so the routing becomes active immediately without you having to click the 'OK' button first. The reset button is used instead to change the routing back to the default setting. Additionally, you can prevent a channel not being processed by a plug-in from passing through by clicking the pass-through link to break the flow. This effectively works as a channel mute, and could be useful if, for example, you wanted to remove the LFE or Centre channel from the overall 5.1 channel.

You'll notice in the main text that I always refer to audio-based channels, rather than just Audio channels, since there are channels on the SX mixer that produce an audio signal besides the Audio channels that play back audio files. Examples of other audio-based channels would include FX and VST Instrument channels, and these channel types can have more than just one or two-channel output configurations. This means, for example, that it's possible for a VST Instrument to have a multi-channel output in the space of a single channel on the SX mixer. Steinberg's VST sampler, Halion 2, has such a 5.1 output, where you can create envelopes that pan the output in surround, and Hypersonic 's outputs can also be configured to be quad outputs, rather than stereo or mono. 


Published May 2004

Friday, December 17, 2021

Cubase: Synchronisation Options

The Synchronisation Setup window is where you can configure how Cubase sends sync data to other devices as the Master, or receives it from other devices as a Slave.The Synchronisation Setup window is where you can configure how Cubase sends sync data to other devices as the Master, or receives it from other devices as a Slave.

If you get that sync'ing feeling when using Cubase in conjunction with external hardware devices, you may need to know more about its synchronisation options. We explain what's what.

The basic principle when synchronising multiple devices in the studio is that you have one Master device that sends sync data to all the other devices, which are said to be Slave devices, in as much as they are 'slaved' to the Master. When you press play on the Master device, for example, all the slaved devices will begin playback at the same time, and a continuous clock signal from the Master will make sure the Slave devices stay in sync.

Cubase 's synchronisation facilities are actually pretty comprehensive, and Cubase can act as either the Master or the Slave — or, in fact, as both at the same time. In this latter configuration, the software can control devices while itself being controlled from another device — for example, Cubase might be slaved to a video machine while simultaneously sending clock data to a synth's arpeggiator.

For Cubase 's synchronisation features to be active, the Sync button on the Transport panel must be enabled, which you can do by simply clicking it, pressing 'T', or selecting Transport / Sync Online. To configure the synchronisation settings in Cubase, you need to use the Synchronisation Setup window, which can be opened by selecting Transport / Sync Setup or Control/Apple-clicking the Sync button on the Transport Panel.

MIDI Clock Caveats

Since the release of Cubase SX/L, many users have reported problems when slaving other devices to Cubase via MIDI Clock. This doesn't seem to affect every user, but if you notice your external devices not synchronising correctly to your Project, Steinberg first recommend making sure that the SysEx option is enabled in the Thru group of the MIDI Filter panel in the Preferences window — which it should be by default.

There's a reason for this: many devices send out MIDI Clock data whether you ask them to or not (consult your manual to see if your device needs to be set to only receive MIDI Clock, rather than transmit it as well), and if this information is sent to Cubase and then resent, via the MIDI Thru facility, back to the device, it's understandable that some confusion can occur. Enabling the SysEx Thru Filter option forces Cubase to filter out all incoming System Exclusive MIDI data (including MIDI Clock) and ignore it.

The second thing to bear in mind when using MIDI Clock is that the MIDI Clock commands supported by Cubase include Start, Stop, and Continue, which all do pretty much what you'd expect them to by their names — Start tells a device to start playback, Stop tells a device to stop playback, and Continue tells a device to continue playback from the point where it was last stopped.

However, it turns out that not all equipment that can be synchronised via MIDI Clock supports the Continue command. Many drum machines fit into this category. So if you notice the device you have slaved to Cubase via MIDI Clock not resuming playback when you're part-way through a Project, it's worth enabling the 'Always Use MIDI Clock Start' option in the Transport panel of the Preferences window, forcing Cubase to use the Start command instead of sending Continue commands.

Master Of The Universe

In most cases, you'll want to set up Cubase as the Master device, so that all your other hardware is slaved and kept in time with the Project that's playing in Cubase. A common example is where you want to enable the arpeggiator or other tempo-based feature on a synth to play in time with the Project in Cubase — but there are many other uses for the software's synchronisation facilities.

Cubase can send out two types of MIDI-based clock, namely MIDI Timecode (MTC) and MIDI Clock, to other devices. The fundamental difference between these types is that MTC is time-based, so the timecode is based on the SMPTE hours:minutes:seconds;frames format, while MIDI Clock is based on bars and beats, consisting of 24 pulses for every quarter note — a 4/4 bar would therefore consist of 96 (4 x 24) synchronisation pulses. For this reason, MTC is typically used to sync video machines, other multitrack recorders, and so on, whereas MIDI Clock would be used to sync the arpeggiator on a synth, for example.

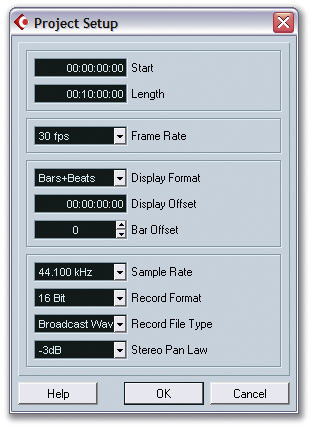
Some important sync-related settings can be found in the Project Setup window. These include the Project's SMPTE start time and frame rate.Some important sync-related settings can be found in the Project Setup window. These include the Project's SMPTE start time and frame rate.If you're going to use MTC, it's important that the frame rate (expressed as frames per second — fps) is set to the same value on your Master (Cubase) and Slave devices. Frames are sub-divisions of each second, and each second must be sub-divided in the same way on each device. (If you're plannning to use MIDI Clock, you can jump straight to the setup instructions in the next paragraph.) To set the frame rate for a Cubase Project, open the Project Setup window by selecting Project / Setup (or pressing Shift+S), click the Frame Rate parameter and choose the required rate from the pop-up menu. The Project Setup window is also used to define the start SMPTE position, which you can do by adjusting the Start parameter — it's set to 00:00:00:00 by default.

To set Cubase so that it acts as a Master device and sends synchronisation data to other devices, all you need to do is decide which MIDI ports you want to send either MIDI Clock or MTC to, and enable the relevant check boxes for those MIDI ports in either the Send MIDI Timecode or Send MIDI Clock groups in the Synchronisation Setup window. That's literally all there is to it!

Slave To The Rhythm

To set Cubase so that it acts as a Slave device, listening and responding to synchronisation data sent from another device, you need to change the Timecode Source setting in the top-left group of the Synchronisation Setup window. By default, Timecode Source is set to None, meaning that Cubase uses its internal clock as the timecode source. However, you can set Cubase to receive timecode via MIDI, ASIO Positioning Protocol, or VST System Link.

  • MIDI Timecode: MIDI Timecode is basically timecode sent via MIDI cables, based on SMPTE frame-based times, as described earlier. If MTC is chosen as the timecode source in Cubase, the MIDI input port that MTC should be received from is set with the MIDI Timecode Settings MIDI Input pop-up menu.
  • ASIO Position Protocol (APP): This is part of the ASIO technology developed by Steinberg to allow audio hardware, such as soundcards, to work with Cubase, where sample-accurate timing information can be received from another device connected to a digital interface on your soundcard. This can be useful if you're recording multitrack audio into Cubase from an external digital multitrack recorder. However, APP must be supported by your soundcard and driver software in order for this to work in Cubase.
  • VST System Link: VST System Link is Steinberg's platform-independent technology for using Cubase with other computers via digital audio interface connections running System Link-compatible software, such as Cubase SX/SL, Cubase VST 5.2 (which runs in slave mode only), and Nuendo. If you're using Cubase on a network of computers running VST System Link-compatible software and you want to sync Cubase to the master machine via VST System Link, this is the option to enable.

The interesting thing about VST System Link is that it also includes timing and tempo information, which is important because unlike Cubase VST, SX/L can't be slaved to MIDI Clock, due to the newer timing engine being based around linear time rather than musical time. This means that if you want to set up a Cubase system primarily as a mixer (slaved to another Cubase system, for example) with tempo-dependent effects, VST System Link is your only choice.

Receiving Timecode From Tape Machines

SynchronisationIf you're slaving Cubase to timecode sourced from an analogue tape machine, which I'm told some people still do, the signal might not be quite as reliable as if it was coming from a synth or another device generating the timecode internally. For this reason, you might want to adjust the Drop Out Time setting in the Options group of the Synchronisation Setup window, which tells Cubase how many frames to keep going for when the timecode signal 'drops out'.

If you notice Cubase occasionally pausing when playback is slaved to timecode from a tape recorder, you might want to increase the Drop Out Time value. However, doing this means that Cubase will take longer to cease playback when you stop the tape recorder, since it will assume it's a drop out until the Drop Out Time value expires. So if your tape recorder is actually sending a reliable timecode signal it's a good idea to reduce this value, to make Cubase more responsive when you stop the recorder.

A closely related option to the Drop Out Time value is the Lock Time parameter, which sets how many accurately-timed frames of timecode Cubase should receive before starting playback based on the location of the incoming timecode. If you notice Cubase starting playback at the wrong timecode position, before jumping to the correct timecode position, you might want to try increasing the Lock Time value. Conversely, if you have a really efficient tape machine you might want to reduce this value so that Cubase locks to the incoming timecode sooner and everything feels a little snappier.

Frames Of Reference

When Cubase is being slaved to another device, you can see via the Sync indicator on the Transport Panel whether incoming sync data is being received. When the Sync button is disabled, this indicator will report an Offline status, but when you activate the Sync button and Cubase is slaved to another timecode source, the Sync indicator will report either an Idle status (meaning that Cubase is waiting to receive timecode), or a Locked status, which confirms that Cubase is locked to an incoming timecode, and also displays the frame rate of the timecode. The Frame Rate setting in the Project Setup window is automatically adjusted, and the Project's frame rate is instead determined by whichever device is sending the Master timecode to Cubase.


Published June 2004

Wednesday, December 15, 2021

Cubase's Key Editor

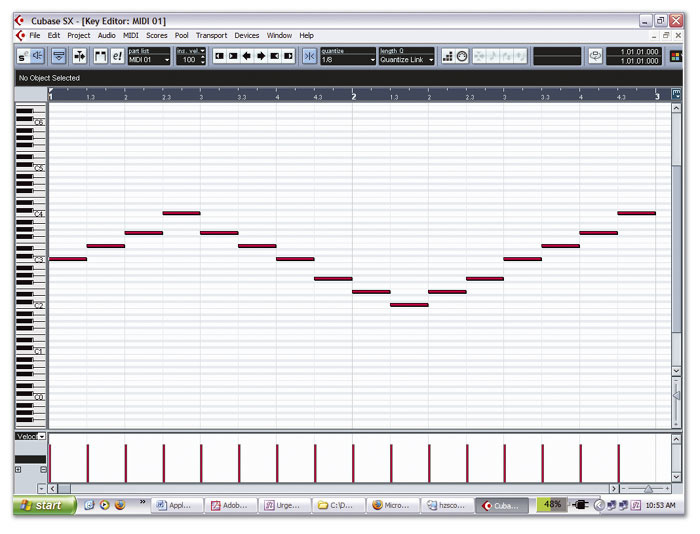
The Key Editor has many useful key commands for changing and manipulating the current selection of MIDI note events, without your hands ever having to leave the keyboard. The Key Editor has many useful key commands for changing and manipulating the current selection of MIDI note events, without your hands ever having to leave the keyboard.

The Key Editor is a seemingly straightforward MIDI editor, yet under its surface lie a number of features that can really speed up your editing tasks. We explain, as well as reporting on the new version 2.2 Cubase update.

It has to be said that, compared to Cubase VST, the Key Editor found in Cubase SX/SL version 1 was a little under-nourished for the liking of serious Cubase MIDI fiends. So it's perhaps no surprise that it received a great deal of attention in version 2 from Steinberg's developers, and although some users still feel it lacks a few of the finer points from the previous generation of Cubase, there's no doubt that the Key Editor remains one of the program's strongest assets.

Learning key commands is always a great way to speed up workflow in any app, and it's possible to achieve some quite detailed editing in the Cubase Key Editor using nothing more than cursor keys and a handful of modifiers. Using the left and right cursor keys, for example, enables you to step forwards and backwards through the note events in the editor. When you have more than one note event on the same beat, the order in which these are selected depends on the order in which they were entered into Cubase. This order is the same as displayed in the List Editor and, other than opening this window at the same time, there's no real way to know in what order events will be selected, unless you're dealing with a monophonic line.

The temptation when navigating through the Key Editor with the cursor keys is to use the up and down keys to select the different notes in a chord. However, as you'll soon realise, these keys are reserved for transposing the selected note (or notes) higher or lower, in semitone steps. To move the current selection up or down by an octave, press Shift at the same time as either of the cursor keys. This begs the question: what happens if you hold down shift while pressing the left and right cursor keys? Well, this works for selecting notes, in much the same way as described earlier, except that the previously selected note (or notes) stay selected as you extend the selection of notes further forwards or backwards in the event list. For example, with a note selected, holding down Shift and pressing the right cursor key three times will select the next three notes in addition to the one that was already selected.

On the subject of selecting notes, here's an interesting (and brief, don't worry!) digression. When you want to select notes of the same pitch, there's a neater way than by using the commands in the Edit / Select menu. The problem with this command is that it always selects onwards from the currently selected note, meaning that if you have notes of the same pitch earlier in the song, these won't become selected. While this can be useful in some cases (and can also be achieved by Shift-double-clicking a note), you can select every note of a given pitch in the Key Editor at any point by Control/Apple clicking the pitch on the keyboard that runs up the left of the window.

Nudge, Nudge, Wink, Wink

Once you've selected some notes in the Key Editor, you can also carry out quite a number of edits without your fingers ever having to leave the keyboard. We've already looked at transposing — that is to say, adjusting pitch — but you can also adjust the position of notes, in addition to the start or end points. Holding down Control/Apple allows you to nudge the selection forwards or backwards in time, based on the current quantise setting. With a quantise setting of 1/8, for example, notes will be nudged forwards or backwards in eighth-note steps (or quavers, for European musicians!). And remember, assigning quantise values to key commands via the 'MIDI Quantise' group isn't a bad idea either: I usually use Alt+1 to Alt+7 for whole notes through 64th notes respectively. This operation works the same irrespective of whether or not Snap mode is enabled.

If you want to adjust the length of a note (or the currently selected notes), press Alt and Shift together while pressing either the right or left cursor keys to increase or decrease the note length (or lengths) — this time in steps according to the current Length Quantise setting. I usually leave Length Quantise set to Quantise Link, to make things easier, especially where key commands are concerned, although you can assign the Length Quantise values to their own key commands via the 'Set Insert Length' group. To adjust only the start point of a note, leaving the end point where it is, just press Alt (without the Shift key) while using the left and right cursor keys instead. This command uses just the regular quantise setting.

Two things are worth noting about the key commands we've discussed for nudging and adjusting the length and start points of notes. Firstly, these commands are also available via the Nudge toolbar commands, which are usually hidden by default. Simply right-click on the toolbar, and make sure Nudge is checked, to reveal them. Secondly, key commands also work for manipulating events in the Project window. The left and right cursor keys select the next or previous event on a track, while the up and down keys select the next or previous track in the track list. Holding down Shift for either direction selects multiple objects or tracks, and although the selection of objects on a track works the same as the selection of notes within the Key Editor, handling of multiple track selection is a little different. Press Shift and the up cursor key to select the tracks above the selected track, one by one, and press Shift and down to select the tracks below it. The difference here is that selecting additional tracks works independently in the two directions, basically meaning that there's no way to decrease the number of selected tracks without starting again (by pressing the up and down cursor keys without Shift).

Cubase SX 2.2 Update

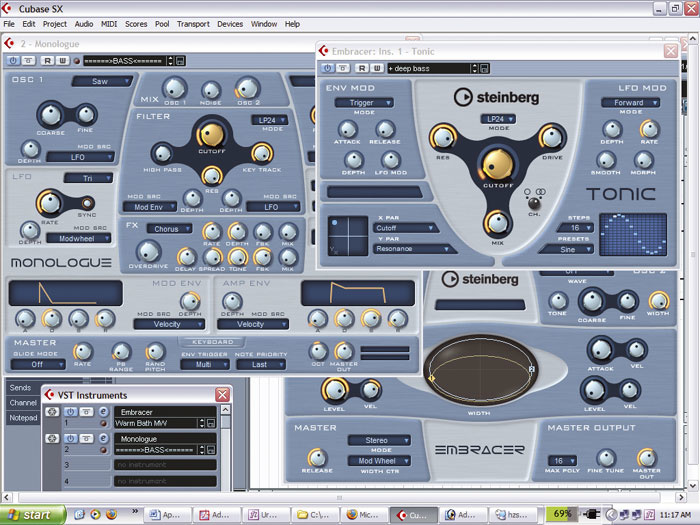
Cubase SX 2.2 includes three new plug-ins: Monologue, Embracer and Tonic.Cubase SX 2.2 includes three new plug-ins: Monologue, Embracer and Tonic.

Steinberg recently released Cubase SX v2.2, an update that adds many long-awaited features to the application, such as support for Mackie Control XT. Mackie Control XT units are added to the Device Setup window just like regular Mackie Control devices, but when Cubase detects that multiple Mackie Control devices have been set up it spreads the channel selection across the available devices, assuming that the XT units are placed, in order, to the left of the main Mackie Control unit. This behaviour also extends to modes where one channel's (or a plug-in's) controls are spread across the available encoders. Staying with control surfaces, the Generic Remote has also been enhanced with the ability to import remote description files defined in v1.x versions of Cubase.

While users with control surfaces will no doubt appreciate the improvements to that aspect of Cubase, one of Steinberg's highlights for the 2.2 release is the addition of three new plug-ins developed in collaboration with Wizoo. Monologue is a two-oscillator virtual analogue synth based on physical modelling techniques. Being a monophonic instrument, it's ideal for bass, lead and sequenced sounds, as demonstrated by the selection of presets. Embracer is a pad synthesizer that can work either in stereo or surround, thanks to an additional second stereo output added to the Mixer to deal with the rear channels. The width and spatial positioning of the two pad wavetable oscillators (offering a choice of 12 waves) can be controlled via an intuitive interface. Finally, Tonic is a filter that models the characteristics of analogue filters with variable envelope triggering modes, and has a step sequencer for drawing your own LFO shape.

A new option that may be the most significant part of 2.2 for Windows users is the 'Use System Timestamp' flag at the bottom of the DirectMusic panel in the Device Setup window. Enabling this option forces the time stamp given to each MIDI event as it passes through Window's DirectMusic sub-system (the part of the DirectX multimedia Windows API that handles MIDI) to be used rather than the time stamp generated by Cubase when it records the event. This solves what has become an increasingly common problem whereby (with certain MIDI device drivers) MIDI events are shifted backwards in time during real-time MIDI recording.

Cubase SX 2.2 is available for download from www.steinberg.net.

Something's Cooking

One of the great things about key commands in Cubase is the ability to combine a sequence of them into a Macro, which we've looked at in previous Cubase Notes columns. Using this technique with the commands we've just been looking at, you can create some really useful tools to achieve Logical Editor-style operations without using the Logical Editor. This is useful since you still can't assign key commands to Logical Editor presets in Cubase, although this is hopefully not too far away.

As an example Macro, how about creating something that copies the currently selected notes and moves the copy an octave above or below the original? In the Key Commands window, click the Show Macros button, followed by 'New Macro', to start creating a new Macro. By selecting the appropriate key command in the upper part of the window and clicking 'Add Command', add the following commands to the Macro: 'Edit > Copy', 'Transport > Locate Selection', > 'Edit > Paste', and 'Navigate > Add Up'. The Transport command is necessary because Cubase always pastes the contents of the clipboard at the current position of the Project cursor. It's necessary to set the Project cursor to the start of the selection in this Macro, so that the notes are pasted back into the Editor at the correct time.

For adjusting the length and position of notes, a nice idea (especially if you use a separate keypad device for triggering key commands) would be to build Macros to automatically select a different quantise setting before the required Nudge command. In this way you could have different keys to adjust note length by eighth notes, quarter notes, and so on.


Published July 2004

Monday, December 13, 2021

Cubase: Timewarp

An example of how you might use the Timewarp tool to create a tempo map when working with video and identifying hitpoints with Markers.An example of how you might use the Timewarp tool to create a tempo map when working with video and identifying hitpoints with Markers.

It's just a jump to the left, and then a step to the right. With your hands on your hips, you bring your knees in tight. But it's the pelvic thrust that really drives you insane. Let's do the time-warp again...

I think it's probably safe to say that this could be the first column in the history of SOS to use lyrics from The Rocky Horror Picture Show as an introduction, but given that Steinberg chose to name a tool in SX 2 as the Timewarp tool — the subject of this column, incidentally—­ what's a writer to do?

The Timewarp tool was Steinberg's reaction to the complaints made by users after the original release of Cubase SX, which had very few features for manipulating tempo. In the 'classic' Cubase, tempo-manipulation features had matured over the years, and the graphical Mastertrack editor contained many facilities for musicians working with film, or users who needed to build a tempo map around a MIDI or audio recording. Aside from the Tap Tempo feature of the Beat Calculator in SX 1, there really was no way to get around the absence of the old Mastertrack, where you could identify time and meter hits, link the two together, and have Cubase automatically work out the tempo changes that would make the two points line up.

Fortunately, however, from Cubase SX 2 (and Nuendo 2.1) users have the Timewarp tool, which is a completely new way of looking at the problem of creating tempo maps. Actually, if you've ever used Opcode's old Vision sequencer, you might notice something familiar about the Timewarp tool; but on the whole, it provides a much easier way of building tempo maps than the old Mastertrack editor.

Time Slips By

As a simple example, say you import a two-bar drum loop and you want to match the tempo of the Project to the tempo of the loop.

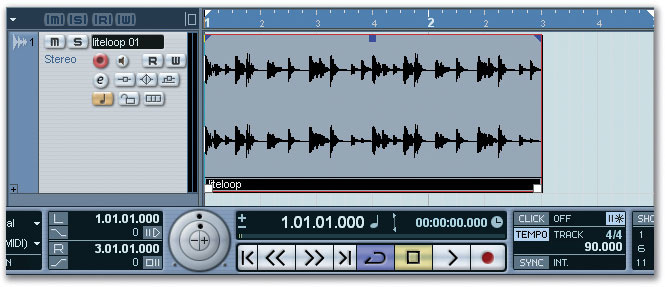
  • First, import the drum loop as usual and place it at bar one on the Project window — see the screen below.
  • Now choose the Timewarp tool (in between the Mute and Draw tools on the Project window's toolbar), and, with Snap mode active, select Events from the Snap pop-up menu on the Project window's toolbar.
  • In the actual Event Display of the Project window, drag bar three to the end of the two-bar drum loop and Cubase will recalculate the tempo of the Project based on how long it now takes to get from bar one to bar three. The result is that the Project's tempo is now the same as the tempo of the drum loop (see second screen, overleaf, top), and you'll notice that setting Snap to Events makes it much easier to ensure you're accurately dragging bar three to the end of the audio Event.

This two-bar audio loop that's been imported into the Project window is clearly at a different tempo than the Project.This two-bar audio loop that's been imported into the Project window is clearly at a different tempo than the Project.

The basic principle of the Timewarp tool is that it allows you to drag musically-relevant locations in bars and beats to linear time locations. For this reason, you need to have Bars and Beats selected as your Primary Display Format for it to work (Cubase will prompt you if you don't), and you also need to be using the Tempo Track (again, Cubase will prompt you if you're not).

By default, dragging a bar (or beat) with the Timewarp tool on the Project window always adjusts the previous Tempo Events, so if there are no tempo changes in your Project, the first Tempo Event will be adjusted. If there are Tempo Events later in the Project, a new Tempo Event will be automatically created (and adjusted) at the location where you click, so that the later Tempo Events aren't affected. You can force Cubase to create a new Tempo Event (if no later Tempo Events exist) by Shift-clicking with the Timewarp tool, which can be a useful shortcut if you're creating tempo maps.

When the Timewarp tool is selected, you'll notice the Ruler turns a maroon colour and Tempo Events are displayed in yellow across the Ruler, which is visually rather helpful. These Tempo Events can be moved in time by simply dragging them with the mouse, and if you do this you'll notice that the actual tempo value of the Event is adjusted so that future Events stay locked to their linear time locations. If you want to move a Tempo Event without its tempo value changing, so that future Events move forwards or backwards in linear time, simply hold down Alt/Option while dragging the Tempo Event in the Ruler. Tempo Events can be deleted by Shift-clicking them in the Ruler.

There are two modes of operation for the Timewarp tool, which can be selected by toggling the Key Command for the Timewarp tool, or clicking and holding on the Timewarp icon on the toolbar and choosing one of the two modes from the pop-up menu. The first, default mode is Warp Grid, and when you use the Timewarp tool in this mode, all Tracks are switched to a linear timebase so that, as the tempo changes, although the events lose their musical positions, the precise time at which the Events are played is preserved. The second mode, Warp Grid (musical events follow) has the opposite result: musical times are preserved, while the time at which the Events occur changes.

Back To The Process

Back from the grave, the Process command in the latest revision of Nuendo enables you to manipulate multiple Tempo Events with a few numbers and a single mouse-click.Back from the grave, the Process command in the latest revision of Nuendo enables you to manipulate multiple Tempo Events with a few numbers and a single mouse-click.Although it's not in Cubase at the time of writing, at the request of well-known and technologically-astute German film composer, Hans Zimmer, Steinberg have re-implemented a version of the Cubase VST-style Process command (which used to reside in the Do menu of the Mastertrack editor) in the latest version of Nuendo. While Process isn't quite as visually interesting as the Timewarp tool, it provides a quick and efficient way of dealing with multiple tempo events in one command.

Taking film as an example, say you've written a piece of music that lasts a minute and is structurally perfect, but now the picture gets re-cut slightly so that the piece needs to last 55 seconds instead. Your music contains Tempo Events, and rather than rewriting or editing the music, you want to simply compress it, while keeping the shape of the existing Tempo Events, to make the music fit the new length of picture. The way to do this is to scale the tempo of the Project and all the Tempo Events it contains proportionally, but doing this manually, one Tempo Event at a time, would be fiddly, to say the least. So instead, there's the new (or old, depending on how you look at it) Process feature.

Using Process is fairly straightforward. Open the Tempo Track Editor (Project / Tempo Track, Apple/Control-T, or Apple/Control-click the Tempo button on the Transport Panel), select the Tempo Event you want to adjust and choose Edit / Process Tempo. Note that you won't be able to open this window if no Tempo Events are selected. The upper four boxes show the start and end times of your selection in musical (PPQ) and linear time, and it's possible to adjust the selection range from these fields. The end point should be the musical point that you want to match to a new time location.

In the lower part of the window, Current Length shows the length of the selection in the selected Format (this will normally be Timecode), and you type in the new time location you want to hit in the New End Time field. This will automatically work out a new length and a suitable Scalar value (to scale the Tempo Events by). When you hit Process, the selected Tempo Events will be adjusted so that the end selection point specified in the upper part of the window matches the New End Time in the lower part.

Building A Map

Like the majority of tools in Cubase, the Timewarp tool is available in other windows besides the Project window, such as the Key editor and the Sample editor, and the techniques described in the previous section are equally applicable for using the Timewarp tool in these other windows.

In the Key editor, the main use of the Timewarp tool is for building a tempo map around a MIDI recording that might not have been played to a metronome click, for example. It's worth noting that when using the Timewarp tool in the Key editor, although the last Tempo Event is still the Event that gets manipulated, Cubase will create a new Tempo Event at the start of the active Part if no Tempo Events exist between this point and the point in time you are dragging with the Timewarp tool.

With the help of the Timewarp tool, the tempo of the Project now matches the tempo of the drum loop.With the help of the Timewarp tool, the tempo of the Project now matches the tempo of the drum loop.

When you use the Timewarp tool in the Sample editor, only the default Warp Grid mode is available, since you obviously can't adjust the length and positioning of audio data without using an additional timestretch algorithm.

One very useful function of the Timewarp tool is when building tempo maps for working with film. The trick is to create a Marker Track on the Project window and place Markers at the locations of various hit-points — timecode positions you want to hit with a musically relevant structure. The Marker Track should be set to linear time mode (so that the button that toggles timebase between musical and linear on the Marker Track shows as a clock), which means that the position of the Markers will stay associated with linear time positions when Project tempo changes.

Markers should be created at timecode positions, so you might want to toggle the Primary Display Format to Timecode or, alternatively, use the Project Browser with its internal Time Format set to display Event positions in timecode. Once you've identified the necessary hit-points in the video and created the appropriate Markers, you can use the Timewarp tool to drag bars and beats onto the hitpoint positions to build your tempo map, using the process described earlier, making sure that Snap is set to 'Events'. 


Published August 2004