Saturday, December 11, 2021

Friday, December 10, 2021
Cubase's MIDI Device Manager
 The MIDI Device Manager in all its glory. Note the hierarchy of the Patch Banks list in the bottom-left of the window, where the elements labelled Patches and Performance are examples of Patch Banks, Group 1 is a Folder, and the icons with small 'P' symbols indicate Presets.
Cubase SX 's MIDI Device Manager provides a way of choosing patches and banks on your external MIDI hardware by name rather than number. This month we look at how to create your own MIDI Patch Name Scripts to make this possible.
One of the smallest features that impressed me the most in the original Cubase SX was the neat pop-up library, with inbuilt search facility, which appears when you choose a patch for a MIDI device that has published its list of patch names to the application. Most VST Instruments publish their patch names by default, but for this to work with regular MIDI devices you need to have assigned MIDI Devices to specific MIDI ports available to the system, in the MIDI Device Manager.
A MIDI Device is a virtual representation of a hardware device in Cubase and is based on a Patch Name Script that describes to Cubase the patches and banks used by the hardware device. MIDI Devices are configured in the MIDI Device Manager, and you can add one by clicking the Install Device button and selecting the appropriate device from the Add MIDI Device window and clicking OK. The device you've just added should be selected in the Installed Devices list. You can assign it to a MIDI output port by clicking the Output pop-up menu (just beneath the Import Setup button) and selecting the MIDI output port to which you have connected the actual hardware device.
Unfortunately, Cubase SX doesn't come with a Patch Name Script for every piece of MIDI gear in existence, but fortunately this Cubase Notes column is here to help when you need to create your own MIDI Devices and Patch Name Scripts from scratch.
Not Just A Number
To create a new MIDI Device:
The next step is to add some Patch Banks to the device, but the first thing to point out about Patch Banks is that they shouldn't be confused with the regular MIDI banks on your instrument — Cubase provides another organisational layer for these, as we'll see in a moment.
If your MIDI device has several modes that you might refer to as Patch, Performance and Drums (for playing individual sounds or programs, combinations of sounds, and drum sounds respectively), these are the elements we'd describe as Patch Banks when creating a new Patch Name Script. However, if your MIDI Device doesn't feature different modes that would be categorised as Patch Banks, don't worry. Since a MIDI Device has to contain at least one Patch Bank, just use the Patch Bank Cubase creates by default for a new MIDI Device.
In the spirit of the British sit-com Allo, Allo, listen very carefully: I shall say this only once. When you want to edit Patch Banks — for example, for renaming them or creating new ones — you need to make sure the Enable Edit button is active (ticked) just above the Patch Banks list. If it isn't active, simply click it. Some early versions of Cubase had a problem wherein Enable Edit isn't always active, even when it appears to be, so if you're ever in any doubt simply disable Enable Edit and reactivate it, and everything should be fine. When Enable Edit is truly active, the Commands pop-up menu should appear in a lighter-coloured text.
To create an additional Patch Bank, click the Commands pop-up menu above the Patch Banks list and choose 'Create Bank' from the pop-up menu. To rename a Patch Bank, such as the 'Empty Bank' one that Cubase creates for you, simply select the Bank in the Patch Banks list at the bottom-right of the MIDI Device Manager window. Click the name part of the Patch Bank entry, type a new name into the text-edit field and press Return. You can delete a Patch Bank by selecting the appropriate Patch Bank and pressing the Backspace key.
When there's more than one Patch Bank in a MIDI Device, an extra button labelled 'Bank Assignment' appears in the centre strip, providing access to another page of controls that allows you to set which Patch Bank is used by each MIDI Channel in the device. It's necessary to assign Patch Banks to MIDI Channels because only the Folders and Presets for one Patch Bank can be displayed when selecting presets for a MIDI Track on the Project window. To change the assignment of Patch Banks to MIDI channels:
Adding Multiple Presets
 The Add Multiple Presets window does exactly what it says on the tin, allowing you to create multiple presets, automatically incrementing the appropriate parameters, in one pass.Although adding presets one at a time is perfectly acceptable, this process can quickly become tedious, considering that most modern MIDI devices often have many hundreds of Presets, many at a time. So, to add multiple Presets in one go:
By default, the Add Multiple Presets window provides a Program Change event; however, you'll notice that, unlike the columns provided in the Preset edit view, there's no Value column for the Program Change messages. Instead, there's a Range column. If Range is set to 0-127, for example, Cubase will automatically create 128 Presets where the first program change Value is 0 and the subsequent Values are incremented by 1 — so that a Preset is created for every value from 0 to 127. The Default Name field at the bottom of the window provides a root name for the Presets: in the above example, the Presets we'd create would be named Preset 0, Preset 1, and so on. The Presets created would then select consecutive sounds on your MIDI device.
If you need to send a Bank Change event before the Program Change in a Preset (or any other event, for that matter), you can edit or delete the Program Change event in exactly the same way as in the Preset edit view, and you can also select additional events below the first event if required. For example, if you wanted to create 128 Program Change events for bank 1 on your MIDI device, you'd simply create a Bank Change event first and set the range to the value of the Bank Change message you want for all the Presets — in this case '1'. Then create a Program Change event after the Bank Change event, as described in the previous step.
Folders & Presets
After creating the new MIDI Device's Patch Banks, it's time to fill these with Folders and Presets. In the context of Patch Name Scripts, a Preset represents a single patch, program, sound, or whatever you want to call it, on your MIDI device. A Folder is a way of organising Presets within Patch Banks. You could use Folders to represent the banks of sounds on your MIDI device, or even to group Presets in terms of their category — for example, Folders for pianos, strings, basses, and so on.
 The Bank Assignment page allows you to assign specific banks to each MIDI channel of your device — useful, as shown, where you want the drum bank to be used only on channel 10, for example.To begin with, let's consider a simple device where there might only be a handful of Presets required and no need for Folders. If you expand the default Patch Bank in the Patch Banks list, you'll notice that Cubase creates a default Preset labelled 'Off', which is effectively a blank Preset. To add a Preset to a MIDI Device:
To configure a Preset, select the Preset you want to configure; in this case, select the 'Off' Preset and the bottom-right area of the MIDI Device Manager will open into a view where you can edit Presets. The Preset editor view is made up of a series of columns, and the idea is that each Preset contains one or more MIDI events that are sent to your MIDI device when the Preset is selected in Cubase, so that the right sound or program is selected on the synth or other MIDI device.
To add an event to the Preset, simply click at the top of the MIDI Message Name column in the Preset editor view and select the required MIDI event from the pop-up menu that appears. The basic event that changes programs or sounds on a MIDI device is known as a program change, so you'll probably want to select Program Change from the pop-up menu. This just happens to be the first entry in the list.
Give the Program Change event a suitable value by clicking the default value and entering a new value within the range indicated in the Valid Range column. The value will depend on the Preset you're creating: for example, if you were creating a Preset for the Grand Piano sound on a General MIDI sound module, you'd want a Program Change event with a value of 0 (as this is the value defined for the General MIDI Grand Piano). You should be able to find the relevant Program Change values required by the sounds on your MIDI device in the device's manual. Additional events (for changing banks — see 'Adding Multiple Presets' box) can be added by clicking in the MIDI Message Name column below the previously created Preset.
You can delete the event currently highlighted by the light-blue box by pressing the Backspace key, and select a different event by clicking (or using the cursor keys) in any column in another event. Using the up and down cursor keys is often the safest way, since you can accidentally change the settings of an event you want to keep by clicking with the mouse. Rename a Preset as you would a Patch Bank, by selecting it in the Patch Banks list, clicking the name part of the Preset, typing a new name in the text-edit field and pressing the Return key.
And finally, to delete a Preset, simply select the Preset you want to delete in the Patch Banks list and press the Backspace key. You can also select multiple Presets and delete them in one pass, just as you'd select multiple files on your computer's desktop. In other words, select a Preset as normal and Shift-click another Preset to select all the Presets in between, or Control/Apple-click the individual Presets you want to select.
Published September 2004
Thursday, December 9, 2021
Wednesday, December 8, 2021
Q. Why does it take so long to freeze a VST Instrument track?
 The time it takes to freeze a track in Cubase SX 2 will vary depending on the length of the Project.
I use Cubase SX 2 and find the Freeze function for VST Instrument tracks very useful. I was disappointed to note that it can take six or seven minutes to freeze a VST track. Why is this, when it only takes one to two minutes to export an entire composition as a WAV file?
Graham Pettican
PC music specialist Martin Walker replies: Steinberg introduced their Freeze function in Cubase SX version 2.0, and it's certainly handy to be able to turn CPU-hogging software synths into normal audio tracks and then deactivate them, especially as it's a reversible process, so you can still go back and make changes later on.
Unfortunately the current version of Steinberg's Instrument Freeze function relies on the Project Length when performing its calculations (you can find this in the Project Setup window, launched from the Project menu). By default, each time you create a new project, its length gets set to a different default setting depending on which template you select. For instance, the 16-track MIDI Sequencer template defines a length of six minutes, the Empty and Default templates both have lengths of 10 minutes, while the 16-track Surround Mix and 24-track Audio Recorder are both defined as a huge 30 minutes.
Each output of the various VST Instruments used in your songs is also scanned for a potential audio signal throughout the entire length of the project, which further complicates the calculations, making them take longer. Steinberg have admitted that this is the 'first generation' of their new Freeze function, and have already stated publicly that improved features and speed increases are planned for future releases.
In the meantime, since most songs tend to be far shorter than the default settings, the easiest way to ensure that your freezes take less time is to open the Project Setup window and set the Project Length to just slightly longer than your song. Leaving this extra room should ensure that any long note-release times and reverb tails are properly captured in the frozen version.
Published October 2004
Tuesday, December 7, 2021
Monday, December 6, 2021
Cubase SX3 Preview; Range Selection
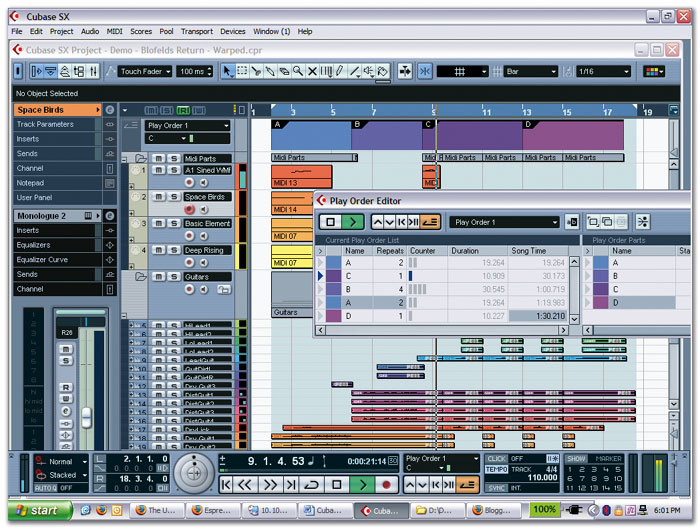 Version 3 of Cubase SX maintains the visual style of its predecessor but includes a number of welcome changes, such as the ability to see the colour assigned to a track, viewing of the Sections for a VST Instrument Channel below the Sections in the Inspector for the corresponding MIDI track, and a smaller 'smallest' height for tracks. Notice also the Play Order Editor, which allows you to specify an order for the defined Play Order Parts when a Project is played back.
This month we provide an exclusive preview of the new version of Cubase, SX 3, and offer advice on how to get the most out of Cubase 's Range Selection tool.
The big news in the Cubase community by the time you're reading this month's column will be Steinberg's announcement of Cubase SX 3, the first major revision to Cubase SX since, well, Cubase SX 2 last summer. But seriously, SX 3 is a very significant update to the application, and, in many ways, is a bigger step forward for Cubase users than last year's update to SX, mainly due to the fact that the emphasis in the new feature set is on musically creative functions. There are also a great many bug fixes and workflow improvements that are especially gratifying to see, as a few stem from a year's worth of campaigning the good people at Steinberg on behalf of a film composer of my acquaintance who uses Cubase and Nuendo.
Warp Factor 9
If you were exhausted by the bad jokes that could be associated with the Time Warp tool introduced in SX 2 (and covered a couple of months back in Cubase Notes), you'll be pleased at the prospect of more warp-related puns in SX 3, courtesy of the new Audio Warping feature. Audio Warping essentially brings Acid-, Live- or Soundtrack-like functionality into Cubase, for real-time timestretching and pitch-shifting of audio, which includes the ability to import Acid loops, opening up a vast library of content for SX users. The feature works in a similar way to the current method of creating hitpoints for slicing up audio, except that once you have identified the rhythm of an Audio Event with so-called Warp Tabs, you can either drag these to timestretch the audio, or have Cubase use them to adapt the tempo of the audio to match the Project during playback. As I mentioned earlier, this all happens in real time and enables the audio to follow even the most eccentric of tempo changes — including ramps.
For those who enjoyed the days of pattern-based sequencers, before the current linear graphical arrange windows came into vogue, Play Order Tracks will be especially welcome, and certainly rank among my favourite new features. A Play Order Track is a new track type that allows you to define regions within your arrangement (called Play Order Parts), which you can then specify to play in a certain order, rather than have your Project play back linearly from bar one to the end. This is a very powerful arranging feature that's great for trying out ideas, and once you have a Play Order you like, it's possible to 'flatten' playback of the Play Order back into a linear arrangement.
One neat feature of the old Cubase was Mixer Maps: the ability to create on-screen panels to control external MIDI devices, so that if you wanted an on-screen representation of your Access Virus synth, for example, you could define various rotary controls, faders and switches to send messages and remotely alter the physical controls on the device, creating a Mixer Map. This functionality has returned in SX 3, as an extension to MIDI Device Maps, called MIDI Device Panels. Once you've created a custom Panel, it can appear in its own window, much like a VST Instrument editor, or in a dedicated Inspection Section or Mixer view.
Last, but not least, in my very brief highlights of SX 3 is Inplace Editing, which enables you to expand a MIDI Track so that it displays an almost complete Key Editor, including Controller Lanes, in the space that the Track occupies in the Project window.
Although that's all we've got space for this month as a preview, look out for the review of SX 3 in next month's issue. There we'll be making a more in-depth examination of what Steinberg have done with the latest version of Cubase.
Editing The Global Project Timeline
As you may know, it's possible to manipulate the global timeline of a Project based on the positions of the left and right locators, moving all objects forward or backwards in time on the Event Display, or cutting and pasting sections of Parts across all tracks in the Project in one pass. These time-based commands are particularly useful because they also affect the Tempo Track, moving tempo changes forwards and backwards as needed. That can normally only be done via the Tempo Track editor.
To cut all Events between the locators to the clipboard, select Edit / Range / Cut Time or press Shift+Control/Apple+X. This selection can later be pasted to a new part of the Project at the current position of the Project Cursor by selecting Edit / Range / Paste Time or pressing Shift+Control/Apple+P. Alternatively, you can paste the cut section back to its original position by selecting Edit / Range / Paste Time at Origin. If you wanted to delete the section of the Project (without it being copied to the clipboard), you'd simply choose Edit / Range / Delete Time.
When you're working on a Project, it's quite common to reach a stage where you need to insert an extra couple of bars between objects, and it can be a real pain to manually split all the objects (where necessary) and move them forward. Instead, to insert a couple of bars at a point in the Project, use the left locator to indicate where you want the extra time to be inserted, and the right locator to specify the length of time you want to add. So, if you wanted to add four bars at bar 41, for example, you'd drag out a selection from bars 41 to 45 and select Edit / Range / Insert Silence or press Shift+Control/Apple+E.
The reason the above techniques are worth knowing about in the context of Range Selection, as covered in the main text, is that all of these commands work within the scope of a Range Selection if you don't want to affect the whole Project. For example, if you wanted to insert two bars in the middle of a Project on only two tracks, you could drag out a Region Selection across these two tracks (where the start represents the point to add the extra time and the end denotes the length of time to add), and then use the same Edit / Range / Insert Silence Command.
Making Your Selection
When you make selections on the Project window with the Select tool, it's only possible to fully select one or more objects, which is great if you want to copy the eight-bar piano Part from bar one to bar nine, for example. However, what if you wanted to copy only bars three to six of the piano to bar nine, instead of the whole thing? While this isn't exactly a cumbersome process, you'd have to perform a little resizing after copying the piano Part, to trim the start and end points, and also make sure the Part started correctly at bar nine.

 The Region Selection tool makes accomplishing certain operations, such as the one illustrated in these two screens, incredibly quick and easy. Here, a selection that includes certain sections of specific Parts is moved to another area of the Project in one drag of the mouse: no need for the Scissors tool!To make life easier in these situations, especially when working with multiple objects across multiple tracks, Steinberg implemented the Range Selection tool, which allows you to select just a region of the Project window. Taking the previous example, the Range Selection tool would allow us to select just bars three to six, rather than the whole Part, and copy only that section to bar nine.
The Range Selection tool's icon appears next to the main Select 'arrow' tool on the Project window's toolbar and can be selected using the same methods as for any other tool — either by clicking on this icon, pressing the relevant Key Command (2 on the main part of the keyboard, by default), or from the Quick Menu.
With the Range Selection tool selected, you can make a selection by simply dragging the mouse in any direction to cover the area you want. The selection can be made across a single object and track, or over multiple objects and tracks; if you've used a word-processing application such as Microsoft's Word, it might be helpful to think of Cubase 's Range Selection procedure like making a text selection in Word.
While you're making a selection, you might notice that it automatically snaps to the Event Display, if Snap Mode is enabled. Once a selection has been made, you can modify its start and end points by placing the mouse pointer over the start or end of the selection, until you see the resizing tool, and dragging the start or end point to the new position. Alternatively, make more precise numerical alterations to the selection by using the Event Infoline, which automatically displays the settings of the current selection.
It's All In The Wrist
Once you've selected a range with the Range Selection tool, there are many tasks you can carry out on the selection while the tool is still active — but once you choose another tool, the selection made with the Range Selection tool disappears. Two of the most useful transport commands also work when you've made a selection, allowing you to set the position of the left and right locators based on the selection (by selecting Transport / Locators to Selection or pressing P), or set the position of the Project Cursor to the start of the selection (by selecting Transport / Locate Selection or pressing L).
You can move the data from whatever objects are encapsulated within the selection by simply dragging the selection to another area of the Event Display. As you drag, an indicator will appear to show you what position it will be moved to when you release the mouse, just as when moving objects. The fundamental difference between using the Range Selection tool for tasks like moving, as opposed to using the Object Selection tool, is that only the selected area is moved when you use the Range Selection tool, regardless of whether the selection covers the entire length of an object. The Range Selection tool thus provides a quick way of moving parts of an object, without having to use the Split tool first before moving the relevant section.
If you hold down the Alt/Option key while dragging a selection with the Range Selection tool, the selected area is copied to another part of the Event Display, leaving the original objects unharmed. To delete an area marked by a selection, select Edit / Delete or press Backspace. You can split objects covered by the selection at the start and end points of the selection by choosing Edit / Range / Split or pressing Shift+X.
A useful way of resizing an object or objects is to drag out a selection representing the new length of the object, with the Range Selection tool, and select Edit / Range / Crop. The objects covered by the selection are cropped to the start and end points of the selection, although no data is actually lost and you can easily resize the object to restore it.
Published October 2004