Thursday, September 16, 2021

Wednesday, September 15, 2021
Tempo Maps For Pre-Recorded Audio
By John Walden
 As described below, the audio file contains a rhythm guitar part with tempo variations. In the first MIDI track, quarter-note 'taps' have been recorded in time with the freely recorded guitar part. After these were edited to tidy up their timing, the second MIDI track was created, removing the MIDI notes on beats two, three and four of each bar to leave whole-note taps.
Sometimes the click can steal the life from a session, so why not start with a live performance?
Cubase SX and SL have a range of tools that allow tempo to be managed and manipulated. For example, for a short audio recording, the Beat Calculator can be used to find the original tempo of the recording and this tempo can then be adopted for the Project or inserted as a tempo change into the Tempo track. The Beat Calculator also includes a Tap Tempo function which allows you to calculate the average tempo of the section by tapping on the computer's space bar (or mouse button) during playback of pre-recorded audio. These functions are very helpful, but they are intended primarily for short sections of audio (perhaps a couple of bars) where the tempo is constant and finding an average tempo is all that's required.
Where these functions are less useful is with longer sections of pre-recorded audio where, for any number of reasons, the tempo may have varied — either because of subtle variations by the musicians while playing the song or because of sections within the arrangement where there are planned, and more dramatic, shifts in tempo. This touches upon one of the obvious pitfalls of working with any of the modern MIDI + Audio recording environments — it is so easy to just set the tempo at the start of the project, start the click track and then slavishly follow it. In reality, most music, when performed live by a group of musicians, will contain some variations in tempo. Even at a subtle level, and just like variations in dynamics, these tempo variations can add to the emotional response of the listener. A simple example would be a slight increase in tempo during a chorus relative to a verse — a live band might do this almost subconsciously, adding to the excitement of the song. However, if the same band have to follow a fixed-tempo click in the studio, they might find it difficult to capture the essence of what gives the live performance some of its character.
 Tempo track mode needs to be set in the Transport Panel so SX will follow any tempo changes created.
Fortunately, SX has the necessary tools to allow a tempo 'map' to be constructed from a freely recorded performance (whether recorded as audio or MIDI or both). Indeed, it can be quite a liberating experience in the studio to forget all about the sequencer's tempo and lay down your backing or guide track 'live'. Alternatively, you could use a live recording from a rehearsal session that has the right feel as a basis for constructing a tempo map for a later studio recording of the song. Either way, once the tempo map is constructed within the SX Tempo track, the click track will follow its variations. Any subsequent MIDI parts can then be edited and quantised to the bar grid using all the usual tools, regardless of variations in musical tempo. So, just how do you become the master rather than the slave in the musician-sequencer relationship?
Quick, Slow, Quick, Quick, Slow
Despite the absence of several useful tempo tools from VST in the intial relase of SX, the current version has all the necessary tools for the job.
As described more fully below, the 'Merge Tempo from Tapping' tool (found in the 'MIDI / Functions' submenu) provides a way of using a MIDI keyboard to tap in a beat that follows the tempo of a pre-existing performance. Cubase will then take these MIDI notes and automatically construct a tempo 'map' of the performance within the Tempo track. Depending upon how accurate your tapping has been, the resulting tempo map can sometimes require a little fine-tuning, and if so, the Time Warp tool can be used to tidy up any loose ends. The 'Merge Tempo from Tapping' dialogue.
For the purposes of this example, I used a solo rhythm guitar part, recorded directly into SX via a DI. I deliberately played with some minor tempo variations during the main body of the piece and then added a 'double time' section prior to a gradual tempo decrease to provide the finish. I recorded this into a new SX Project with the default tempo set to 120bpm. Although the intention is to create a tempo map within the Tempo track, it is worth setting an original tempo that is easy to recall — if things don't go quite you'd planned, it makes it easier to delete the contents of the Tempo track and return the Project to its original state. The Project also needs to be set to 'Tempo track mode' rather than 'Fixed tempo mode' within the Transport panel.
As a brief aside, it is worth considering the kind of performance you choose to attempt this tempo-mapping process with. For example, some types of audio recording will make it easier to follow the beat than others — a full band recording is easier, because your tapping can follow the drummer as s/he (hopefully!) keeps the timing of the band locked together. The sharper the transients within the audio, the easier it is to follow the timing and locate the exact positions of beats. As in the example illustrated here, a solo guitar or a guitar/vocal performance can also work fine provided the guitar has a fairly strong rhythmic component to it. However, whatever form the live performance takes, make sure the timing itself is tight — while a duff note or two will not matter, attempts to gloss over the section where the bass player and the drummer lost the rhythmic plot are unlikely to prove very successful. While I've used an audio recording here as my 'tempo master' performance, it is perfectly possible to use a freely played MIDI performance — just don't quantise it prior to constructing the tempo map!
Doolally Tap
The next step simply requires a new MIDI track to be created and, while monitoring the existing performance, to record yourself 'tapping' in MIDI notes, in time, throughout the full length of the track. To make this easier, I usually connect the MIDI track to a suitable MIDI drum device or plug-in so I can hear myself playing along — in this particular example, I used Groove Agent.
As we will see in a moment, the 'Merge Tempo from Tapping' function can work with taps made at a number of musical intervals. For the majority of people, quarter notes (on every beat of the bar) or whole notes (just on the first beat of the bar) are likely to feel most comfortable. There are advantages and disadvantages to having more or fewer 'taps', but in most cases, quarter notes serve as a sensible starting point. However, it is worth using a different MIDI note for the first beat of the bar relative to beats two, three and four. This means that the whole notes can easily be extracted and placed in a second MIDI track if you wish to see whether a tempo map created from whole notes might provide a better match to the live performance. Whatever interval is used, it's a good idea to continue tapping out time for a couple of bars beyond the end of the pre-recorded material to avoid any sudden jumps back to the default tempo.
While most of us might like to think we can play along perfectly in time with another musical performance, the chances are that the recorded MIDI 'taps' might need a little tidying up to tighten the synchronisation between them and the original live performance. Although this step can be omitted, and any sloppiness sorted out using the Time Warp tool as described below, I find it worthwhile to spend a little time editing my playing in the MIDI track. The most effective way of doing this is to use the excellent 'Edit In Place' function (although this is only available to SX users), as this allows the alignment between the transients within the audio and the MIDI notes to be matched visually. Alternatively, providing a suitably high level of zoom-in is used, this can be done quite easily by hand — although remember to switch 'Snap' off first.
Once any editing has been completed, selecting the MIDI part that contains the 'taps' and choosing the 'MIDI / Functions / Merge Tempo from Tapping' option opens the dialogue shown in the screenshot on the previous page. There are only two settings to be made here. First, you specify the musical interval of the taps, and second, you can tick the 'Begin at Bar Start' box. As its name suggests, this forces the first note (which ought to coincide with the first beat of the first bar of the pre-recorded live track) to fall on the start of a bar, so in most cases it should be ticked.
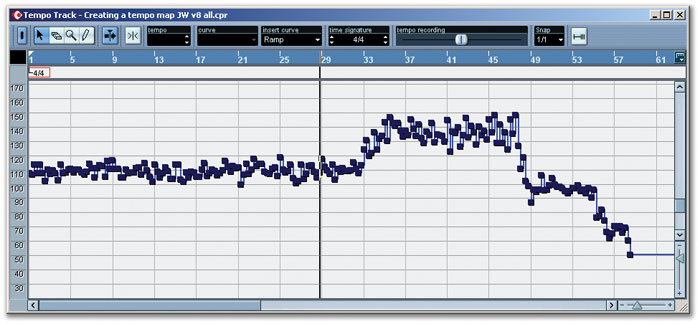 This tempo map was created using quarter-note tapping, and while the basic pattern of tempo variation can be clearly seen, it obviously still needs some tidying up!
With these settings made, a quick click on 'OK' is all that is required and, in a blink of an eye, Cubase will have done the necessary and created a 'map' of the tempo changes within the performance and placed them into the Tempo track. For our example Project, I've shown two Tempo maps: one created based on quarter-note tapping while the other is based on whole-note tapping. As can be seen, the broad patterns are very similar but, because the process creates a tempo curve point for each note within the MIDI track, the quarter-note version looks a little busier. Given that a tempo jump is placed at each tempo curve point, in projects where there are gradual changes of tempo, quarter-note taps are probably going to produce a more appropriate result.
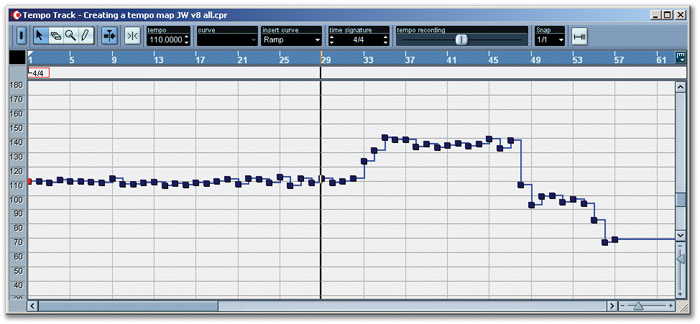 This second tempo map was created using whole-note tapping. The earlier bars seem a little smoother and less subsequent editing is likely to be required. However, the gradual tempo reduction between bars 47 and 57 might require work as it doesn't appear as smooth as in the quarter-note version.
The simplest way to assess the accuracy of the tempo map created, or to compare the results from different maps, is to set a drum module to follow the tempo map and let it play back alongside the original performance. Again, I used Groove Agent for this.
Warp Speed
Hopefully, if all went to plan and your ability to follow a beat is up to scratch, the Tempo track resulting from the 'Merge Tempo from Tapping' function might be all that is needed. However, if there are still sections where the new tempo map doesn't sit tightly enough with the timing of the original performance, then a little judicious use of the Time Warp tool is called for.
As shown in the screenshot below, if the Time Warp tool is selected, the positions of the tempo curve points are displayed within the Project window Ruler bar. Zooming in to any problem sections allows the positions of the transients relative to the bar/beat grid to be inspected and, if required, some fine-tuning can be performed using the Time Warp tool to drag the offending bar positions directly onto the start of the transients.
 The Time Warp tool can be used to perform any final, detailed tempo editing. Note how bar two seems to hit the beat with the audio exactly but the position of bar three seems a little early. The Time Warp tool can be used to drag the position of bar three to the right to coincide with the audio transient. This would also smooth the tempo value out at bar three closer to the 108/109 bpm seen in bars one and two.
Incidentally, it is perfectly possible to use the Time Warp tool to create a tempo map for pre-recorded audio from scratch. All that is required is to identify the first beat of every bar within the audio and use the Time Warp tool to drag the appropriate ruler positions into place. However, using this approach on its own is generally more time-consuming than combining it with 'Merge Tempo from Tapping' for anything longer than a couple of dozen bars.
Time Is On Your Side
There are all sorts of elements that combine to make a musical performance that engages the attention of the listener and, for many styles of music, tempo variation, whether subtle or dramatic, is an important part of this process. With the vast majority of musicians now using digital technology at the heart of their studios, the 'set and forget' mentality for song tempo is all to easy to fall into. As the example above shows, given the tempo tools within SX, it doesn't have to be this way. You don't always have to be a slave to the (fixed tempo) rhythm. Go on, do yourself a favour and record a 'live' backing track for your next song and get SX to follow you instead.
Published October 2005
Tuesday, September 14, 2021
Monday, September 13, 2021
MIDI Tracks & Keyboard Functions
We look at how to use the facilities available to Cubase's MIDI tracks to recreate certain master keyboard functions.
While trawling around the SOS forum this month, I came across a post asking about how to recreate certain master keyboard functions in Cubase, such as a keyboard split that would separate the keyboard into two zones, each controlling a different VST Instrument. Setting up this kind of behaviour in Cubase is fairly easy, and there are actually two slightly different ways of tackling the problem; so in this month's Cubase Notes we will, quite literally, be looking at... Here you can see a keyboard split created via the second method described in the main text, using one track and two sends. Notes received on this track between C-2 and B2 are sent to the Monologue VST Instrument, while notes between C3 and C8 are output to A1.
Doing The Splits
For the sake of example, let's say we want to split our keyboard at C3 (which is the MIDI note for middle-C in Cubase) so that all notes below C3 are played by one VST Instrument, and all notes above and including C3 are played by another. To begin with, load the two VST Instruments of choice in the VST Instruments window.
The first method of setting up this keyboard split is to create two MIDI tracks in the Project window and assign the output of the first track to the first VST Instrument and the output of the second track to the other VST Instrument. The default behaviour in Cubase is that MIDI Thru is active on only the selected track, which is set by the 'Enable Record on Selected Track' preference in the Editing — Project & Mixer page of the Preferences window. (MIDI Thru itself is set by enabling MIDI Thru Active in the MIDI Preferences page, for those who are interested.) However, it's possible to play both MIDI tracks simultaneously by either record-enabling or monitor-enabling both tracks, so that both of them receive incoming MIDI data.
At this point, when you play your MIDI keyboard both VST Instruments are layered on top of each other. The next step is to limit their ranges so that each MIDI track only plays certain notes:
As a side note, when you're setting the Min value it can't be higher than the currently set Max value. So if the Min value doesn't seem to be changing, you may need to adjust the Max value first.
Alternatively...
Setting up two tracks for the keyboard split is fine, but it's a little clunky having to make sure both tracks are enabled all the time and having duplicate data recorded on two tracks. Wouldn't be nicer to do the same thing with one track? OK then: to set up the same keyboard split with one track:
You now have the same keyboard split, but using only one track, and since there are four sends available per track, you could even have a keyboard split with up to four zones.
If you're wondering why we set the track to 'Not Connected' rather than a VST Instrument, and didn't use the Range in Track parameters to define the first zone, using just one send for the second zone, the reason is that setting the Range in Track parameters limits the notes sent to all the sends. So if you set a range for all notes below C3 in track parameters, the send would only ever receive the notes below C3, making it impossible to create the two zones.
Steinberg's original Studio Case bundle for Mac and Windows users proved to be one of the company's most successful products on its release in September 2003, combining a cut-down version of Cubase SX, known as Cubase SE, with 'junior' SE versions of popular virtual instruments such as Virtual Guitarist Electric Edition, Groove Agent, The Grand, D'cota and Halion for just $300. Now Steinberg have introduced the Studio Case 2 bundle, which picks up where the previous bundle left off, featuring Cubase SE 3, a cut-down version of Cubase SX 3, which shares the same VST 2.3 mix engine used in other Cubase products, and adds a new SE version of the recently released Virtual Bassist.
Published October 2005
Saturday, September 11, 2021
Friday, September 10, 2021
Working With Video In Cubase SX/SL
By Mark Wherry
 Here you can see a Video and an Audio Event on the Project window, with Cubase's built-in Video Device Player window open. The parameters available in the Event Infoline are for the selected Video Event, and you'll notice that they're pretty much identical to the parameters you would expect to see for an Audio Event.
Since its SX reincarnation three years ago, Cubase has once again become one of the most flexible tools for writing music to picture. Let's investigate...
There are two things you need to master when working with video in Cubase: first, the mechanics of actually getting video to play in time with your Cubase Project and working with timecode, and second, building tempo maps that allow you to accurately place musical moments at specific time locations in the video. In this month's Cubase workshop, we're going to look at the first of these areas — but stay tuned, as we'll be turning our attention to learning how to build tempo maps specifically for writing to picture in a future issue.
Inside Or Out?
There are two ways you can run video alongside a Cubase Project. The first is to use Cubase 's built-in video player and make your video file (or files) part of your Cubase Project. The second is to synchronise an external video device via MIDI Time Code (MTC) so that when Cubase 's transport is running, the external device chases and runs in sync. There are many advantages to running video inside Cubase: not requiring any extra equipment is an obvious one, but another is that the synchronisation between Cubase 's transport and the video is instant, so the picture starts playing immediately with the Project, and the appropriate frame at the current position of the Project Cursor is always shown.
Despite these advantages, though, running picture in Cubase isn't always the best solution. As anyone involved in film or TV will know, it's rare to only ever receive one cut of video. A far more common situation is that you receive multiple cuts, on a weekly (or sometimes daily) basis, that have to be re-integrated into your Project. Let's say you're working on a 30-minute TV show that comprises 20 different music cues, and each of these music cues is a separate Cubase Project, each containing video. Every time you get a new cut of video, you'll have to update the video in 20 different Cubase Projects: if you're working on a feature film that might have 50 to 100 cues across multiple reels of video, this situation becomes really frustrating, really quickly.
For this reason, a large majority of working media composers tend to run video outside of their sequencers, and even if your main sequencer is Cubase it's pretty common to see a separate system, locked via MTC, being used to run video. The big advantage of an external video machine is therefore that you can reload the video once and every Cubase Project will lock to whatever the external video machine is playing. The disadvantage is that it usually takes a second for the video machine to lock in with Cubase, and getting the video to display the exact frame at the current position of the Project Cursor isn't always as easy as you might think.
So if you're working with one or two video files that won't be updated on a regular basis, the best approach is probably to run video within Cubase. However, if you're working with multiple video files that will have frequent updates, the extra expense of a separate computer to run video is probably justified by the time you'll save. While this article covers using video in Cubase, in the near future we'll be looking at tips for running a separate video system alongside Cubase.


Running Video In Cubase
When you're running video in Cubase, you can be grateful that it has possibly the best internal video handling of any sequencer or digital audio workstation available, thanks to functionality that was originally introduced in Nuendo 1.0 way back in 2000. Basically, an audio file is referenced in a Cubase Project as an Audio Clip, and when you use an Audio Clip in the Project window you create an Audio Event, which can be dragged around, resized, and so on. A video file is therefore referenced as a Video Clip, and a Video Clip appears in a special Video Track in Cubase as a Video Event, which can be dragged around, resized and handled just as if it was an Audio Event.
 Video Clips are organised in the Pool's Video Folder. Notice how the Info column details several useful parameters, such as the frame rate of the video.
To add a video file to a Cubase Project, select Pool / Open Pool Window, click the Import button at the top-centre of the Pool window (or select Pool / Import Medium) and choose the video file to be added. A Video Clip will be automatically added to the Pool to represent the video file. If your video file contains audio content, such as dialogue or temp music, you'll need to extract this data as a separate audio file, as Cubase has no way of playing audio contained within a movie file. To do this, select the Video Clip in the Pool and choose Pool / Extract Audio from Video File. A new Audio Clip is added to the Audio Folder in the Pool.
At this point it's worth noticing the Info column in the Pool, which for a Video Clip tells you the frame rate of the video (in addition to its length and resolution), and for an Audio Clip shows what sample rate, bit depth and channel format are used, along with the length of the file. It's important that the frame rate of the Cubase Project matches that of the video, so that the timeline of the Project exactly matches the timeline of the video. To set the Project's frame rate, open the Project Setup window by selecting Project / Project Setup (or pressing Shift+S), choose the appropriate frame rate from the Frame Rate pop-up menu, and click OK.
The next step is to create a Video track in the Project window (Project / Add Track / Video) and an Audio track (Project / Add Track / Audio) of the appropriate format (such as stereo or mono, as indicated by the information in the Pool). Now, drag the Video Clip from the Pool onto the Video track so that it's positioned at the start of the Project; and do exactly the same with the Audio Clip, so that it lines up precisely underneath the Video Event. In order to keep the video and its audio together, it's a good idea to group these two Events, by selecting them both and choosing Edit / Group (or pressing Ctrl/Command+G). Now, any edit operations you apply to either Event will be applied to the other Event. You can later ungroup these, if you want to, by selecting both Events and choosing Edit / Ungroup (or pressing Ctrl/Command+U).
 The Event Display-Video page in the Preferences window lets you disable the drawing of thumbnails on Video Events to save your computer's resources, and also to set the size of the video cache memory used to store the thumbnails, saving on disk access.
Once you have Video Events in a Video track, you can open Cubase 's video window where the playback of the video will be displayed by selecting Devices / Video or pressing F8. See the 'Understanding Cubase 's Video Player Device' box (above) for more about the various playback options.
At this point, it's important to make sure that the video is placed (or 'spotted') to the correct timecode location in your Cubase project. Hopefully, your video will contain a timecode burn-in (literally, timecode that's visible, or 'burnt', into the image you see) from the editorial department that gave you the video; if it doesn't, you may need to ask them what the first frame of picture should be. If there is indeed a burn-in on your video, you need to make sure that the timecode in Cubase precisely matches the timecode on the video.
If the timecode starts running at the start of the video, all you need to do is take a note of what the SMPTE time is on the video. This is easy if the Video Event is at the start of the Project, as you can just set the Project Cursor to zero and look at the Video Player window. Next, open the Project Setup window again and set the Start value to the timecode value at the start of your video, before clicking OK. Now, wherever you place the Project Cursor, the timecode visible on the video should be exactly the same as the timecode readout in Cubase. If you can't see a timecode readout in Cubase, set the Secondary Display Format to Timecode by clicking the Select Secondary Time Format button (which is located just above the Record button on the Transport Panel) and selecting Timecode from the pop-up menu. Usually, it's best to leave the Primary Display Format set to Bars+Beats, since that's the time format you'll need to work in once you start writing some music.
The only slight problem you might encounter is if the timecode on the video doesn't start running at the very start of the video — in this case you'll need to crop the Video Event so that the start of the Event is the first frame of video you can reference in terms of timecode. This is pretty easy, as you can change the start point of the Video Event just as you would that of an Audio Event, by dragging the Event's start handle, or numerically by selecting the Event and changing the Start time in the Event Infoline. If you're going to adjust the start of the Event in the latter way, you might want to swap the Primary and Secondary Display Formats temporarily, so that you can adjust the start of the video in terms of frames rather than bars and beats. Do this by clicking the Exchange Time Formats button (which is an icon just above the Stop button on the Transport Panel and looks like a thin line with two arrows).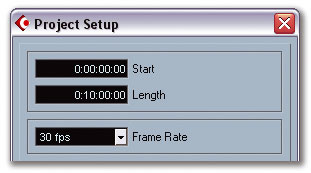 The Project Setup window enables you to set a SMPTE timecode position for the start of the Project, which makes it possible to precisely synchronise the playback of the video in Cubase. The frame rate of the video you're working with is also set in this window.
All You Need Is Cache
By default you'll notice that the Video Event displays a series of frames from the video, to give an approximate idea of what's going on in the picture at any given position along the timeline. The option to see (or not see) these so-called 'thumbnails' is located in the Event Display-Video page of the Preferences window, and you'll notice that this page also contains an option for setting the size of the Video Cache. The Video Cache is used to store the thumbnails generated from the video file in memory, so that Cubase doesn't have to read from the disk every time the thumbnails need to be redrawn. If you find yourself zooming in and out of the Project window horizontally quite frequently, this causes the thumbnails to be constantly redrawn, so it's worth increasing the cache size if you notice either your computer slowing down or the process of redrawing the thumbnails on the Video Event being sluggish.
Cubase SX/SL 3.1 adds a further new trick for improving performance when working with thumbnails, by offering the option to create a thumbnail cache file on disk as well. The way this works is that if Cubase needs to redraw a thumbnail that doesn't exist in the memory cache and would take too much processing to generate from the video file, it uses a lower-resolution thumbnail stored in the cache file instead. Once the processor is free to redraw the thumbnail from the video file, Cubase will do this, and the thumbnails will be redrawn at a higher resolution. To create a thumbnail cache file, select the Video Clip in the Pool and choose Pool / Generate Thumbnail Cache.
At this point I have a small confession to make: there is actually a quicker way of performing the tasks I've just described. Selecting 'File / Import / Video' displays a file selector with two built-in options that are enabled by default: 'Extract Audio' and 'Generate Thumbnail Cache'. If these options are enabled, Cubase will automatically extract the audio, generate the thumbnail cache, add the appropriate Audio and Video tracks and the Audio and Video Events.
The reason for explaining the whole of the process is more for those situations where you might need to do something out of order, or work with multiple video files in the same Project. This latter point is actually really important, because Cubase SX is one of the only sequencers on the market that can deal with multiple video files in the same Project, since the Video track, like any Audio track, can contain multiple Events from different files. This is incredibly handy, because TV shows and films are often broken down into acts and reels, and Cubase allows you to load these in a single Project if you wish, without having to use a separate application to merge them together.
And that's just about all there's space for this month. Coming soon, synchronising external video playback, and a look at how to write music to picture using Cubase 's tempo map features.
Published November 2005