Welcome to No Limit Sound Productions

Company Founded
2005
Overview

Our services include Sound Engineering, Audio Post-Production, System Upgrades and Equipment Consulting.
Mission
Our mission is to provide excellent quality and service to our customers. We do customized service.

Monday, August 9, 2021

Cubase: Detailed Audio Editing

By Simon Millward

Dragging the Range Selection tool within an audio event allows you to make selections across any range in the Project window.Dragging the Range Selection tool within an audio event allows you to make selections across any range in the Project window.

Cubase SX supplies us with a comprehensive set of editing tools, but the manner in which they can be used varies enormously — and also depends upon the task at hand...

There are probably no hard and fast rules about exactly how you go about doing detailed audio editing in Cubase SX. For example, some audio editing jobs can benefit from the drawing of volume automation curves in the sub-tracks of the Project window. This often suits the removal of unwanted breathing, hum, hiss and other interference within vocal or guitar recordings, or the spill between drum microphones. Automation curves have the advantage of being non-destructive and visually clear on the screen, but they may not be ideally suited to all audio editing tasks.

This month, I propose to show you some techniques for the more 'destructive' type of audio editing — where you go in and actually change the waveform — as well as a lightning-fast non-destructive technique for setting up crossfades within audio events in the Project window.

These techniques help with the removal of clicks and the detailed modification of breaths and other interference within vocal recordings. Before you frown upon my use of the word 'destructive', remember that destructive audio editing in Cubase SX is never truly destructive since you can always go back to the original (or undo the processing steps) in the Offline Process History dialogue.

Preparing Your Work Space

When you are editing audio in fine detail, you might assume that you should simply select the event, open the Sample Editor and use its specialised toolbar. After all, the Sample Editor is for detailed editing at the sample level. While this is true, it is not always the best solution, and you may be overlooking some useful editing techniques along the way. There is a lot you can achieve in the Project window before you ever need to open the Sample Editor. However, before you start any detailed audio editing it's worth taking the time to assemble your own set of essential tools and think why you need them and in what combinations they are particularly useful. These could be the standard tools as you find them on the toolbar, they could be menu functions, or they could be existing key commands or macros.

Tools & Functions For Audio Editing

Tool or FunctionMenu or Toolbar LocationKey Command
Range Selection tool(Project window toolbar)'2'
Zoom To Selection(Edit / Zoom menu)'Z'
Undo Zoom(Edit / Zoom menu)Alt+Z
Play Selection range(Transport menu)Alt+Space
Select None(Edit / Select menu)Alt+\
Fade-out(Audio / Process menu)F5
Silence(Audio / Process menu)F6
Fade-in(Audio / Process menu)F7
Split At Cursor(Edit menu)Alt+X
Crossfade(Audio menu)'X'
Open Focused Sample Editor(Edit / Macros)'W'
Draw tool(Sample Editor toolbar)'3'

If not already assigned, assign appropriate key commands to the menu functions you expect to use most frequently, and, if you regularly use particular combinations of tools and functions, write a macro and assign an appropriate key command to it. Organising key commands and macros helps you use your set of tools quickly and easily.

Set up your Project window with suitable dimensions and an appropriate track size for your audio tracks. This gives you the necessary screen space within which you can work comfortably. Save your settings as a Workspace (Window / Workspaces).

Establish a practical physical method of using your tools. For example, try arranging your work area so that you are using your left hand for key commands on your QWERTY keyboard and your right hand for mouse manipulations (or vice versa for left-handed users). This two-handed approach can dramatically speed up the editing process.

Natural Selection

My own set of essential tools and functions for audio editing is shown in the table on the previous page.

As you can see, the first few items in the list are based around the idea of 'selection'. When I am editing audio in fine detail, I find that I repeatedly need to select a specific passage in order to zoom in to take a better look or to engage playback over that selection alone. For example, when you hear a digital click in your audio the natural reaction is to stop playback, select the area where you heard the click, zoom in to find out if it is possible to see the click in the waveform, and then play back the passage again. This sequence of actions is taken care of with the first four tools/functions in my list. Let's take a look at their use in more detail.

The Range Selection tool is a real friend when it comes to detailed audio editing. By default, this tool is selected by pressing '2' on the computer keyboard, or you can select it directly using the mouse on the toolbar. It's a simple matter to select a range in an audio event in the Project window, by dragging the tool within the event.

The Zoom To Selection function (Edit / Zoom submenu) fills the Project window with the selected audio. This is a good one-step function for instantly focusing on the area of interest. To ensure simultaneous horizontal and vertical zooming deactivate the Enlarge Selected Track function in the Edit menu.The Zoom To Selection function (Edit / Zoom submenu) fills the Project window with the selected audio. This is a good one-step function for instantly focusing on the area of interest. To ensure simultaneous horizontal and vertical zooming deactivate the Enlarge Selected Track function in the Edit menu.Once you have made your selection, the Zoom To Selection function is an excellent way of instantly zooming in to the details of the audio, as it fills the whole of the Project window with the selected passage. By default, the key command for Zoom To Selection is Alt+S, but I have found it easier to re-assign 'Z' to this function. I have also assigned Alt+Z to the Undo Zoom function. This means that you can now instantly zoom in to your selection and back out to an overview of the Project window using the fairly logical 'Z' and Alt+Z key commands.

Once you are zoomed in to your selection, you may wish to engage playback over the chosen passage. This is easy using Play Selection Range in the Transport menu (by default, the key command is Alt+Space). You could also use Alt+G to engage loop playback. When you are viewing short passages of audio at high magnification like this it is normally best to deactivate Autoscroll (press 'F') to prevent the selection scrolling awkwardly out of view. Also of great importance is the Select None function (the fifth item on the list) which allows you to cancel the current selection so you can start afresh with a new selection. This is essential when you need to select a new range which is found within the boundaries of the current selection.

Close To The Edit

Using combinations of the first five tools and functions allows you to navigate to the problem area within your audio. Detailed audio editing is one of the few occasions where it is almost as important to get a good view of the edit as it is to hear it properly. Zoom To Selection should allow you to get close enough to start the actual editing. I do a lot of work with vocals and the spoken voice and the next three functions in my list have been chosen specifically for this. The functions in question, Fade-out, Silence, and Fade-in, are all found in the Process menu and I am using these principally for removing or reducing unwanted breath and lip interference. Of course, the techniques described here can be adapted to any kind of audio material.
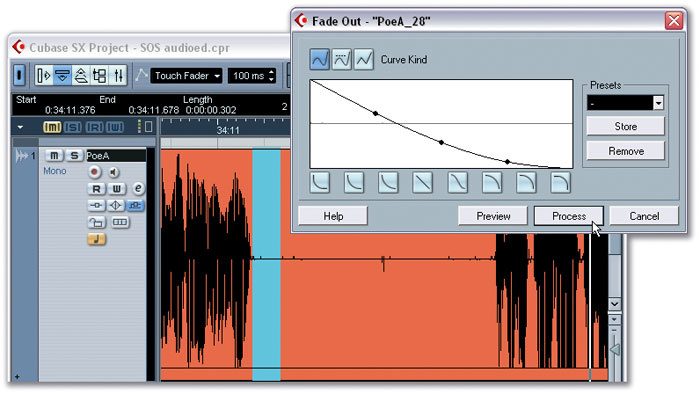
Select an appropriate range and use the Fade-out function (Audio / Process menu) to create a suitable fade-out just after the wanted part of the material. Note the low-level interference in between the two main waveforms. This is the target for this processing technique.Select an appropriate range and use the Fade-out function (Audio / Process menu) to create a suitable fade-out just after the wanted part of the material. Note the low-level interference in between the two main waveforms. This is the target for this processing technique.Directly after the fade-out, a second range selection is processed using the Silence function (Audio / Process menu). This range selection begins where the previous range selection for the fade-out ends.Directly after the fade-out, a second range selection is processed using the Silence function (Audio / Process menu). This range selection begins where the previous range selection for the fade-out ends.Directly after the silence, a third range selection is processed using the Fade-in function (Audio / Process menu).  This range selection begins where the previous range selection for the silence ends.Directly after the silence, a third range selection is processed using the Fade-in function (Audio / Process menu). This range selection begins where the previous range selection for the silence ends.As many readers will already be aware, brutally removing all unwanted noises in a vocal recording with the Silence command alone is rarely a satisfactory solution. Sudden changes between background ambience and absolute digital silence stick out like a sore thumb, particularly when the target audio is isolated or high in the mix. The result is wholly unnatural. In addition, complete removal of all breaths can render the performance sterile and lifeless. So, what is the solution? Well, where absolute silence is necessary to remove an unwanted click or lip noise, you normally get far better results by fading down to the edit point, overwriting with an appropriate length of silence, and fading back up to continue with the remaining audio. The Fade-out, Silence and Fade-in functions allow you to do exactly this, and that is why they are in this order in my list. Selecting the Fade-out or Fade-in functions opens dialogues where you can choose a preset fade shape using the buttons below the curve display. Alternatively, you can create your own by dragging the handles which appear when you click on the line of the curve. Each time you select either the Fade-in or Fade-out functions, the dialogue opens with the previously selected curve in the display, which can be quite handy for repetitive editing. The Silence function has no dialogue since it simply replaces any selected audio with absolute silence.
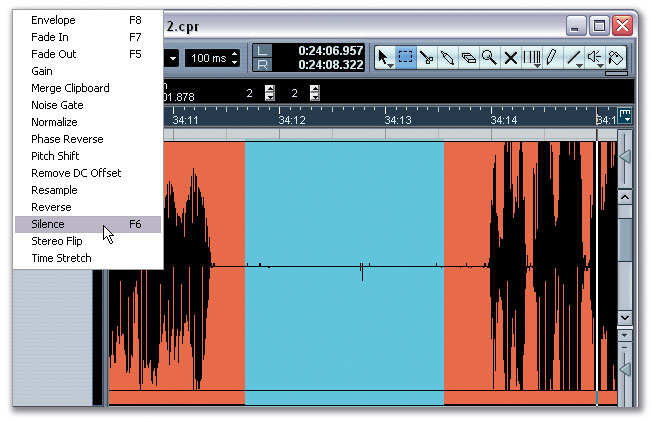
With this technique, the Fade functions are intended to be used in combination with the Range Selection tool which defines the section of audio to be processed. The screens above show this triple-tool technique in action, removing low-level lip and breath noises between words in a voice recording. Note that after selecting and processing the section for the fade-out, selection of the second section intended for the Silence function is achieved by dragging the start point of the first selection over and beyond its end point (wrapping over) to create a new selection. This ensures that your silence starts at the exact end point of the fade-out. A similar technique should be used for the fade-in to ensure that the fade begins at the exact end point of the preceding silent section.

It is also possible to use the Envelope function to achieve similar results in one move by creating your own 'bowl' shaped envelope, but separating the fade and silence functions gives you maximum flexibility when dealing with difficult edits. In all cases, successful results depend very much upon the accuracy of the range selections as well as the appropriateness of the fade curves. Cutting too close to the wanted material might prematurely stifle the outgoing or incoming audio. You also need to pay careful attention to breaths, particularly at the start of a word or phrase. These are often best left untouched to retain the natural feel of the performance.

Secret Weapon

A vocal recording suffering from 'lip-smacking' noises between words, seen as two brief peaks at around 25s and 35s.A vocal recording suffering from 'lip-smacking' noises between words, seen as two brief peaks at around 25s and 35s.The same vocal recording after processing with the Crossfade function technique described in the main text. Where necessary, the crossfades may be fine tuned directly in the Project window by dragging the whole crossfade to a new position or adjusting the start and end points.The same vocal recording after processing with the Crossfade function technique described in the main text. Where necessary, the crossfades may be fine tuned directly in the Project window by dragging the whole crossfade to a new position or adjusting the start and end points.Here, the Crossfade function is used in an unorthodox manner to create a 'bowl'-shaped envelope, a non-destructive alternative to the Fade-out, Silence and Fade-in functions in one easy move. This is invaluable for reducing lip noise and interference between words and phrases in vocal takes.Here, the Crossfade function is used in an unorthodox manner to create a 'bowl'-shaped envelope, a non-destructive alternative to the Fade-out, Silence and Fade-in functions in one easy move. This is invaluable for reducing lip noise and interference between words and phrases in vocal takes.Click removal in the Sample Editor using the Draw tool.Click removal in the Sample Editor using the Draw tool.The next two items on the list, Split At Cursor combined with the Crossfade function, are my secret weapon. I only ever use the former Fade-out, Silence and Fade-in functions for detailed edits where a crossfade fails to achieve a satisfactory result. The real secret here is how you set up the Crossfade dialogue to achieve the same processing action as the former three functions combined. It's relatively easy. Firstly, double-click on an existing crossfade to open the Crossfade dialogue and create your own custom shaped curves or use the preset shape buttons. The idea is to create an overall 'bowl' shaped curve which begins with a fade-out, continues with a short segment of silence (or near silence), and ends with a fade-in. This is a recreation of the Fade-out, Silence and Fade-in functions but it's achieved in one easy move and is entirely non-destructive. For the purposes of this exercise the fades in and out are comparatively short compared to the middle silent section. In addition, the silent section need not be located at the absolute lowest point of the curve display. You may prefer a near-silent horizontal line located just above the lowest point of the curve display. Try a crossfade with an overall duration of around 500-700ms.

To use the Crossfade function in this context, adjust the settings in the Crossfade dialogue to resemble a bowl shaped envelope (as described above). Now select and listen to your audio event (preferably a vocal take or speech). Whenever you hear any unwanted noise in between words or phrases use Split at Cursor (Alt+X) to split the event at that point, in much the same way as you might use markers to mark points of interest. When you have worked through enough audio, select all the newly split events and select Crossfade ('X') to implement crossfades at all the split points.

De-select all the events and audition the crossfades one by one. Many of the crossfades may have already masked the problems within the audio using the default settings but, where necessary, you can fine-tune the results by dragging the curve or changing its length directly in the Project window while auditioning the audio in cycle playback mode. De-activate the Snap button for dragging by small amounts. You may also need to re-open the Crossfade dialogue to fine-tune the curve shapes. Use Locate Next Event and Locate Previous Event ('N' and 'B' key commands) to navigate to each crossfade and try setting up a pre-roll of one or two bars to give yourself a short run-in.

I mostly use this to reduce low-level lip noise and interference in between words and phrases in vocal takes. To make my edits I need to split the events fairly accurately. Each split point falls roughly at the mid-point of each section of unwanted interference. You can go on to create any number of shapes/durations for specific editing tasks and store them in the Crossfade dialogue's preset menu for future use. The default settings of the Crossfade function (stored using the save default button) are recalled whenever you open the dialogue. This is handy for repetitive tasks.

Click Removal

The final two items in the first table are designed specifically for click removal using the Draw tool in the Sample Editor. Normally, when you open the Sample Editor after having made a selection with the Range Selection tool, the editor opens focused upon the entire event within which you made your selection. Since this is not always convenient, I have created a Macro which forces the Sample Editor to open focused precisely upon the current range selection (see the table below for a list of the functions contained within this Macro, and see Mark Wherry's article on Macros in the July 2003 issue of SOS for more details about creating your own Macros).

Macro: Open Focused Sample Editor

Transport — Locators To Selection

Edit — Open

Zoom — Zoom To Locators

Edit — Select In loop

Zoom — Zoom To Selection

To understand how the focused Sample Editor macro can help you, try the following: choose your audio containing the click or other irregularity. While remaining in the Project window, zoom in closely and select a small zone around the click using combinations of the first five tools/functions in the first table. You will normally need to deactivate the Snap button for this kind of work.

When you feel ready to make the edit, use the focused Sample Editor macro. This procedure is often quicker than opening a non-focused Sample Editor and, more often than not, helps you get to the problem area with greater ease (I should also mention that the Open Focused Sample Editor macro may also be used to good effect on MIDI parts). Once you are in the Sample Editor, you may need to zoom in still more by dragging downwards with the pointer in the ruler. The zoom factor must be less than one before you can use the Draw tool. The zoom factor is shown in the info bar, and you will know that it is less than one when the waveform is shown as a line rather than as a 'filled' form. Your click should now be clearly visible in the display and may resemble the one shown in the screenshot below. To remove the click, select the Draw tool and manually re-draw a line over the appropriate range, attempting to create a plausible waveform according to the surrounding characteristics. If you are good at drawing you should now be click-free!

Clarification

To clarify your understanding of the techniques described above, just remember that each procedure involves two overall logical stages: 'selecting' followed by 'editing'. With reference to the list of tools/functions in the first table, the first five items are for selecting, and the next seven are for editing. Easy! 


Published September 2006

Friday, August 6, 2021

Processing Acoustic Guitars

The acoustic guitar has its place in almost every style of contemporary music. So how can you use the processing tools of SX to help find the right place in your mix for all that strumming and picking?

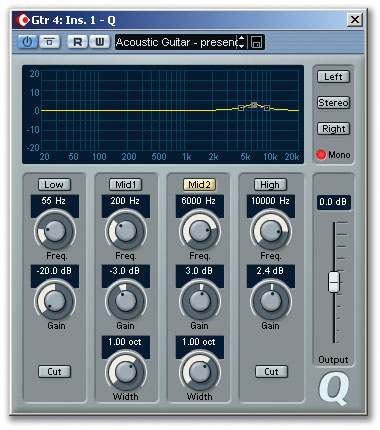
Cuts centred at 100-300Hz and 1-3kHz can help if the sound is a little boomy or needs to be more open and transparent. Cuts centred at 100-300Hz and 1-3kHz can help if the sound is a little boomy or needs to be more open and transparent.Adding a few dBs around 5-7kHz can add a little presence. Adding a few dBs around 5-7kHz can add a little presence.There can be very few instruments whose use is as ubiquitous as the acoustic guitar. In almost all branches of contemporary popular music — from folk through to heavy rock — acoustic guitars have their place. While there have been some dramatic improvements in sample-based 'virtual' acoustic guitar instruments during recent times, even a half-decent guitarist is likely to produce a more realistic performance by playing the part.

Using Q to roll off the lows and add a little high-end sparkle makes a good basic starting point for acoustic guitars in a full mix. Using Q to roll off the lows and add a little high-end sparkle makes a good basic starting point for acoustic guitars in a full mix.

However, the performance is not everything — the recording also has to be a good sonic fit to the musical piece as a whole. So, what can Cubase SX offer if you are looking to get the perfect, hand-crafted acoustic guitar part into your mix? Clearly, different sounds are needed for different uses, and the likely processing choices will depend upon whether the acoustic guitar is being used for accompaniment, as a rhythmic element or as a featured (solo) instrument. As with many mixing questions, frequency balance and level are the key issues — so it is no surprise that the focus is on EQ and compression. However, before considering the tools SX offers for the post-recording (mixing) processing that might be applied to acoustic guitars, some brief comments on the recording process itself might be worthwhile.

Keep It Natural

Back in the August 2001 issue of SOS, Paul White (with a little input from Mike Senior) produced a very useful technique column called 'Recording Acoustic Guitar'. In the main, this focused upon the recording process itself, rather than the subsequent processing that might be applied while mixing. Paul and Hugh Robjohns also produced a video tutorial on the same topic that appeared on SOS DVD2 (with the November 2005 issue of SOS). It covered issues such as microphone choice, microphone placement and stereo recording. Interested readers can read the original article, so there is no need for me to repeat the excellent guidance already given. However, it is worth emphasising one key issue that comes out of these guides.

As mentioned above, within a mix, acoustic guitars are often shaped tonally in a way that would perhaps sound unnatural if heard in isolation. However, it is very difficult to pre-judge what will be required prior to the mixing stage. Therefore, when recording parts, the best method is to go with the most natural reproduction of the guitar sound that your instrument, recording room and equipment (mic/preamp) allow. Keep any EQ processing to a minimum and change the recorded sound of the guitar via mic positioning, if possible. If compression is required while tracking, then keep it gentle. By sticking to these basic guidelines, the recorded track should be a faithful reflection of the performance with a well-balanced frequency response. If your mix does then require you to radically cut, or perhaps more subtly enhance, particular frequency bands then fine; with a well-balanced original recording, free from over-compression, you will be keeping all your mixing options open.

Tone Shaping

If the guitar is being used as a featured instrument — perhaps a solo guitar or a solo guitar accompaniment to a lead vocal — then the guitar sound will probably need to be left as natural as possible. If the recording process has been well done, then little or no further processing may be required — perhaps a subtle EQ cut in the dominant frequency range occupied by the lead vocal (the SX Spectrum Analyser, from the Audio menu, can be used to help identify where this might be) and a little gentle compression will be all that is required.

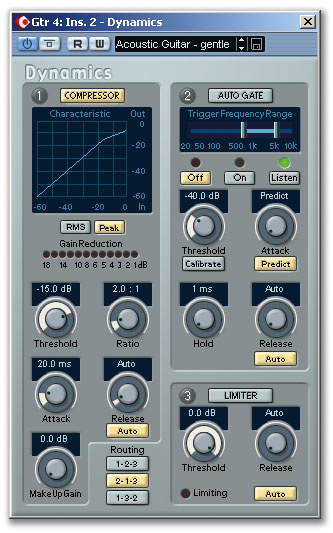
Go easy on the compression. In this example, a gentle 2:1 ratio is being applied above a -15dB threshold to only catch the peaks.Go easy on the compression. In this example, a gentle 2:1 ratio is being applied above a -15dB threshold to only catch the peaks.Things can get a little more tricky when a place for the acoustic guitar has to be found within a more complex mix. EQ can be used to shape the tonal balance of the guitar part so that a suitable balance is achieved between giving the guitar part its own space within the mix and making sure that it does not tread upon the frequencies required by other instruments. Compression can help even out the dynamics of the guitar part to ensure it neither gets lost in a busy mix nor that it overpowers other elements of the arrangement. My personal preference is to place EQ first in the signal chain and then drive the compressor with only the guitar frequencies that are going to be important within the mix, but there are no fixed rules here and so some experimentation is often required.

Whether you use the standard SX channel EQ or the four-band Q plug-in (from the Filter group of the SX plug-in list), there are a few fairly standard EQ adjustments that can form a good starting point for acoustic guitars. In a full mix, perhaps featuring drums, bass guitar, some keyboard parts, vocals and possibly some electric guitars, there are going to be plenty of other instruments that are competing for space (and carrying the power) in the lower end of the frequency range. Cutting some of the bottom end below 100Hz thins out the acoustic guitar sound a little and, if there is plenty of kick drum, bass guitar or powerful electric guitar present, all these frequencies in the acoustic guitar track will do is make things a little muddy. If the part needs to cut through a mix more clearly, a little extra 'sparkle' can be applied by boosting by a few dB above 10kHz. This does need to be done with some care, however, as it can give the sound a little too much sizzle if overdone, creating a very unnatural result, even within a full mix.

The Multiband Compressor can be used to control both tonal balance and dynamics. In this example, the gain of the various bands is used to roll off the lower frequencies and boost the upper two bands for presence and sparkle.The Multiband Compressor can be used to control both tonal balance and dynamics. In this example, the gain of the various bands is used to roll off the lower frequencies and boost the upper two bands for presence and sparkle.Between these low-end and high-end extremes, there are three other frequency ranges that are commonly worth experimenting with. First, if the guitar sounds a little boomy (perhaps a little too much soundhole in the microphone positioning during recording?), sweeping a parametric band from Q through the 100-300 Hz range may help identify where the problem lies. Once the offending frequency is identified (and this may depended upon both the guitar and the part being played), it can be gently cut by 2-3 dB to reduce the problem. Second, applying a cut within the mid-range can help to make the sound a little more open and transparent. Again, sweeping one of Q 's parametric bands through the 1-3 kHz range will soon identify whether this helps or not. Finally, a modest EQ boost somewhere in the 5-7 kHz range can add a little presence to the sound. In some cases, this may be preferable to the high-end sizzle added above 10kHz, especially if there is also plenty of high-frequency energy provided by the various cymbals within the drum track.

While the combination of these EQ changes may, in isolation, make the acoustic guitar part sound a little weedy and perhaps a touch too bright, it is likely to sit much better within a busy mix, while occupying less space. Until you become more confident in your ability to judge these sorts of EQ changes, plenty of A/B comparisons are needed, both with the EQ applied and bypassed and also with the guitar soloed and heard within the context of the full mix. Again, unless the guitar is the featured instrument, it needs to work within the mix rather than in isolation, and in this context, a 'natural' sound may not be what is required.

On The Level

It is quite difficult to give very specific advice about suitable compression settings for acoustic guitar when mixing — the details will depend upon both what the role of the guitar part is within the mix and the style of the part played. However, it is probably true to say that the more exposed the guitar part is, the more subtle the compression needs to be in order to maintain a natural dynamic to the performance. With SX 's Dynamics plug-in, it is probably worth starting with a fairly gentle 2:1 ratio setting and adjusting the threshold downwards until gain reduction is only really being applied to the peaks of the performance rather than continuously.

Magneto can be a useful alternative to standard compression. It can also be useful to warm up a DI recording made via the guitar's built-in pickup.Magneto can be a useful alternative to standard compression. It can also be useful to warm up a DI recording made via the guitar's built-in pickup.In terms of attack times, a setting somewhere between 10 and 20 ms provides a decent starting point. Some care is needed with really fast attack times — while they will control the level more severely, they can also rob the attack of each note or chord strum of its natural character, resulting in a very weak and lifeless sound. For most acoustic guitar material, I've always found that the Auto Release function of Dynamics does a decent job, but if you do feel the need to set this manually, be guided by the tempo of the material — with up-tempo strumming, a longer release time may mean that the compressor has not fully released by the time the next strum occurs, which might have the unwanted result of reducing the impact of the attack of each strum. An alternative approach to controlling the dynamics of a strummed guitar part is suggested in the 'Something Fishy' box.

One Stop Shop

Another possibility when mixing is to replace the Q and Dynamics plug-ins with the Multiband Compressor. As I outlined in the May 2006 issue when looking at basic mastering within SX, this plug-in can be thought of as both a dynamics control and, by adjusting the gain settings for the particular frequency bands, also provide some control over the tonal balance. Multiband Compressor includes a preset for acoustic guitar which forms a decent starting point but, as with mastering, the number of bands, band gain and frequency range can all be adjusted to taste.

In essence, the same basic guidance described above applies here. For example, if the guitar part has to sit in a full mix, reduce the gain on the lowest band to roll off some of the low-end. Equally, a little presence or high end sparkle can be added by increasing the gain of bands centred about 6kHz and 12-14 kHz respectively. Multiband Compressor does, however, have a down side — it doesn't provide any detailed control over attack and release times — and with some performance styles, this lack of control is a distinct disadvantage.

Magneto & Other Tricks

Duplicating a track, offsetting the original relative to the copy and then panning left and right can create the impression of a tightly double-tracked performance.Duplicating a track, offsetting the original relative to the copy and then panning left and right can create the impression of a tightly double-tracked performance.As an alternative to overcooking the EQ controls, another approach is to insert the Magneto plug-in on to an acoustic guitar track. By adding a little tape emulation you can give the track some added warmth, some 'tape' compression and, by tweaking the HF Adjust setting, add a little top-end zing. This can work well with some material, but be careful when applying it to rapidly strummed chords as, in my experience, it tends to squash the chord attacks if overdone — a little goes a long way.

A further trick when mixing a strummed guitar part is to make a duplicate track from your mono recording, pan them to opposite sides of the stereo image and then slightly offset the timing of one track relative to the other. This can create the impression of a tightly played double-tracked guitar part and can result in a very wide stereo image — not necessarily very 'natural', but this is not a major consideration in most pop music styles. The impression can be further enhanced by applying very slightly different EQ and compression settings to each track. As with any 'man-made' manipulation of the stereo image, however, it is always worth ensuring that the mix still works in mono.

Roomworks may not be the most sophisticated sounding reverb plug-in available, but some of the presets work well with acoustic guitar.Roomworks may not be the most sophisticated sounding reverb plug-in available, but some of the presets work well with acoustic guitar.

And Finally

Depending upon how closely miked the original recording was and the acoustics of the recording room, the final touch of magic might be some additional reverb. Unless the part is a slowly played solo guitar piece, less is definitely more when it comes to acoustic guitars. Roomworks offers a number of presets that can be adapted to work well enough in this role. For example, for a tighter, ambience-only sound, the 'Room Roomour' preset combines a short pre-delay and short decay, while a more spacious sound (without going over the top) is provided by the 'Plate Vintage' preset.

Given the various processing options discussed here, it is worth repeating the comment made earlier — start by making the most natural and faithful recording of your acoustic guitar performance that you possibly can. The processing options in SX can only achieve so much during mixing and you are much more likely to achieve the required result if you can gently chisel away at elements of a full, even recording. If you find you are trying to apply corrective processing to add something that isn't present in the original recording or remove something that shouldn't have been recorded in the first place, it is probably time to get the microphone out again and go for another take! 

Something Fishy

The excellent <em>Floorfish</em> expander/noise gate plug-in — it's free and not at all fishy!The excellent Floorfish expander/noise gate plug-in — it's free and not at all fishy!In the August 2001 'Recording Acoustic Guitar' article mentioned in the main text, Mike Senior describes how a gate or expander could be used to bring out the rhythmic element of a strummed acoustic guitar by letting the main attack portion of each strum through but then quickly 'ducking' the level of the sound between strums. The Auto Gate section of SX 's Dynamics plug-in doesn't really help with this effect (the gate is either fully open or fully closed). However, the Floorfish VST plug-in does offer this capability and is well worth checking out.

Floorfish is available free from DigitalFishPhones (www.digitalfishphones.com) within their 'Fish Fillets Channel Insert Package', a bundle that includes Blockfish (a decent compressor) and the wonderfully named Spitfish (a de-esser). And, no, I've no idea why the programmers are so obsessed with fish! 


Published October 2006

Wednesday, August 4, 2021

Q. When I mix in Cubase, my mixed-down songs do not sound as good in playback as they did before I saved them. Why?

 By Hugh Robjohns


Q. When I mix in Cubase, my mixed-down songs do not sound as good in playback as they did before I saved them. Why?

When I mix in Cubase, my mixed-down songs do not sound as good in playback as they did before I saved them. I listen before and after saving; in the same room with the same monitors; with the same quality conversion, and without any digital clipping on any busses. I usually mix 32 channels down to eight stems, and then into a stereo output buss.

Does analogue summing provide a more accurate representation of the multi-channel mix, an enhancement to the sound of the mix, or both? Can I get to the first option by simply capturing the pre-save monitor output with an accurate stereo A-D converter? And can most of the benefit of analogue summing be derived from creating stems in the DAW before saving, then routing just the stems out for analogue summing? Alternatively, can those benefits be gained by making all adjustments to channel levels in the software, and then running the software-adjusted signals through a summing device that makes no further gain adjustment? If so, are the gain controls on most analogue summing devices necessary?

Vince Daukus

Technical Editor Hugh Robjohns replies: Wow, that's a lot of questions to get through! Bear in mind that I'm not a Cubase expert, so I can only talk to you from the analogue summing perspective.

The first query, about an audible difference between a 'live' session and a replay from the saved file, is an interesting one. The audio components of a session in progress will typically be working within a 32-bit floating-point domain, whereas the output D-A will only accept a 16- or 24-bit fixed-point signal. So a conversion process is required which will involve some form of dithering. It is well known that some dithering algorithms have a more audible effect on some material than others — particularly where some kind of noise-shaping is involved. So it is possible that the differences you hear are the result of the conversion from the floating-point format to a truncated and dithered fixed-point one.

However, it is probably more likely that the differences you hear are due to the way you are monitoring the 24-bit mixed file. If you are using a different program to replay these files, that alone may explain the change — perhaps there is some kind of internal processing going on that has an audible effect. If you are monitoring through Cubase, it might be because the file is being transcoded back into a 32-bit floating point format within Cubase, and then converted yet again to 24-bit for the monitoring output. That kind of multiple conversion process is likely to result in a sonic degradation, no matter how subtle.

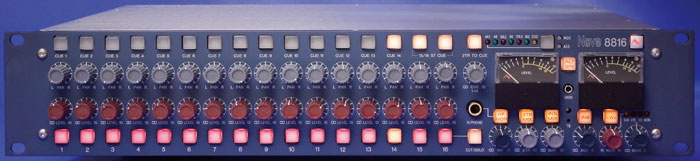
Moving on to analogue summing, I would say it generally sounds 'different' rather than 'better.' Analogue summing is inherently less technically accurate than digital summing (when performed correctly), but often those technical imperfections are musically and sonically attractive — in much the same way that the high levels of harmonic distortion created by some valve preamps are pleasing to the ear. So the answer to your question is: yes, in some circumstances analogue summing enhances the sound of a mix.

Rackmount summing mixers are a relatively new phenomenon. These two models have been reviewed in SOS recently; the Audient Sumo (above) in February 2006 and the AMS Neve 8816 in August 2006.Rackmount summing mixers are a relatively new phenomenon. These two models have been reviewed in SOS recently; the Audient Sumo (above) in February 2006 and the AMS Neve 8816 in August 2006.

One thing that analogue summing provides for free is mix headroom. A huge number of people 'mixing in the box' do so with very high peak levels on each source channel; typically well up above -6dBFS. This results in the mix-buss accumulator having to accommodate signals with sample values above 0dBFS and the master output fader has to be pulled down to compensate. Although this absence of mix headroom shouldn't be a problem in theory, it appears that some systems (and plug-ins) do have a problem with it, and a great many users have found that leaving more headroom on the source channels avoids the problem completely, producing far sweeter-sounding mixes as a result. The old analogue concept of having 20dB or so of headroom was arrived at for a very good reason and has stood the test of time. The concept translates perfectly to the digital world, with the same practical and sonic advantages.

You asked if you could capture the pre-save monitor output with an accurate stereo ADC. Well, yes, you could, but it won't improve anything on a technical level. The output from Cubase is transcoded internally from 32-bit floating point to 24-bit fixed-point samples. These are then passed to the digital output and in turn to the D-A converter that feeds your monitoring. Routing that analogue signal back through yet another A-D converter to get it back into the digital domain gains nothing at a technical level and is likely to degrade rather than enhance the signal. Of course, it is possible that you may like the sonic character imposed by that degradation, in the same way that people like valve preamps.

Next you asked if most of the benefit of analogue summing can be derived from first creating stems in the DAW before saving. The answer is a qualified yes. The advantages of mix headroom and the sonic colouration will be the same whether you mix individual channels or stems in an outboard analogue summing box. However, if the mixing of stems created within Cubase produced samples greater than 0dBFS, the quality loss resulting from a lack of mix headroom in the digital domain would remain.

Finally, you asked if most of the benefit of analogue summing could be derived by making all adjustments to channel levels in the software, and then running the software-adjusted signals through a summing device that makes no further gain adjustment? The answer here would be yes again, because by adjusting the level of source channels before mixing, the advantages of mix-headroom are preserved, and the mix may well sound better as a result.

The gain controls on those analogue summing devices that include them are there to allow the user to optimise the gain structure for whatever source equipment is being used. Some D-A converters operate with peak levels of +26dBu, while some only reach +12dBu, so an input gain trim to optimise the gain structure is both necessary and important if you can't determine the source input levels.


Published November 2006

Monday, August 2, 2021

Tempo & Timing

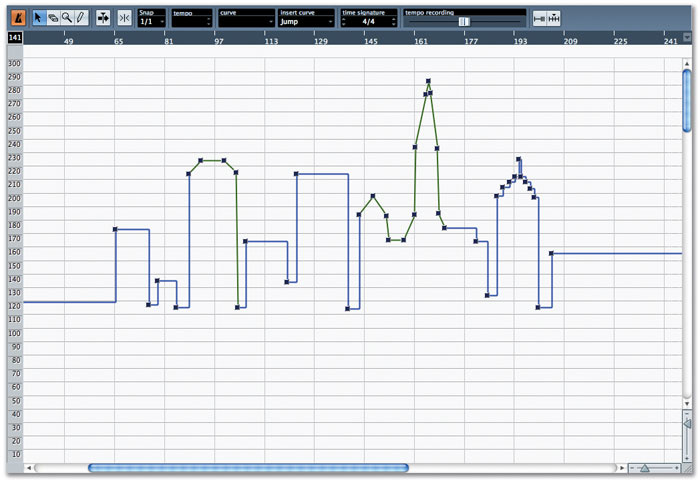
The Tempo Editor: since I spent that fortnight lost in the Nevada desert, I've noticed some curiously avant-garde developments in my compositions... :-)The Tempo Editor: since I spent that fortnight lost in the Nevada desert, I've noticed some curiously avant-garde developments in my compositions... :-)

Cubase 's Tempo Editor offers some powerful ways to manipulate tempo and time signatures in your Projects. This month we take a detailed look at these features.

It might be an interesting study to see how much music has been written with a fixed tempo of 120 bpm in four/four time over the years, just because this is the starting point presented to the user in almost every sequencer of the last 20 years. Fortunately, though, Cubase includes many powerful features for manipulating time in a Project, whether you need to implement structural changes, expressive changes, or you simply want to hit the right cut in a reel of video. In this month's Cubase Technique article we're going to be looking at the first two of these: how to work with tempo and time signatures for musical purposes in Cubase.

The Invisible Tracks

Every Cubase Project contains two tracks that are invisible on the Project window: the Tempo track and the Signature track. As the names suggest, the first is used to store Tempo Events that tell Cubase at what point in the Project to change the tempo, while the second is used to store Signature Events that define the overall time signature map of the Project. Both the Tempo and Signature tracks must contain at least one Event at the start of the Project, and, as I mentioned, Cubase creates a Tempo Event of 120 bpm on the Tempo track, and a four/four Signature Event on the Signature track by default.

The Master + Sync section of the transport panel (to the right of the main transport buttons) has a Tempo section in the middle that indicates the tempo and time signature in the Project at the current position of the Project Cursor. The Tempo Track button itself, as with the Click and Sync buttons, toggles whether the Tempo track is active or not — if the Tempo Track button is disabled, Cubase will ignore the Tempo track completely and use a fixed tempo for the whole Project. Indeed, if you toggle the Tempo Track button you'll notice that when it's active the word 'TRACK' appears next to the button, and when it's disabled the word 'FIXED' appears instead.

In order to set the fixed tempo, make sure the Tempo Track button is disabled, double-click the tempo, enter a new value and press Return. A fixed tempo can be useful in situations where you might want to rehearse a section of the Project, or if you want to record MIDI parts in at a fixed, slower tempo, rather than worry about playing to a click that might speed up and slow down as part of the expression of the piece.

One important point is that toggling the Tempo Track button has absolutely no effect on the Signature track, so any time signatures you've inserted will remain active.

Introducing The Tempo Editor

In order to add to and modify Tempo and Signature Events, you need to use the Tempo Editor, which can be opened by selecting Project / Tempo Track or pressing Control/Command+T. You can also open the Tempo Editor by Control/Command-clicking the Tempo Track button on the transport panel, in the same way that Control/Command-clicking the Click or Sync buttons opens the Metronome and Synchronisation Setup windows respectively.

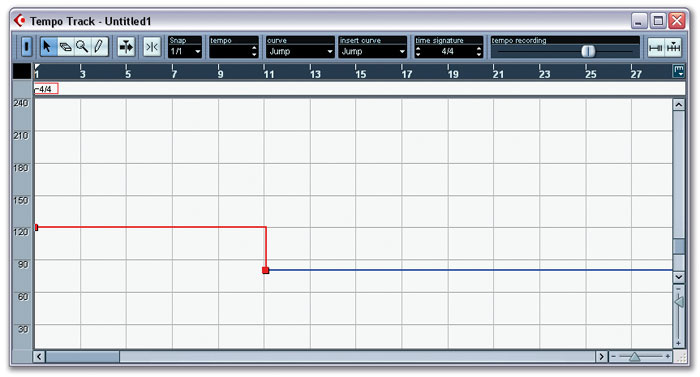
Selecting a Jump curve for a Tempo Event means that the tempo will instantly change to the tempo of the new Tempo Event at the specified position.Selecting a Jump curve for a Tempo Event means that the tempo will instantly change to the tempo of the new Tempo Event at the specified position.The Tempo Editor is functionally similar to the other graphical editors in Cubase, such as the Key Editor, and you'll notice that the main Event Display area is split into two parts: a Signature editor that runs along the top, just below the ruler, and a Tempo editor in the main part of the window. There's also a duplicate Activate Tempo Track button (from the transport panel) in the top-left of the window, to toggle the Tempo Track, just like the Activate Project button in the Project window.

Tempo Events are shown as dark blue squares in the Event Display, and you'll notice that a lighter blue line runs through the editor as a reference so you can always see what the current tempo is at any point in the Project. To adjust the starting tempo of the Project, simply drag the first Tempo Event in the editor, and since this is the first Tempo Event you'll only be able to drag it up and down (to affect the tempo) rather than left to right (to affect the time). All other Tempo Event markers can be dragged in either direction.

While you can zoom in and out to make more precise adjustments to the tempo, often it's easier to simply edit a Tempo Event numerically. With a Tempo Event selected (notice how Tempo Events turn red when selected), its value is shown in the 'tempo' field on the Tempo Editor's toolbar, and you can either double-click it to enter a numerical value, or use the arrows to the right of the value to increment or decrement by 1.0 bpm. You can also adjust the tempo of an Event by pressing the up and down cursor keys to increase or decrease the tempo in 0.1 bpm increments.

The Master Sync section of the transport panel shows the current tempo and time signature, and whether the Tempo track is active or not. If you can't see this section, right-click on the transport panel in an empty area and make sure Master Sync is checked.The Master Sync section of the transport panel shows the current tempo and time signature, and whether the Tempo track is active or not. If you can't see this section, right-click on the transport panel in an empty area and make sure Master Sync is checked.To add a new Tempo Event, simply click with the Draw tool (or Alt/Option-click with the Select tool) at the point in time you want the tempo change to occur — the vertical axis sets the actual tempo of the change. While you don't have to worry about being completely precise here (you can always edit the value later as described above), Cubase provides a couple of tools to help you out.

Firstly, at the top of the tempo scale, to the left of the ruler, is an indicator that shows you the current tempo position of the mouse in the Event Display. And secondly, the Tempo Editor has an independent Snap function that allows you to make sure you place the Tempo Event at the correct point in time. By default, this is set to one bar (1/1), but you can change the value from the snap pop-up menu in the Tempo Editor's toolbar. Annoyingly, it's not possible to adjust the time of the Tempo Event numerically, but you can do this in the Project Browser (see 'The New Mastertrack List Editor' box).

To delete a Tempo Event, select it with the Select tool and hit Backspace or Delete. Alternatively, you could use the Erase tool.

When you create a Tempo Event, you'll notice that the tempo immediately changes to the value of the Tempo Event at the point in time that you've specified. If you try creating a gradual tempo change (such as a ritardando or accelerando) with a series of Tempo Events, you'll notice it's pretty hard to produce a smooth result. For this reason, Cubase actually offers two types of curves for Tempo Events: Jump, the default curve where the tempo immediately 'jumps' to the new tempo at the position of the Event; and Ramp, where the tempo gradually changes from the position of the last Tempo Event to the value and position of the new Tempo Event.

You can tell Cubase to insert a Ramp curve instead of a Jump by setting the 'insert curve' pop-up menu on the Tempo Editor's toolbar to Ramp instead of Jump. Alternatively, to change the curve of an existing Tempo Event, click on the blue line between the Tempo Event you want to change and the previous Tempo Event so that it turns red, and select Ramp from the 'curve' pop-up menu on the Tempo Editor's toolbar.

Express Yourself (Hey, Hey, Hey, Hey...)

One particularly nice feature in the Tempo Editor is the Tempo Recording fader on the toolbar. When the transport is running (which is to say you're either playing or recording in the Project), dragging the tempo recording fader will create new Tempo Events that speed up or slow down the tempo of the Project as you drag. If you drag to the right the tempo gets faster, and if you drag to the left it gets slower. To make finer adjustments as you move the fader, hold down the Shift key before dragging it.

The Tempo Recording fader in the Tempo Editor allows you to record tempo changes with the mouse while the Project is playing back -- sadly there seems to be no way to assign this fader to a physical fader on a control surface.The Tempo Recording fader in the Tempo Editor allows you to record tempo changes with the mouse while the Project is playing back -- sadly there seems to be no way to assign this fader to a physical fader on a control surface.

As you can imagine, using the tempo recording fader is a great way to add rubato (subtle changes in speed that a performer might impose on the music) to your Project's performance, and can be handy when working to video to add a more musical feel, as it's almost like 'conducting' the sequencer.

Signatures

Creating and modifying time signatures as Signature Events is pretty similar to working with Tempo Events. To modify a Signature Event, such as the first one in the Project, select it with the Select tool so that a red outline appears around it, and now you can edit the Signature Event in the 'time signature' field on the Tempo Editor's toolbar. You can increment and decrement the numerator by clicking the arrows to the left of the signature, or adjust the denominator with the arrows to right. Alternatively, you can simply double-click the signature, enter a new value, and press Return.

Selecting a Ramp curve for a Tempo Event causes the tempo change to occur gradually from the previous Tempo Event.Selecting a Ramp curve for a Tempo Event causes the tempo change to occur gradually from the previous Tempo Event.You can create a new Signature Event by clicking the Signature Event Display (under the Ruler) with the Draw tool (or Alt/Option-clicking with the Select tool), or you can simply double-click with the Select tool. Since time signatures can obviously only occur at the start of a bar, you don't have to worry about snap values here as Cubase always adds the Signature Event to the nearest bar where you click. If you need to adjust the position later, you can simply drag the Event with the mouse (or edit it numerically in the Project Browser — see the box below). To delete a Signature Event, simply select it with the Select tool and press Backspace or Delete, or use the Erase tool.

You can also use the Tempo area of the transport panel to create and modify Signature Events (but not, unfortunately, Tempo Events). For example, say you want to change the Signature at the start of the Project to five/four. Make sure the Project Cursor is at the start of the Project, double-click on the numerical signature value on the Transport Panel, enter five/four, and press Return. When you make an adjustment to the current signature and there isn't a Signature Event already existing at the position of the Project Cursor, Cubase will simply create a new Signature Event with the value you specified at the position of the Project Cursor.

Copy, Paste, Import, Export

As with most editors in Cubase, it's possible to select and make operations to either multiple Tempo or multiple Signature Events simultaneously; but you can't select Tempo and Signature Events together and apply the same operation to both. For Tempo Events, you can select many Events at once and delete or move together, whereas with Signature Events you can only delete multiple events — each Signature Event needs to be moved individually.

Unlike some operations in Cubase, you can't Alt/Option-drag Tempo or Signature Events to make new copies, although fortunately that doesn't mean you can't copy one or many Events in the Tempo Editor. Instead you have to use Cubase 's clipboard commands, so if you want to copy a section of Tempo Events, for example, simply select the appropriate Events, press Control/Command-C (or select 'Edit / Copy'), set the Project Cursor to the position where you want to copy the first event to, and press Control/Command-V (or select 'Edit / Paste'). This method works for both Signature and Tempo Events, but you have to copy and paste each type of Event in separate operations.

When you want to import and export Tempo tracks (including signatures between different Projects), Cubase provides handy Tempo track import and export commands from the File menu ('File / Import / Tempo Track' and 'File / Export / Tempo track'). One useful purpose for doing this could also be to make copies (or backups) of an existing Tempo track before you want to try something clever, because while there are always multiple undos in Cubase, if you perform major surgery on the Tempo track only to change your mind a week later, it's quite convenient to reload an older Tempo track via these commands.

One thing to note with the Import Tempo Track command is that it completely replaces the existing Tempo track with the one you're importing — it's not possible to import a new Tempo track to the position of the Project Cursor, for example. This means that if you're making a Project that's a composite of many other Projects, you'll need to assemble a master Tempo track by copying and pasting (as described above) from the various different Projects.

That's all we've got space for, but join us next month for more Cubase-type fun 

The New Mastertrack List Editor

Tempo and Signature Events can be edited numerically in the Project Browser by selecting either the Tempo or Signature track in the Project Structure.Tempo and Signature Events can be edited numerically in the Project Browser by selecting either the Tempo or Signature track in the Project Structure.Long time Cubase users will remember that back in the days of VST there used to be both a graphical and list-based editor for tempo and time signatures. While Cubase SX/SL doesn't have a dedicated list-based tempo/signature editor, it is possible to use the Project Browser for this purpose. If you open the Project Browser (by selecting 'Project / Browser' or pressing Control/Command-B), you'll notice entries for Tempo track and Signature track at the bottom of the Project Structure list, in the left-hand side of the Browser.

By selecting either the Tempo or Signature track in the Project Structure list, you can edit the appropriate Events in the main part of the browser. With Tempo Events, this provides a way of editing both the position and tempo of a Tempo Event numerically by clicking on the value you want to adjust, entering a new value, and pressing Return. The only parameter of a Tempo Event you can't adjust from the Project Browser is whether it uses a Jump or a Ramp curve.

You can edit both the position and value of Signature Events in the same way by displaying the Signature track in the Project Browser, and this is also quite a useful way of seeing an overview of your time signatures on one page, since reading the list of signatures along the ruler in the Tempo Editor is sometimes less intuitive. 


Published November 2006