Welcome to No Limit Sound Productions

Company Founded
2005
Overview

Our services include Sound Engineering, Audio Post-Production, System Upgrades and Equipment Consulting.
Mission
Our mission is to provide excellent quality and service to our customers. We do customized service.

Monday, June 8, 2020

Cubase MultiTap Delay Tricks

By John Walden
A little bit of creative MultiTap Delay can turn even the most basic of drum patterns into something groovy.A little bit of creative MultiTap Delay can turn even the most basic of drum patterns into something groovy.
Looking for creative inspiration? Tap into Cubase's new MultiTap Delay...
Steinberg have seriously improved Cubase's stock plug-in collection in recent years, and among the new options for Pro and Artist users in v10.5 is the modestly named MultiTap Delay. It offers emulations of both modern and vintage delays, up to eight taps (repeats), and very flexible configuration and modulation options. I'll provide a very brief overview of the key features before illustrating some options via a specific example: spicing up a drum part to generate new rhythmic ideas.

MultiTap Delay's GUI is split into three sections. The central portion, with larger knobs and graphic display, is where you configure the number of taps, their relative timing, level and pan, feedback, and other settings that fine-tune the balance between the original and processed signals. Above this, in the Character Panel, you choose between four styles of delay (Digital Modern, Digital Vintage, Tape and Crazy) or pop open the full panel for more detailed adjustments to 'colour' the broad sonic character of the repeats. The options range from pristine, through lo-fi vintage/tape effects, to special effects territory. The bottom strip contains three more pop-open panels (Loop, Tap and Post) which focus on additional effects that can be applied to your delay line. Each provides a six-slot effects chain and there are 14 different effect types available. The three panels differ in terms of where their processing occurs in the signal path, with effects placeable in the effects loop, on individual taps or at the plug-in's main output. The effects include various modulation choices, filtering, pitch-shifting, panning, reverb and, as if eight taps with feedback weren't enough, an additional delay.

Fun With A Drum

For all the potential trickery, this is also a really good, all-purpose, delay plug-in — but its more creative aspects make it stand out from the crowd. So let me take you through a fun exercise with a drum sound.
Our starting point is a simple four-bar Groove Agent acoustic tom pattern, with an instance of MultiTap Delay inserted on the GA Instrument Track. You could use the delay as a send effect, but for the automation options described below the Insert route is easier to configure, so I've done that here and set the delay plug-in's Mix control to 40 percent. I chose the Tape Character preset and tweaked the settings from there (more Saturation and picking the half-sample-rate setting), and added a touch of Overdrive in the Loop Effects panel for extra crunch. This combination means that, as well as adding rhythmic interest, MultiTap Delay will vary the sonic texture with each repeat.

While I've only used a touch of overdrive in my example, MultiTap Delay's effects options provide plenty of interesting possibilities.While I've only used a touch of overdrive in my example, MultiTap Delay's effects options provide plenty of interesting possibilities.
In the main panel, I've configured three taps with slightly decreasing volumes, and adjusted the Feedback to taste (30 percent) so the pattern of repeats is fed back to the delay line but (in this case) at a relatively low level. You can manually edit the position, level and pan of each tap or, via the Tap Rhythm button, position the taps by playing the rhythm that you require. Tap positions can be snapped to a grid resolution or moved without a grid. You also have Quantize and Randomise options (the latter is fun for a 'lucky dip' approach!). However, the key thing to understand is that the Delay setting determines the length of the tap grid. In this example, I've engaged the Sync option and set Delay to 1/1, so the tap grid represents one bar of time. A Decay setting of 2/1 makes the tap grid two bars in length, gives half a bar, and so on. Once you've grasped this, the logic behind laying out a pattern of taps becomes clear. (Without Sync engaged, Delay is set in milliseconds, but the same principle applies.)

Finally, I've engaged the clever Ducker controls — the repeats are ducked (in this case, their volume is lowered by 50 percent) whenever there's a signal at the input to the plug-in. This can be used to duck both the feedback and the delay line, and ensures that your original sound doesn't get masked by the repeats.
For all the potential trickery, this is also a really good, all-purpose, delay plug-in — but its more creative aspects make it stand out from the crowd.

Tap Tweaker

As the audio examples at the end of this article show, we now have something more rhythmically interesting than our original drum pattern. Depending on the musical context this might be all you require, but if you're looking for more complexity, or to add variations during the performance, we can do plenty more.
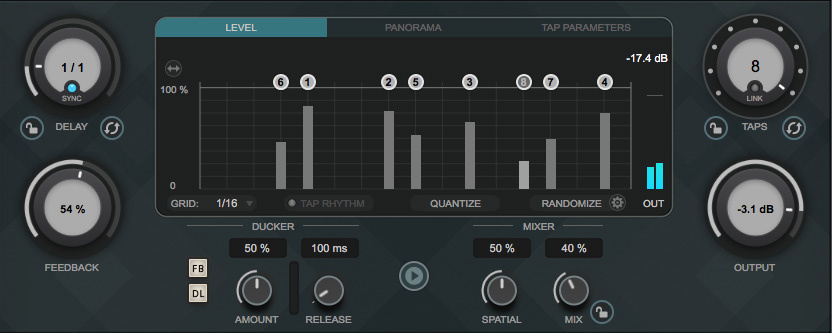
As you adjust the Taps control, your additional taps do not have to appear sequentially along the grid timeline.As you adjust the Taps control, your additional taps do not have to appear sequentially along the grid timeline.
Effects aside, the two simplest tactics are (a) to add more taps and (b) to adjust the Feedback level. As it's super-easy to assign both the Taps and Feedback controls to the Track Quick Control system (right-click on the control to access the pop-up menu), automating both is a great way to change the intensity of the delay processing on the fly. Adjusting the Feedback level is straightforward, but for the Taps control you'll need to pre-configure each additional tap (position, level, pan, etc). It's worth noting that while you're allowed up to eight taps, and each is assigned a number, their position along the grid's timeline doesn't have to be numerically sequential — tap 7 can be positioned before tap 3, for example — so, as you automate the Taps control, you can add repeats with shorter or longer delays, as you prefer.

Double Delay

Again, if you check out the audio examples, you should hear that our very basic drum pattern has been transformed into something much more interesting, and it's possible to vary the intensity of the 'performance' with some simple automation moves. But you don't have to stop there. Why not add a second instance of MultiTap Delay, so you have a second set of eight taps to exploit in your quest for rhythmic variation?

MultiTap Delay's parameters can easily be automated via the Track Quick Control system.MultiTap Delay's parameters can easily be automated via the Track Quick Control system.
At this point, whether you use Insert (as here) or Send effects makes more of a difference. With Inserts, the repeats created by the first instance of MultiTap Delay become the inputs to the second instance and are then subject to processing; things can get quite busy very quickly! However, if you use two Send-based instances of MultiTap Delay, they're independent of each other; both are fed directly by your source track. On the flip side, real-time automation of your two MultiTap Delay instances is much easier when both are used as Inserts on the same track; you can use one set of Track Quick Controls to change the settings for both plug-ins. Real-time control is trickier to do with two independent Send effects.

Anyway, as a starting point for this 'double delay' effect (heard in the final audio example), I've configured two instances of MultiTap Delay as Inserts on my Groove Agent track, using the same simple drum part. To make this easy to replicate, on the first instance I selected the Alt Beat Counterpart preset, while on the second I used Snare Trap Groover. I then set the Feedback, Taps and Mix controls for both instances as Track Quick Controls. The Feedback and Taps controls can be used as before (although lower settings, especially of the Feedback controls, are best unless you want things to get really trippy). However, the two Mix controls are well worth playing with, as they allow you to blend the two delay lines or, by turning either Mix control to zero, effectively remove the delay processing of one plug-in or the other.

I've only really scratched the surface of what's possible with MultiTap Delay and, bar a little overdrive, not even started on the creative options provided by the various effect panels. Perhaps I'll explore that side of things in more depth another time!

Published May 2020

Friday, June 5, 2020

Podcast Dialogue Editing In Cubase

By John Walden
The Channel Strip's audio-sweetening tools are as good for dialogue as they are for music.The Channel Strip's audio-sweetening tools are as good for dialogue as they are for music.
Reduce the time you spend on podcasting post-production, with these Cubase voice-editing tips.
Some podcasters are happy simply to record their dialogue in a single take, top and tail it with their standard channel intro and outro, and publish, warts and all. But most — while still usually recording an episode in a single take — will perform in a way that allows obvious gaffes, over-long pauses, ums and errs, to be edited out later. Knowing that mistakes can be edited can mean a more relaxed attitude when recording and, for example, allow you to take a deep breath and start again if you fluff your lines. But equally, anticipation of an extended period of detailed editing could deter you from creating a podcast in the first place! So it's important to strike the right balance.
Thankfully, a little once-only work to organise things in Cubase can streamline many repetitive editing tasks — and have you transforming your raw takes into polished 'performances' in no time.

Podcasting Presets

Let's consider a typical situation where the dialogue has been recorded as a single take to a Cubase audio track. Everything you need to do to lick this performance into shape falls into two broad categories: you'll no doubt want to 'sweeten' and 'clean' the audio a touch, using EQ and compression; and you'll need to edit the recording to create a better-paced, more polished-sounding performance.
There are plenty of suitable third-party compressor and EQ plug‑ins, but in the vast majority of cases the Cubase Channel Strip has more than enough firepower. If you record your content using a consistent equipment/location setup, it's worth spending time up front figuring out some EQ, de-essing and compression settings, and creating a Track Preset based on them, for rapid...


Published June 2020

Wednesday, June 3, 2020

Ableton: Spicing Up MIDI Drum Parts

By Len Sasso
Live has a few tricks up its sleeve to add variety to your drum patterns.
Adding variation and interest to MIDI drum parts has been taxing programmers for as long as it’s been possible to program drums. Fortunately, Live has a number of tricks to help you out... Perhaps the easiest way to add variety is to occasionally suppress some of the hits for a particular kit piece. The simplest way to do this is to use Live’s Session view Follow Actions to change the clip playing that kit piece. I’ll start there and then move on to explore AutoBeat, a Max For Live sequencer designed specifically for generating drum patterns with randomised triggering. With either method, you’ll usually need to do some editing to the resulting parts for them to make musical sense.

Variations On A Theme

Screen 1: Follow Actions trigger clips that alternate between basic and push‑beat patterns on the kick and ride tracks. The ‘Grab’ clips capture eight‑bar loops for manual editing.Screen 1: Follow Actions trigger clips that alternate between basic and push‑beat patterns on the kick and ride tracks. The ‘Grab’ clips capture eight‑bar loops for manual editing.Screen 1 shows one way to generate kick and ride eight‑bar drum loops with push beats (accents before quarter‑note hits). Separate MIDI tracks for the kick and ride clips are routed to the drum kit track. The top kick clip has hits on the first and third beats and the two clips below it add a push beat before one of those hits. Using two Follow Actions for the top clip allows you to use the numerical values below the Follow Action drop‑downs to set the probability of a repeat versus a different clip — higher numbers raise the probability. The push‑beat clips always play once and then return to the top clip. Each of the ride clips has a hit on the second and fourth beat, the two middle clips add a push beat before one of those, and the bottom clip adds a push beat before each.

The Follow Actions cause the top clip to play three times followed by one of the other clips playing once. The clips labelled ‘Grab’ on the drum track are eight‑bar recordings resulting from these Follow Actions. Those clips are expanded at the top of Screen 1 to reveal the different push‑beat patterns that result. Recording the results each time is the only way to ensure you capture the good takes, and they also give you something to edit.

The next part of the process is to add other drum parts, and one way to do this is to start with other MIDI drum clips in your library and strip out their kick and ride parts. Play those clips on a separate track routed to the drum kit. You can edit the added parts along with the grabbed clips using Live 10’s Multi‑Clip editing feature — for the details see SOS April 2018Live column.

AutoBeat

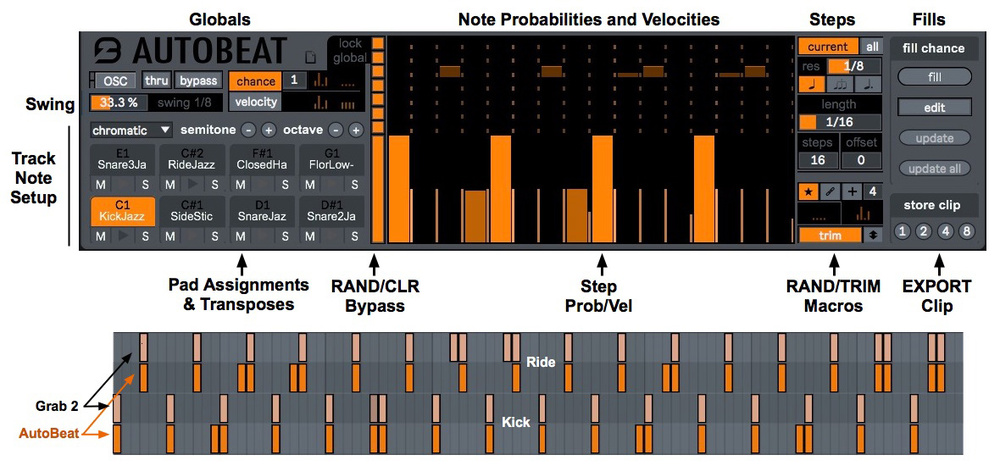
K‑Devices’ Max For Live probability‑based pattern generator AutoBeat ($39) makes fast work of including random elements in your drum patterns, and it generates editable MIDI clips at the click of a button. Screen 2 shows an annotated version of AutoBeat’s control panel along with a comparison of the ‘Grab 2’ clip from Screen 1 and a similar eight‑bar clip generated by AutoBeat.

Before getting into AutoBeat details, have a look at the occasional push beats for each kit piece in the eight‑bar examples. Their placement will change with each pass. In Grab 2 their occurrence depends on the Follow Actions, whereas in the AutoBeat clips it is the result of the probability of triggering the push beats — the shorter and darker notes in the AutoBeat display. In both examples the earlier notes are ‘swung’ a bit to the right of the preceding eighth‑note. In the Follow Actions example that’s where the notes were placed in the source clips. In the AutoBeat example it reflects the Swing setting (a third of an eighth‑note).
Screen 2: AutoBeat offers detailed control over eight‑track drum sequencing. The clip at the bottom compares AutoBeat‑style randomisation with the clip method from Screen 1.Screen 2: AutoBeat offers detailed control over eight‑track drum sequencing. The clip at the bottom compares AutoBeat‑style randomisation with the clip method from Screen 1.
AutoBeat’s interface is crammed full of controls, but it is fairly straightforward. The display in the middle shows AutoBeat’s eight tracks with the track being edited taking up about half of the display. Both the Chance and Velocity edit modes use bars: the velocity bars have their usual meaning, and the chance bars determine the probability that the note will be played — full‑up is always and no bar is never. The kick‑drum track shown in Screen 2 spans two bars of eighth‑notes with hits on beats one and three of each bar. There are also 50‑percent‑chance hits before beat three of bar one and beat one of bar two. Five rows above that are the ride‑cymbal hits on beats two and four with 50‑percent‑chance hits before the last two of those. The rendered clip reflects those settings contrasted with the Grab 2 clip from Screen 1.

You set up AutoBeat with the controls to the left of the track display. In the bottom half you set the note for each track, and the name will include the associated kit piece when AutoBeat is followed by a Drum Rack. Just above the pads you can specify a scale, which is handy for using AutoBeat with pitched instruments. You can also transpose all the pads at once in semitones or octaves. Above the pads you’ll find global settings such as OSC input/output ports, swing amount, MIDI thru, AutoBeat bypass and global randomisation. You can exclude tracks from global randomisation by clicking the orange buttons to the left of the track display (they turn grey). The numerical box next to the Chance button sets how many events will be generated on each track. Next to that, the buttons with multi‑level orange bars generate the events, and the buttons to their right clear the chance bars or reset the velocity bars to 64.

You set track and note parameters using the first panel to the right of the track display. Use the Current button to make settings for the focussed track and use the All button to change all tracks’ settings. You can set note resolution from 32nd notes to whole notes and alter that to normal, triplet or dotted notes. Each track gets its own note length (again, mostly useful for pitched instruments). A track can have up to 16 steps, and with fewer than 16, you can offset track playback. Near the bottom you’ll find three buttons for randomising track Chance and Velocity bars: ‘*’ mode generates the specified number of bars with random values, ‘/’ mode simply randomises the values of the existing bars and ‘+’ mode adds bars to the track. Below these you’ll find a scroll button (up/down arrows) with a mode switch to its left. Trim mode moves all bars up and down and Continued mode also rolls bars over at the top and bottom.
Screen 3: Three setups for taking AutoBeat a little bit outside the box.Screen 3: Three setups for taking AutoBeat a little bit outside the box.

AutoBeat’s ‘fill chance’ panel is for generating fill patterns to alternate with the main pattern. Click‑hold the Fill button to play the fill and drag away while holding to keep it playing when you release the mouse. (You can automate this button.) The Edit button lets you edit the Fill parts. Update transfers the current track’s settings to the Fill track and Update All does so for all tracks. Finally, the Store Clip buttons at the bottom generate MIDI clips of the indicated number of bars from either the Fill or main pattern. The new clip is always placed in the track’s first empty clip slot in Session view, and new Scenes are created if there are no empty slots.

Try This

Here are three ideas to try with AutoBeat:
  • After creating a few patterns, such as the kick and ride in Screen 2, try out AutoBeat’s Random Fill options on some or all of the remaining tracks. For example, use the Exclude buttons to exclude all but the tom tracks and then use the Global and single‑track Chance randomisers with a one‑ or two‑note limit to generate tom tracks (Screen 3 top).
  • Use AutoBeat with tuned percussion such as Live’s AAS Collision instrument. Start by creating or choosing a scale and setting all track resolutions to a quarter‑note. Set AutoBeat’s tracks to different lengths and place a single note on each track (Screen 3 middle). Because of the evolving relative playback positions, you may want to record AutoBeat’s output in long sequences rather than using the Store button. In this example, 36 bars brings all tracks back to the first beat.
  • In addition to setting the chance of a hit occurring within AutoBeat, you can use Live’s Random MIDI effect to switch between two or more kit pieces (Screen 3 bottom). Create a two‑chain MIDI Effect Rack and set its Key Zones so that one chain receives AutoBeat’s highest‑pitched pad and the other chain receives all other pads. Insert Random in the single‑note chain, set Scale and Choices to 1 and set Chance to 50 percent. In your Drum Rack, place the kit pieces you want to alternate (a pair of congas, for example) on consecutive pads starting at the pitch being sent to the Random effect. AutoBeat’s top track will now randomly switch between these kit pieces.


Published October 2018

Monday, June 1, 2020

Echo In Ableton Live

By Len Sasso
Screen 1: Echo’s default settings are shown at the top with four variations below.Screen 1: Echo’s default settings are shown at the top with four variations below.
We delve into Live’s sophisticated new audio delay effect, Echo.
Echo, Live’s newest and most sophisticated audio delay effect, opens the door to sound design possibilities beyond the reach of Live’s other delays. And owing to the advanced graphics in its user interface, Echo is also one of the easiest to use. For coverage of Live’s other delay‑based effects check out the December 2010, January 2012, March 2014 and May 2017 SOS Live columns.

Early Reflections

Echo’s control panel is split into three sections. On the left you’ll find typical delay settings along with a couple of less obvious options. On the right is an output section that also offers reverb and the choice of stereo, ping‑pong or mid/sides processing modes. The large graphic display in the centre has three tabs: Echo, Modulation and Character. You can click‑drag the graphics in the Echo and Modulation sections and also edit them using the knobs and numerical displays. The small white dots in the Echo tab’s graphic always represent eighth notes, and the semicircles in the display indicate echoes in the left and right channels.

To get started, insert Echo on an audio track and place a short, non‑looping, single‑event audio clip in a clip slot on that track. If you start with the default Echo settings (the settings you get when you insert the audio effect rather than one of its presets), you’ll hear echoes a dotted‑eighth‑note apart that slowly die out owing to the left panel’s rate and feedback settings. The yellow button between the Left and Right rate knobs links their settings — changing either knob or the two settings below the knob affects both channels.

The drop‑down showing ‘Dotted’ has four note‑value options: ‘Note’ (the note value displayed beneath the knob), ‘Dotted’ (1.5 times that value), ‘Triplet’ (2/3rds of that value), and ‘16th’ (the number of 16th notes shown beneath the knob). You use the numerical below that drop‑down to create an offset of as much as 33 percent above or below the time setting. The Offset settings are never linked and are reflected in the centre graphic. The Input and Feedback knobs at the bottom work as usual. The ‘D’ button between them determines whether the Dry portion of the output is affected by the Input setting and the ‘Ø’ button inverts the phase of the feedback signal. Finally, notice that you can click‑drag in the Echo graphic to change the knob values in both linked and unlinked mode. When unlinked, dragging in either side of the graphic affects only that side’s settings.

On the right panel, the Stereo, Output and Dry/Wet knobs work as expected. (The Stereo knob has the same function as the Width knob on Live’s Utility effect — it performs a mid/sides volume scaling of the sides channel relative to the mid channel.) The Reverb knob adds reverb at the point in the signal path (Pre, Post or Feedback) selected on the drop‑down menu below the knob. At the bottom of the panel, you select from three processing modes. In Mid/Side mode, the left and right time knobs set the delay for the mid and sides signals.

Screen 2: Four Echo effects process the tracks shown above their panels. Stars indicate modifications to Echo’s default settings.Screen 2: Four Echo effects process the tracks shown above their panels. Stars indicate modifications to Echo’s default settings.

Taming The Beast

Heavy delay gets old fast, but Echo provides a variety of tools for creating subtle modifications to your tracks. In Screen 2, I’ve placed four short clips (8NVG Bass, Drums, Pad and Synth from Live’s Vinyl Classics Pack) on separate tracks and inserted an Echo effect on each track. The clip being processed together with Echo Device‑On automation is shown directly above the Echo panel. Changes to each Echo’s default settings are indicated by gold stars in Screen 2. In all instances, the input is boosted by 3dB and the Clip Dry (‘D’) button is activated.

  • Bass: The Bass track uses Ping Pong mode with no feedback and a 35‑percent Dry/Wet mix. The trick here is to use Ducking with a moderate threshold to subdue the bass echoes. You do that on the Character tab shown on the right.
  • Drum: The drum track uses Echo’s Mid/Side mode with a fast Side time of 24ms to add a little flanging to the drum hits. Use the Side time and Stereo knob to adjust the amount of flanging. Echo’s filter is set for a small, high‑frequency boost, and a 100‑percent Dry/Wet mix is used. Because the two bars of the drum loop are nearly identical, the Mid setting of one bar overpowers most of the echoes after the first bar.
  • Synth: The synth track uses a vocal‑like synth patch to which Echo adds faint, re‑pitched echoes. Echo’s filter reduces the high end. The Modulation tab applies different, random pitch shifts to each side by modulating the delay times. Click the ‘x4’ button on that tab to expand the pitch range.
  • Pad: The Pad track applies an eighth‑note‑triplet echo with no feedback and opposing offsets to the right and left sides. The Filter passes only a high band and its frequency is modulated by a sine LFO with its left and right channels offset. Adjust the Modulation tab’s Filter Mod setting to refine the effect.

Echo First

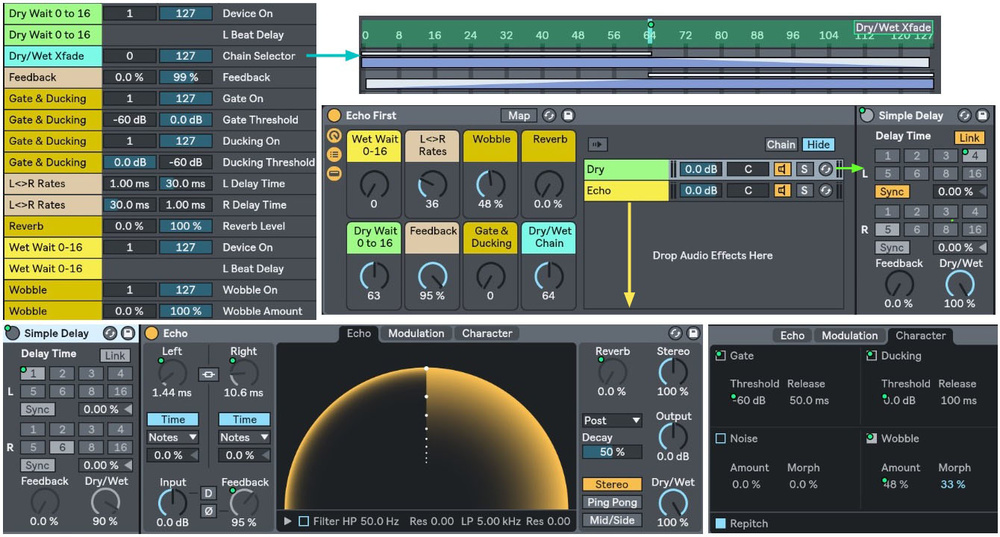
Echoes, of course, happen after the fact, but there’s no reason you have to stick to that. The Echo First two‑chain Instrument Rack in Screen 3 is one way to control the relative timing of the source and echo. Both chains hold a Simple Delay with its two channels linked and set for 100‑percent wet output with no feedback. The Dry/Wet Chain Macro knob (bottom‑right) uses the Rack’s Chain Selector to crossfade between the chains. The two Macro knobs on the left side control each Simple Delay’s Delay Time in 16th‑note steps. When full‑left, the Simple Delay device is turned off. The second chain, labelled ‘Echo,’ has Echo inserted after the Simple Delay. The remaining Macro knobs control various Echo settings.

Screen 3: This two‑chain Rack features a Simple Delay effect in each chain to offset the pre‑ and post‑Echo signals. The Macro knob assignments are shown at top‑left.Screen 3: This two‑chain Rack features a Simple Delay effect in each chain to offset the pre‑ and post‑Echo signals. The Macro knob assignments are shown at top‑left.
This setup works well with almost any Echo preset. In Screen 3 I’ve used unlinked, very short delays for a flanger‑like sound that works especially well with percussion and short sound effects as a source — try it with your favourite Drum Rack. The ‘L<>R Rates’ Macro knob controls the delay times with inverted ranges: 1.0 to 30.0 ms versus 30.0 to 1.0 ms. The ‘Feedback’ Macro knob restricts Echo’s feedback range to 0.0 to 99 percent to avoid runaway feedback. The remaining three Macro knobs control Wobble, Reverb and Echo’s Gate and Ducking thresholds. Raising the ‘Gate & Ducking’ knob reduces the level and likelihood of echoing. Wobble is random modulation of the delay times. Also experiment with the Delay Mod settings in the Modulation section, and be sure to try both normal and x4 modes.
Here are a few ways you might use this Echo Rack:

  • Start with a one‑bar audio or MIDI clip, double the size of the clip and leave the second half blank. Now set the ‘Dry Wait’ Macro knob to 0 and the ‘Wet Wait’ Macro knob to 16 (or vice versa) and playback will alternate between the dry and wet versions.
  • Use clip modulation or track automation for the Rack’s Macro knobs.
  • Use Echo’s Hot‑Swap button to try other Echo presets in the Rack. The settings for controls mapped to Macro knobs will not be imported, so I recommend deleting all but the ‘Wet Wait’, ‘Dry Wait’ and ‘Dry/Wet Chain’ Macro knob assignments. You might also want to reassign one of the unused knobs to Echo’s Dry/Wet control and set it to 100 percent. This will preserve the wait times and Dry/Wet Chain setting, and all the imported presets will play 100‑percent wet.
  • Use Max For Live Audio effects modulators to automate Echo controls and Rack Macro knobs. The Core Library Pack contains three of these in its Devices folder: LFO, Shaper and Envelope Follower. You should place Envelope Follower between Simple Delay and Echo in the Echo chain of the Echo First Rack so that the envelope follows the signal feeding Echo. Try it mapped to Noise Amount in Echo’s Character tab or Echo’s Reverb knob with an inverted range of minimum 50 percent to maximum 0 percent. Use Envelope Follower’s Rise, Fall and Gain settings to tweak the results. You can place LFO and Shaper anywhere in the audio signal path. Try using Shaper to modulate the Echo First Rack’s ‘L<>R Rates’ knob and LFO to modulate Shaper’s Offset numerical.


Published November 2018