Welcome to No Limit Sound Productions

Company Founded
2005
Overview

Our services include Sound Engineering, Audio Post-Production, System Upgrades and Equipment Consulting.
Mission
Our mission is to provide excellent quality and service to our customers. We do customized service.

Saturday, November 5, 2016

Q. How can I make the most of a small studio space?

By Tom Flint
When space is limited, you need to think carefully about how to lay out your studio.When space is limited, you need to think carefully about how to lay out your studio.

I'm just about to set up a studio in a room of my house and I was wondering if you have any tips on where to put everything. I have quite a few keyboards, sound and effects modules, guitars and a computer workstation, and I also record vocals, so I need to provide for all those things. The room I have is quite small and I know it'll never be perfect in terms of acoustics, but can you offer any advice on general layout?

Tony Mendelle

SOS contributor Tom Flint replies: If your workspace doesn't feel right, you'll probably find it difficult to commit yourself to doing any work. Get it right, on the other hand, and hopefully inspirational recordings will follow!

The way I see it, a typical home studio has three important spots where most of the activity takes place, which we'll call the engineering seat, the performance seat and the listening seat, and it's a good idea to start by thinking about where these might be best situated. The engineering seat is where you'll be when working at a computer, hardware multitracker or stand-alone sequencer. This is where the majority of editing, mixing and programming takes place, and is therefore somewhere you are likely to be for long periods of time. The performance seat is the place where music is created and played, perhaps using a workstation keyboard, a guitar or a simple MIDI controller. It can even be the same place as the engineer's seat if you use a desk with a sliding keyboard shelf. The last significant spot is the listening seat. Even the smallest studio needs one, in my opinion. It is where you can relax with a cup of tea, listen to your music and ponder. Without one, your studio will merely be a place of work and you'll be tempted to leave it whenever you feel jaded. Naturally, this position should be angled towards the studio's speakers, but you won't be doing any really critical listening from here so you needn't worry too much.

For efficient working you'll want to have the most frequently used bits of kit within reach from the key working positions. If, for example, you are using hardware multi-effects processors patched into the send/return loop of a workstation, you'll want to be able to easily reach the effects parameter controls during mixing. Many pro studios tend to have racks of gear under the desk, but I avoid this arrangement at all cost. If, like me, you find touching your toes a struggle, you'll be much more comfortable having everything up at eye level. Not only does this leave leg room below, it also makes the programming of effects units or rack synths a more appealing prospect, allowing you to get the most from your equipment without having to move from your playing or mixing position. The space under the desk need not be wasted though. I use mine to store boxes and unused bits of kit, and it is also home to my two guitar amps, which I don't need daily.

If you are recording your own vocals and use hardware preamps, it is also vitally important to have them close to hand when standing near the mic, so that adjustments can be made while singing. In my setup, for example, I have a 10U rack of gear seated on top of my desk so that all my effects and preamps are between three and five feet high, which is ideal for checking settings and making adjustments. If the preamps are feeding a multitracker or computer workstation, it is also useful to be able to see the input meters on the display screen from the vocal position, at least while levels are being established. Once again, if everything is to hand, excessive levels can be curbed by simply reaching for the preamp output level control. It's often possible to use footpedals to remotely adjust transport controls when performing, but it is well worth arranging things so that recording devices can be manually operated too.
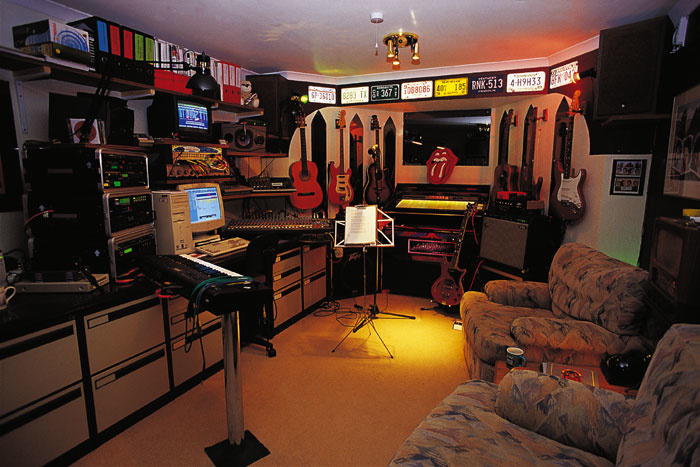
A comfy chair or two can make your studio a much nicer place to be. 
A comfy chair or two can make your studio a much nicer place to be.

Having the right desk surface can make all the difference, and often the most effective option is to build your own so that it fits the room, your equipment and your own physical stature. I built my desktop at a height that allows me to comfortably play my master keyboard either when I'm standing up or when seated on a stool. In fact, I have everything, including my multitracker, placed on the same desk so that it can be operated from both positions. You'll save money by building your own desk, too. My desk, which is nine feet long and two feet deep, has a frame built from thick planed pine and an MDF top, and it probably cost less than £40 in materials.

Putting up some shelves will give you somewhere to put boxes of leads and adaptors, old copies of SOS and other general studio clutter. The side benefit is that by placing them carefully they can also be used as a crude, but often effective, form of acoustic treatment. You might also consider hanging your guitars on the wall to free up floor space and mounting monitors on wall brackets to free up the desk.
One of the most limiting factors governing your studio layout will be the interconnectivity of the gear. Every studio requires power, audio I/O and, in most cases, a network of MIDI connections. For mains power, I like to wire up my own plug-boards so that I can cut the cable to the required length and run it around the edge of the room, well away from doorways. In fact, it's a good idea to make sure that there aren't going to be any cables running in front of doorways, cupboards and so on, otherwise sooner or later they'll get hooked on a fast-moving foot and will do some damage to you or your equipment.

Furthermore, a patchwork of wires makes vacuuming difficult. Being able to clean a studio effectively is an important consideration, because dust can seriously damage audio equipment such as mics or faders.
MIDI leads are best kept as short as possible, because the data stream doesn't include any error correction and errors become more likely the longer the cable is, so it's worth planning the MIDI layout early on. If MIDI Merge or Thru boxes are used in the system, these can be carefully placed to act as hubs for the network.

It's possible to buy both audio and MIDI leads in a variety of colours and this is well worth doing, because it makes it far easier to distinguish each cable from the rest. Otherwise it's a good idea to label each lead using stickers wrapped around either end. Labels can be used for mains plugs too.

Before building your studio, it's also worth remembering that bad posture and poor ergonomics can cause repetitive strain injury (RSI) and other uncomfortable conditions. For more on the subject, check out the feature SOS ran in the January 2002 issue (www.soundonsound.com/sos/Jan02/articles/studioergonomics.asp).

Published November 2005

Thursday, November 3, 2016

Q. What is that 'robot voice' effect?

By Steve Howell
Modern software vocoders like Native Instruments' Vokator are far more sophisticated than their hardware forebears.Modern software vocoders like Native Instruments' Vokator are far more sophisticated than their hardware forebears.

In the recent TV ad campaign for Marks & Spencer, they use the Electric Light Orchestra track 'Mr Blue Sky'. There's a distinctive robotic vocal sound in it that I am curious about. How was it made? I was thinking at first that it was something like Auto-Tune (as on the annoying Cher single!) but the ELO record was made years before that. Or is it a remix? (I'm not old enough to remember the original!)

Danny Finn

SOS contributor Steve Howell replies: The effect is created using a device known as a vocoder, which is short for voice encoder, though it was also briefly known as a 'voder'. Like so many things in this business, the vocoder dates back many decades and, again like so many things in this business, is derived from telephonic communications technology!

It was originally developed by Homer Dudley of Bell Labs in the '40s as a means to compress audio for transmission down copper telephone lines. Later, one Werner Meyer-Eppler of Bonn University saw the potential for the vocoder in the then-emerging genre of electronic music.

Basically, a vocoder has two inputs: a modulator and a carrier. The modulator is usually fed by a microphone, typically with sung or spoken words, and the carrier will take a bright, sustained synth sound. Chords are played into the carrier input and words are spoken (or sung) into the modulator. The spoken/sung words are electronically imposed on the carrier signal, to create the effect of the synth speaking or singing. So how does this magic work?

Q. What is that 'robot voice' effect?


The carrier signal is split into different frequencies, using very tight band-pass filters (not unlike those in a graphic equaliser), and each of these has a voltage-controlled amplifier or, more recently, a digitally controlled amp. The modulator input is similarly split into different frequencies and on the output of each of the modulators' band-pass filters is an envelope follower that opens and closes the corresponding amplifier on the carrier input (see diagram). Thus, if you were to say 'ooaaah' into the modulator, the lower filters on the modulator would activate and open the lower filters on the carrier's signal; as the modulating signal moved into 'aaaah', the modulator's higher filters would be activated, in turn opening the carrier's upper filters and creating the illusion of vocals.

The number of filter bands the vocoder has is crucial. In the early days of analogue vocoders, for technical reasons (and reasons of cost) they typically only had around 10 bands, making speech somewhat unintelligible. More recent developments using modern DSP allows vocoder designers to include almost any number of filters, meaning that intelligibility is greatly improved, although they still sound like vocoders. Of course, these filters only really deal with the vowel components of a sound; to cater for sibilants and fricatives, such as 's', 'b' and 'p', noise generators are sometimes used, which are triggered when the modulator detects them. While they help, they are still not convincing.

Vocoders were grossly over-used to the point of cliché in the '70s ('Mr Blue Sky' being a prime example!) and they subsequently fell from grace. However, they can be responsible for some stunning sounds, and one only has to listen to Herbie Hancock's use of his Sennheiser vocoder in his brief foray into dance/disco music in the '70s and '80s to confirm this. Feeding the vocoder with an impeccably phrased Minimoog, Hancock created perfectly realistic and fluid lead vocals but with a curious robotic quality. He multitracked these to create harmonies and backing vocals to stunning effect.

More recently, the vocoder has become much more than just a 'speaking synth' effect, and people routinely now feed drum loops into the modulator to rhythmically chop the carrier signal.
Prominent vocoder manufacturers of old were EMS (whose products are still on sale), Moog (who I believe based their design on the vocoder Wendy Carlos contructed out of discrete modules on her giant Moog modular), Sennheiser, Korg and, of course, Roland, with their famous Vocoder Plus.

More recently, there has been a veritable glut of software vocoders on the market, some free, some shareware and some payware. Notable examples are Akai's DC Vocoder and Native Instruments' Vokator, both of which offer outstanding intelligibility and flexibility.


Published November 2005

Wednesday, November 2, 2016

Backstage with Michael Bluestein of Black Beagle Sound

Q. Why is the signal louder when it is panned to the centre?

By Hugh Robjohns
Different mixers employ different panning laws.Different mixers employ different panning laws.

When I plug my guitar into my 16-track and send the same signal to two channels, if I pan both channels to the middle it sounds louder than if I pan one all the way left and one all the way right. Surely it should sound the same — if they are both in the middle, the signal is coming through both speakers, and if one is panned left and one right, it's still coming through both speakers. Can you explain what's going on?

SOS Forum Post

Technical Editor Hugh Robjohns replies: Panning laws vary between products, depending on whether they are designed to maintain constant voltage, constant power, or a compromise between the two. The compromise version is probably the most common these days, with pan pots designed to provide something like a 4.5dB attenuation when at the centre. Constant power gives 3dB of centre attenuation, while constant voltage gives 6dB.

If you pan identical signals fully left and right, you have full-level signals in each output channel. However, if you pan the signal to the centre, the left and right outputs will be attenuated by (in the case of the common 'compromise' panning law) 4.5dB. But because you have panned both input channels to the centre, each output channel is receiving two lots of signal, each 4.5dB lower than the level of a single channel panned fully left or right. Since your two signals are identical, they will sum together and the level will rise by 6dB. So we go up 6dB from -4.5dB and find that each output channel is now carrying a summed mix of +1.5dB. Hence, each output channel is now carrying a signal that is 1.5dB higher than it was when you panned the channels individually left and right, so it will sound slightly louder.

For the record, if the mixing desk employed the constant power law, with 3dB central attenuation, the two channels panned centrally would produce an output of +3dB in each channel, while a desk with the constant voltage law would produce an output that was exactly the same level as the fully panned channels (in terms of signal voltage, at least).

The constant power panning law is used where you want a panned signal to remain at more or less the same perceived volume regardless of where you pan it. However, this panning law looks wrong on the desk meters, which only show a constant level if you use the constant voltage law! Hence the halfway-house compromise law, which tries to satisfy the demands of both situations reasonably well.


Published November 2005

Tuesday, November 1, 2016

Q. Can I connect an AES output to an S/PDIF input?


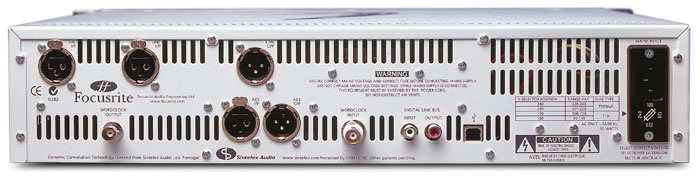
Liquid Channel offers AES digital in/out on XLRs.Liquid Channel offers AES digital in/out on XLRs.

I own a Focusrite Liquid Channel (which is great!) and would like to connect it to my MOTU 828's digital input. However, on the digital side of things the Liquid Channel only has an AES-EBU input and output, and the MOTU 828 only has S/PDIF and ADAT digital connections. How can I connect them together?

Bernhard Wagner

Technical Editor Hugh Robjohns replies: The proper way to connect AES to S/PDIF is to use a dedicated digital format converter, of which there are plenty around (although some older designs only pass 16 bits rather than the full 24, so check before buying). The M Audio CO3 and the Behringer Ultramatch and Ultramatch Pro probably represent the most affordable options.

However, although it is a rather makeshift solution (a 'bodge', to use the technical term), if you only need the signal to travel a fairly short distance — say, no more than two metres — you can get an AES output to feed an S/PDIF input with just a simple XLR-to-phono cable. Wire pin 2 of the XLR to the tip of the RCA phono jack, and pin 3 of the XLR to the sleeve of the phono. Pin 1 of the XLR should remain wired to the cable screen at the XLR end, but leave it disconnected and insulated at the phono end.

Strictly speaking, the Channel Status and other subcode data is formatted differently between AES and S/PDIF, but very little equipment bothers to send or read the full subcode data set anyway, so it is rarely a problem.

Published November 2005

Korg Kronos Effects Tutorial Part 2: Master and Total Effects