Monday, August 4, 2014

Saturday, August 2, 2014
Q. Is there a better way of controlling sibilance than a de-esser?
A recording of mine is suffering from excessive sibilance, so I have tried processing it using a de-esser. The problem is that the processing seems to be having a detrimental effect on the sound of the vocal. Is there another way I can get rid of the sibilance, or something I can do differently?

Dan Simpkin via email
The vocal immediately following the Now Time marker (green line) sings 'Too late a ghost'. The 'T' of 'Too' is attenuated, after which the automation line rapidly slopes back up to reach the track's general level. The next attenuation is the 'T' in 'Late', which almost stands on its own and is easily tackled. Finally, the 'S' and 'T' at the end of 'Ghost' were reduced together.The vocal immediately following the Now Time marker (green line) sings 'Too late a ghost'. The 'T' of 'Too' is attenuated, after which the automation line rapidly slopes back up to reach the track's general level. The next attenuation is the 'T' in 'Late', which almost stands on its own and is easily tackled. Finally, the 'S' and 'T' at the end of 'Ghost' were reduced together.
SOS contributor Tom Flint replies:
Ideally, a de-esser should automatically attenuate troublesome sibilance without its actions adversely affecting the perceived quality of the audio, but the problem is that a static set of de-esser parameters often doesn't work well for an entire performance. Not all of the sibilants within a single performance will be equally objectionable, and the energy in different sounds such as 'S' and 'T' might occupy different frequency ranges. One solution is to automate the threshold and frequency parameters of your de-esser so that it only works as needed, but my feeling is that if you're going to get into using automation to control sibilance, it makes more sense to directly automate the level of the vocal track within your DAW. It can be time-consuming, but offers precise control over each individual instance of sibilance, and enables you to visualise the problem within your DAW's arrange page.
The first thing to do is to enable level automation on the vocal track, and display the volume parameter for editing with the mouse. The next thing to do is find the first problem instance of sibilance. I use the horizontal and vertical zoom controls to expand the waveform until the contours of the word containing the problem are clearly defined. It's often possible to identify the syllables in a word just by looking at it in close-up.
Once you've identified a problem sibilant, create a pair of automation nodes at either end, in effect bracketing that syllable. You can then select the two innermost nodes and drag them down to reduce that sibilant in level without affecting the rest of the track. I very occasionally find it necessary to add a few more nodes while getting the shape right, and delete those that turn out to be superfluous at the end. Having a small number of nodes is good practice as it means that level adjustments can be done quickly by moving a single line. The screen below shows a short phrase in Cakewalk's Sonar with level automation used to control sibilance in this way.
After attenuating the worst instances of sibilance, I listen through to see how natural the overall performance is sounding. It may be the case that after reducing the level of the main offenders, the ear becomes less bothered by the others and a more lenient approach can be taken thereafter. Sometimes as little as a 3 or 4 dB drop in level results in a significant improvement, but it is also very surprising how much reduction can be applied without it sounding at all odd. The most important thing to note is that although you can often identify syllables visually, only your ears can tell you how much attenuation is needed, and how much will sound natural. In other words, what sounds right is right. Manually automating the level provides an opportunity to make alterations that better suit how the brain interprets what it is hearing.
One of the great advantages of using automation to control sibilance is that you're not limited to applying it just to the level of the track. For instance, it's often the case that sibilance is exaggerated by auxiliary effects such as reverb or delay. If this is the case, try copying your automation curve to the relevant send parameters on your vocal track, then scaling it drastically so that the level of those sends is heavily attenuated for sibilants. Likewise, any high-frequency EQ boost on your vocal track can make sibilance worse, so try copying the same automation curve to the gain parameter on the relevant band of your EQ plug-in.
When the level automation is complete, overall level adjustments can be made by sending the channel to an intermediate bus and using its fader to boost or cut by the required amount, thereby leaving the sibilance control automation undisturbed.

Dan Simpkin via email
The vocal immediately following the Now Time marker (green line) sings 'Too late a ghost'. The 'T' of 'Too' is attenuated, after which the automation line rapidly slopes back up to reach the track's general level. The next attenuation is the 'T' in 'Late', which almost stands on its own and is easily tackled. Finally, the 'S' and 'T' at the end of 'Ghost' were reduced together.The vocal immediately following the Now Time marker (green line) sings 'Too late a ghost'. The 'T' of 'Too' is attenuated, after which the automation line rapidly slopes back up to reach the track's general level. The next attenuation is the 'T' in 'Late', which almost stands on its own and is easily tackled. Finally, the 'S' and 'T' at the end of 'Ghost' were reduced together.
SOS contributor Tom Flint replies:
Ideally, a de-esser should automatically attenuate troublesome sibilance without its actions adversely affecting the perceived quality of the audio, but the problem is that a static set of de-esser parameters often doesn't work well for an entire performance. Not all of the sibilants within a single performance will be equally objectionable, and the energy in different sounds such as 'S' and 'T' might occupy different frequency ranges. One solution is to automate the threshold and frequency parameters of your de-esser so that it only works as needed, but my feeling is that if you're going to get into using automation to control sibilance, it makes more sense to directly automate the level of the vocal track within your DAW. It can be time-consuming, but offers precise control over each individual instance of sibilance, and enables you to visualise the problem within your DAW's arrange page.
The first thing to do is to enable level automation on the vocal track, and display the volume parameter for editing with the mouse. The next thing to do is find the first problem instance of sibilance. I use the horizontal and vertical zoom controls to expand the waveform until the contours of the word containing the problem are clearly defined. It's often possible to identify the syllables in a word just by looking at it in close-up.
Once you've identified a problem sibilant, create a pair of automation nodes at either end, in effect bracketing that syllable. You can then select the two innermost nodes and drag them down to reduce that sibilant in level without affecting the rest of the track. I very occasionally find it necessary to add a few more nodes while getting the shape right, and delete those that turn out to be superfluous at the end. Having a small number of nodes is good practice as it means that level adjustments can be done quickly by moving a single line. The screen below shows a short phrase in Cakewalk's Sonar with level automation used to control sibilance in this way.
After attenuating the worst instances of sibilance, I listen through to see how natural the overall performance is sounding. It may be the case that after reducing the level of the main offenders, the ear becomes less bothered by the others and a more lenient approach can be taken thereafter. Sometimes as little as a 3 or 4 dB drop in level results in a significant improvement, but it is also very surprising how much reduction can be applied without it sounding at all odd. The most important thing to note is that although you can often identify syllables visually, only your ears can tell you how much attenuation is needed, and how much will sound natural. In other words, what sounds right is right. Manually automating the level provides an opportunity to make alterations that better suit how the brain interprets what it is hearing.
One of the great advantages of using automation to control sibilance is that you're not limited to applying it just to the level of the track. For instance, it's often the case that sibilance is exaggerated by auxiliary effects such as reverb or delay. If this is the case, try copying your automation curve to the relevant send parameters on your vocal track, then scaling it drastically so that the level of those sends is heavily attenuated for sibilants. Likewise, any high-frequency EQ boost on your vocal track can make sibilance worse, so try copying the same automation curve to the gain parameter on the relevant band of your EQ plug-in.
When the level automation is complete, overall level adjustments can be made by sending the channel to an intermediate bus and using its fader to boost or cut by the required amount, thereby leaving the sibilance control automation undisturbed.
Friday, August 1, 2014
Q. Can you help me with drum editing in Cubase 5?
I have to edit eight tracks of drums on six songs. Generally there are four to six takes. I'm using Cubase 5 and would like to know the easiest way to edit the tracks. Obviously I'm using the 'lanes fixed' option for the kick, snare, hi-hat and overheads, but it will take forever to solo each take. Any ideas on how I can make the process easier? Any help would be greatly appreciated.
Via SOS web site

In Cubase 6.5, Steinberg greatly improved their comping tools, making it much easier to edit together the best sections of a multi-take, multitrack recording.In Cubase 6.5, Steinberg greatly improved their comping tools, making it much easier to edit together the best sections of a multi-take, multitrack recording.
SOS Reviews Editor Matt Houghton replies: In all honesty, I found this sort of work to be a royal pain in the posterior in Cubase 5, so the first thing I'll recommend is that if you're planning to do this sort of work a lot, it would be well worth you upgrading to the latest version of Cubase (v6.5 at the time of writing, but check our Cubase 7 review on page 20!), assuming your computer and OS are up to the task. Among many other features that have been added or refined, the multitrack, multitake editing functions have been overhauled specifically in 6.5 to make the task you describe much easier, and along the way they've added more useful tools. Read our reviews of Cubase 6 (/sos/apr11/articles/cubase-6.htm) and Cubase 6.5 (/sos/jun12/articles/cubase-6-5.htm) and you'll soon see what I mean!
If you prefer to stay within Cubase 5, the best I can suggest is a workaround. When making edits to multitrack drums, you'll want to select all tracks at the same time for each take. There's no sense just punching in a different section of the snare mic, for example, as any spill from other instruments will cause problems with the other tracks, and you'll still have the original snare in the other mics, potentially causing phase-relationship problems with the punched-in part. Personally, I'd create a folder track to house the multiple tracks for each take, so that you have four to six folders — one for each take — and eight tracks within each folder. The reasons for this are twofold. Firstly, it enables you to use the solo button on each folder to instantly audition the desired take; secondly, it allows you to use scissors on the folder to edit all tracks for a take in one action, and to use the mute tool to silence the other takes at that point. When you then come to comping your take you can have a master folder with eight tracks on to which you can drag and drop the relevant takes. As I said, it's an onerous process, and although there are other ways to skin this cat, they're equally burdensome in my opinion. So if you're doing any amount of multitrack, multi-take editing, it would be well worth updating to the latest version of Cubase (and of course you'll get many more features into the bargain).
Via SOS web site
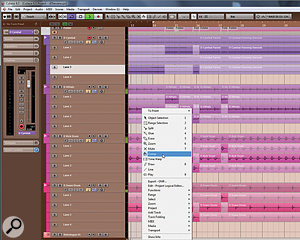
In Cubase 6.5, Steinberg greatly improved their comping tools, making it much easier to edit together the best sections of a multi-take, multitrack recording.In Cubase 6.5, Steinberg greatly improved their comping tools, making it much easier to edit together the best sections of a multi-take, multitrack recording.
SOS Reviews Editor Matt Houghton replies: In all honesty, I found this sort of work to be a royal pain in the posterior in Cubase 5, so the first thing I'll recommend is that if you're planning to do this sort of work a lot, it would be well worth you upgrading to the latest version of Cubase (v6.5 at the time of writing, but check our Cubase 7 review on page 20!), assuming your computer and OS are up to the task. Among many other features that have been added or refined, the multitrack, multitake editing functions have been overhauled specifically in 6.5 to make the task you describe much easier, and along the way they've added more useful tools. Read our reviews of Cubase 6 (/sos/apr11/articles/cubase-6.htm) and Cubase 6.5 (/sos/jun12/articles/cubase-6-5.htm) and you'll soon see what I mean!
If you prefer to stay within Cubase 5, the best I can suggest is a workaround. When making edits to multitrack drums, you'll want to select all tracks at the same time for each take. There's no sense just punching in a different section of the snare mic, for example, as any spill from other instruments will cause problems with the other tracks, and you'll still have the original snare in the other mics, potentially causing phase-relationship problems with the punched-in part. Personally, I'd create a folder track to house the multiple tracks for each take, so that you have four to six folders — one for each take — and eight tracks within each folder. The reasons for this are twofold. Firstly, it enables you to use the solo button on each folder to instantly audition the desired take; secondly, it allows you to use scissors on the folder to edit all tracks for a take in one action, and to use the mute tool to silence the other takes at that point. When you then come to comping your take you can have a master folder with eight tracks on to which you can drag and drop the relevant takes. As I said, it's an onerous process, and although there are other ways to skin this cat, they're equally burdensome in my opinion. So if you're doing any amount of multitrack, multi-take editing, it would be well worth updating to the latest version of Cubase (and of course you'll get many more features into the bargain).
Q. When was the click invented?
I've been wondering: when was recording to a click first used? And when did it start to become widely used? Did they used to record to metronomes before the advent of MIDI? I've tried searching the Internet for answers to these questions but haven't found any answers.
Via SOS web site
 We owe a lot to Disney's production of Fantasia, which, among other things, introduced the method of using a click track.We owe a lot to Disney's production of Fantasia, which, among other things, introduced the method of using a click track.Q. When was the click invented?
SOS Technical Editor Hugh Robjohns replies: I'm sure people must have recorded using metronomes in the early days but, as far as I'm aware, the first documented use of a 'click track' in the modern understanding of the term was by Walt Disney's team for the Fantasia film soundtrack back in 1940. The requirement was to be able to pan different orchestral sections around the auditorium via six speaker arrays: three across the front and three across the back. To do that, they needed to record the sections to separate tracks (remember this was in the days of mono optical film audio machines locked together with chains and sprockets!) and so they used a click track to keep the sections in time on each take.

The Fantasia project introduced a lot of things we take for granted today such as click tracks, pan-pots, VCA level automation, multitrack recording, overdubbing, surround sound and more besides!
However, the Second World War took the focus away from sophisticated surround-sound cinema productions, and the click-track idea didn't really surface again until MIDI sequencing and quantising became commonplace in the 1980s.
Via SOS web site
 We owe a lot to Disney's production of Fantasia, which, among other things, introduced the method of using a click track.We owe a lot to Disney's production of Fantasia, which, among other things, introduced the method of using a click track.Q. When was the click invented?
SOS Technical Editor Hugh Robjohns replies: I'm sure people must have recorded using metronomes in the early days but, as far as I'm aware, the first documented use of a 'click track' in the modern understanding of the term was by Walt Disney's team for the Fantasia film soundtrack back in 1940. The requirement was to be able to pan different orchestral sections around the auditorium via six speaker arrays: three across the front and three across the back. To do that, they needed to record the sections to separate tracks (remember this was in the days of mono optical film audio machines locked together with chains and sprockets!) and so they used a click track to keep the sections in time on each take.

The Fantasia project introduced a lot of things we take for granted today such as click tracks, pan-pots, VCA level automation, multitrack recording, overdubbing, surround sound and more besides!
However, the Second World War took the focus away from sophisticated surround-sound cinema productions, and the click-track idea didn't really surface again until MIDI sequencing and quantising became commonplace in the 1980s.
Subscribe to:
Posts (Atom)