Welcome to No Limit Sound Productions

Company Founded
2005
Overview

Our services include Sound Engineering, Audio Post-Production, System Upgrades and Equipment Consulting.
Mission
Our mission is to provide excellent quality and service to our customers. We do customized service.

Wednesday, July 31, 2024

Reverb Rating

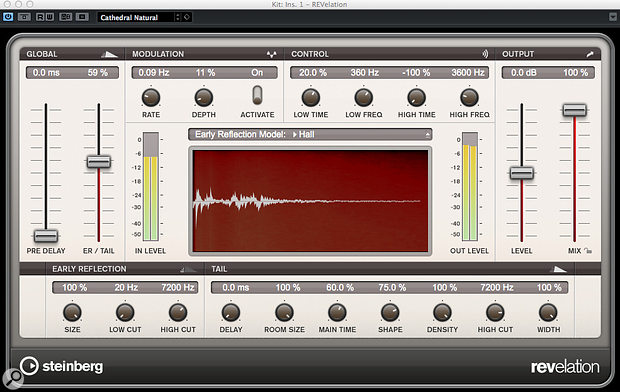
Revelation, Cubase’s ‘upmarket’ algorithmic reverb, isn’t the resource hog that you might expect.Revelation, Cubase’s ‘upmarket’ algorithmic reverb, isn’t the resource hog that you might expect.


Cubase Pro 8 gives you four different reverb plug-ins to choose from, but which one should you be using?

It’s not that many years since Cubase’s reverb plug-ins seemed to be the butt of a fair few forum jokes, but Steinberg have made considerable progress on this front in recent years and Cubase 8 Pro boasts four decent reverbs. Two, Roomworks and Roomworks SE, were first introduced with Cubase 4. Roomworks is an algorithmic reverb which supports both stereo and surround formats, and the SE version is a streamlined version which places a lower strain on your computer’s CPU. In Cubase 5 Steinberg upped their game further by introducing Reverence, a convolution-based reverb capable of both stereo and surround-sound operation. Finally, Cubase 7.5 brought with it a new stereo-only algorithmic reverb called Revelation.

We may be spoiled for choice, then, but do you know which is the best reverb to opt for in your project? Two obvious factors might influence that decision. First, the sound, pure and simple: in different circumstances, you may be after different end results. You might require realism, you might prefer classic sheen, you might want to focus only on early reflections, or you may yearn for a lo-fi sound, and so on. The second factor is how efficient a reverb you require, which depends on the complexity of your project and the processing ‘grunt’ of your computer. A particularly CPU-hungry reverb plug-in might not always be the best option — it’s not as if you can ‘freeze’ an effects channel in the way you can an audio or instrument track. So, I’ll look at CPU load and sound quality here, and in that order...

Great Expectations

Given the different generations of plug-in and the different processing types (algorithmic and convolution), you might expect that the CPU load of these four reverb plug-ins would run down from Reverence (highest), via Revelation and then Roomworks, down to Roomworks SE — but my tests show that this isn’t actually the case!

Testing this kind of thing is fairly easy and you could easily compare these reverbs with any third-party ones you have if you wish. For example, both Task Manager (under Windows) or Activity Monitor (under OS X, and what I used here) can give you process-level CPU usage data. The figures produced are bound to be system-specific but, with a bit of care, you can draw some general conclusions about the relative loads each plug-in generates.

For my own tests, I set up a Cubase Pro 8 project with 10 audio tracks, each with an instance of all four reverb plug-ins as insert effects. I focused on stereo use and used 10 tracks/instances to (hopefully) obtain more reliable data. I then simply enabled/bypassed each set of 10 plug-ins in turn and noted the ‘user processes’ CPU load in Activity Monitor. It’s these figures I’ll quote here, but note that Cubase’s own ‘average load’ meter in the VST Performance display suggested very similar values.

Reverence, a  convolution reverb with bundled impulse library, is capable of some very realistic results.Reverence, a convolution reverb with bundled impulse library, is capable of some very realistic results.I repeated the tests using two different reverb presets; a ‘small room’ (short decay) setting and a ‘cathedral’ (long decay) setting. For Roomworks, I also repeated all the tests at the default Efficiency setting of 10 and at what I supposed would be a less CPU-intensive 50. I also ran my tests both with and without ASIO Guard (Steinberg’s ‘squeeze more out of your CPU’ technology) enabled. You can toggle this on/off via the VST Audio System section of the Device Setup panel.

Uneven Load

With my 10 audio tracks (and nothing else) playing, all plug-ins bypassed and ASIO Guard disabled, I recorded a four percent CPU load as my benchmark. Starting with the room presets, I engaged 10 instances of Revelation and the usage moved that to six percent. Switching to 10 instances of Reverence generated a CPU load of just over seven percent. Switching to a cathedral preset gave figures of six percent (no change) and eight percent (slightly higher) for Revelation and Reverence, respectively. Repeating all these tests with ASIO Guard engaged reduced all these figures by around one percentage point, which is a pretty decent saving when you consider that the load was already four percent before any plug-ins were activated. While my host system (a late-2013 i7 iMac) is pretty well specified, I was pleasantly surprised by how modest a load 10 instances of these two ‘high-quality’ reverbs generated.

To my surprise (I’d half expected the more recent releases to take advantage of the increase in computing power over the years) the older plug-ins were less CPU-efficient. With ASIO Guard off, engaging 10 instances of Roomworks (a ‘room’ preset and the Efficiency setting at 10) resulted in a 10 percent CPU load; noticeably higher than either Revelation or Reverence. With 10 instances of Roomworks SE, I saw an eight percent CPU load, again higher than the two newer reverbs, despite this being the ‘lite’ version of an old reverb. Changing the Efficiency setting to 50 in Roomworks dropped the CPU figure to just under eight percent. All these figures remained the same for a ‘cathedral’ preset while engaging ASIO Guard again shaved around one percent off all these figures.

Roomworks has been around since Cubase 4. It includes an Efficiency setting, which can be useful if you need to save some CPU resources.Roomworks has been around since Cubase 4. It includes an Efficiency setting, which can be useful if you need to save some CPU resources.The obvious conclusion is that these data are a result of more efficient processing/algorithms in the more up-to-date plug-ins. If so, Revelation and Reverence might be win-win because as well as being more efficient (they’re less CPU-intensive) they both offer, to my ears, higher-quality results in general than Roomworks. Unless there’s a specific sound in Roomworks that you like, then, it seems that you should always opt for one of the newer models.

That said, before you start choosing reverbs based on their CPU hit, it’s well worth noting that a single instance of HALion Sonic playing a three-note chord (alongside my 10 audio tracks, ASIO Guard on, no other plug-ins active) generated around a six percent CPU load, which is similar to 10 instances of Revelation or Reverence. This rather arbitrary test suggests that the load generated by a reverb plug-in is not going to be the most significant CPU hog if you also tend to use a virtual instrument or two in your Cubase projects.

The Sound Of Space

Judging the ‘best’ sound from a number of similar effects plug-ins is a deeply subjective and personal process and depends on the musical and sonic context within which the those comparisons are made (what suits a solo vocal may not suit a kick drum in a thrash-metal track). For these reasons I can’t give you a definitive verdict here, but I can at least give you a flavour of how well each reverb works for some typical tasks.

Roomworks SE might look simple but it remains a  solid little performer.Roomworks SE might look simple but it remains a solid little performer.The audio demos (hosted at http://sosm.ag/sep15media) are based on a solo vocal, a full drum kit and a solo snare. For each of the four reverbs I applied ‘room’, ‘cathedral’ and early-reflections ‘ambience’ treatments, to see how they performed in different roles. I used all the reverbs as insert effects and set the wet/dry balance to 50 percent, which is probably not ‘right’ for a typical mix but is easily audible and makes it easy to ensure consistency in the comparison process.

While there are all sorts of differences that could be noted (I’d suggest making your own observations based on the audio demos and on your own tests) a few things struck me as obvious. First, compared with the others, Revelation seems to provide a ‘wetter’ signal. In fact, in the end, I found myself having to dial back the wet/dry control to around 25 percent to achieve a similar sort of reverb level; it sounds very good but I find myself needing less of it in a mix context to make it sit correctly.

Second, the Reverence convolution reverb has a very distinctive sound in comparison with the three algorithmic reverbs. It produces arguably the most ‘real’ sense of the virtual space. It also seems a little subtler and, in this case, a slightly ‘wetter’ signal could be used while still producing a comfortable reverb level.

Just how many reverb plug-ins does it take to make your computer fall over? My CPU load-testing setup.Just how many reverb plug-ins does it take to make your computer fall over? My CPU load-testing setup.Third, for shorter room-style treatments, I thought Roomworks and even Roomworks SE put in a decent turn. They perhaps fared a little less well in the ‘cathedral’ application, where I felt the decay tails were a little less smooth. It was Reverence that stood out for me as the winner here.

For the ‘ambience’ examples, both Revelation and Reverence allow you independent adjustment of the early reflections and tail response, giving you far more control over the result. For Roomworks and Roomworks SE, I could only reduce the reverb time to something in the 0.3 second range. Reverence was, again, the winner here for me; it just sounds that much smoother and more natural. That said, I like the control Revelation provides and, despite the limited control, Roomworks’ performance was by no means unacceptable. The SE variant perhaps fared a little less well to my ears in this role — it was a little ‘metallic’ to my ears.

Final Frontier

So what conclusions can we draw from all this? Well, if you want a natural-sounding reverb that gives a sense of a real space, Reverence should probably be your go-to starting point. Based on the CPU data, it really isn’t the resource hog you might have expected compared with, for example, Revelation. If you want a ‘character’ reverb then I’d suggest choosing Revelation to start with: it’s big, bold and offers a very flexible control set, which makes it possible to refine your results quite precisely. It is also not particularly CPU-hungry.

Finally, while I was surprised at the CPU load generated by Roomworks and Roomworks SE, I was also surprised at how respectable they sounded compared to their younger and more up-market siblings. For users of the entry-level Cubase Elements — in which Roomworks SE is the only bundled reverb — it’s hopefully reassuring that you’ll still be able to achieve some solid results.


Published September 2015

Monday, July 29, 2024

Services Rendered


Whether archiving projects, creating stems or saving CPU resources, Cubase 8’s Render In Place feature has you covered.

Whether you need to save some CPU resources in a complex project, create a set of stems for mixing and/or mastering, or simply ensure that you can either move your project to another audio environment or preserve it for archive purposes, the Render In Place facility that was added in both the Pro and Artist versions of Cubase 8 can be a really useful tool.

The Render In Place settings give you plenty of flexibility when rendering your audio or MIDI events and tracks.The Render In Place settings give you plenty of flexibility when rendering your audio or MIDI events and tracks.

Rendered Superfluous?

As the name suggests, Render In Place (RIP) provides a way of turning existing audio or virtual-instrument tracks into new audio files. RIP is not without its limitations, as we’ll see, but it is both versatile and powerful. Cubase already has a number of other tools that provide audio-rendering services, of course, including Bounce Selection, Track Freeze and Export Audio Mixdown. So does RIP render (sorry!) these existing functions superfluous? Well, yes and no, because while there’s certainly plenty of overlap between these features, and Steinberg may see RIP as an eventual replacement for some or even all of the above facilities, my educated guess is that all those older features will hang around for some time so that users with established workflows are not unduly disturbed. I’m sure that I will continue to use Export Audio Mixdown for final stereo mixdown tasks, for example, and perhaps for archiving projects, but for other tasks I can see myself turning to RIP.

Super Saver

A strength of RIP is that it can be applied at different ‘levels’, such as to single or multiple events on a track, or to a single track, or multiple tracks at once, or even to a whole project. Selecting a track means the render process will apply to all events on the track. Selecting individual clips means the render will be limited to them.

With the target material selected, go to Edit/Render In Place. You’ll be invited to choose Render (with Current Settings) or Render Settings. The latter option, which you’ll want to choose for first-time use, opens a dialogue box in which you can configure exactly how the render process will be executed. The settings you specify are retained until you revisit the dialogue and make further changes. Although small, this dialogue box holds a wide range of possibilities but, for now, let’s focus on its upper portion, where you have to make just two choices.

First, from the uppermost drop-down menu, you can choose between As Separate Events (a new rendered audio event is created to match each clip on the source track), As Block Events (source events that are touching are rendered as a single new event), or As One Event (a single audio event is rendered, spanning all the selected events in the source track).

The second choice is a ‘one of four’ affair and where things get a little more interesting, as you can control exactly what is rendered to the new audio track/event. For example, Dry (Transfer Channel Setting) renders the pre-insert audio signal to a new audio event on a new channel, with any channel settings from the source track (insert plug-ins, channel-strip settings, EQ) being copied to the new track. In the case of rendering a virtual instrument or rendering some VariAudio tweaks on a vocal track, this is really useful — it gives you the exact sound of the original track but still allows full control of it’s standard processing elements when mixing.

Your rendered audio is placed on a  new audio track immediately beneath the source track.Your rendered audio is placed on a new audio track immediately beneath the source track.The other three options gradually include more of the source track/event’s settings into the render. Channel Settings renders all the inserts, channel strip and EQ settings, Complete Signal Path includes any send effects too, whereas Complete Signal Path + Master FX adds in any processing placed on the master stereo output bus to the rendered audio. There are occasions when either of these options would be useful and/or appropriate. For example, you might use the Complete Signal Path option if you wanted to lock in all your standard track and send-level Cubase processing before moving your whole project over to another dedicated mixing/mastering application. You need to be careful with this if you have any dynamics processing on the bus, though — because the whole mix isn’t triggering your bus compressor, the results may sound a little ‘off’.

If you use either ‘Complete Channel’ options, the Tail Size setting in the bottom half of the dialogue box may need tweaking. This allows you to specify the length of an additional audio ‘tail’ to each rendered audio event, which enables you to include the decay of any reverb or delay processing in the render.

By default, when you apply RIP at the level of a single track, a new audio track is created immediately beneath the source track (an upper case ‘(R)’ is added to the track name to indicate it is a rendered version) and the source track is muted. However, if you’re rendering to save CPU resources (for example, a complex VSTi track), selecting the Disable Source Tracks option via the drop-down menu at the bottom releases the CPU and RAM resources used by the source track. This is, in effect, Track Freezing, but with greater flexibility in terms of exactly what is being rendered — it’s potentially very useful indeed.

Stem Creator

If you select multiple tracks, or events on multiple tracks, you have more options. For example, provided you don’t have Dry (Transfer Channel Settings) selected, you should see a Mix Down To One Track option. Left unticked, each track is rendered as described above. The benefit of that is speed — you need only initiate the process once. If you tick the Mix Down To One Track box all selected tracks/events are rendered to a single audio track, which is a great way to simplify a complex project. For example, if you have a lead vocal or bass guitar part that’s spread over multiple tracks, you can easily consolidate it down to a single track, making it easier to manage as part of a final mix.

Render In Place’s Mix Down To One Track option is a  useful way to create stems, as shown here for a  set of guitar tracks.Render In Place’s Mix Down To One Track option is a useful way to create stems, as shown here for a set of guitar tracks.Another potential application for this option is the creation of stem tracks for your major instrument groups (drums, bass, rhythm guitars, keys, and so on). That could be useful in music-to-picture work or working with a mastering engineer, or even just for you to simplify the mixing process. Used in this context, RIP mirrors some of the features offered by the Channel Batch Export (CBE) option in the Export Audio Mixdown window. Unlike with CBE, you have to execute RIP individually for each stem you wish to create, but you get much more detailed control about what you wish to include in each stem.

Live Long & Prosper

If you’ve been working with audio for any length of time, you’ll be only too aware of how quickly recording formats can become tomorrow’s museum pieces. Production ‘in the box’ can be particularly vulnerable to changes in virtual instrument or audio plug-in availability, unless you are very careful about your project archive process.

Because RIP allows you to process multiple tracks in a single pass, you can easily create multiple archive versions that (a) are essentially ‘audio-only’ versions and could, in principle, be opened in any DAW at some point in the future regardless of what plug-in technologies are available, and (b) contain different amounts of the track-level processing rendered within the audio.

The Render In Place settings shown here would create an audio-only version of your project — ideal for archival or if running low on computer resources when mixing.The Render In Place settings shown here would create an audio-only version of your project — ideal for archival or if running low on computer resources when mixing.For example, if you select all the tracks in your project, and apply the RIP settings shown in the final screenshot, the end result is an audio-only version of your project where each rendered track embeds all the original channel-level plug-ins, EQ or strip settings, but not any send or master-bus effects. You do practice safe sequencing don’t you? RIP means you have no excuse for shocking accidents. With Remove Source Tracks selected, the newly rendered version of your project will also have low CPU/RAM resource demands and be ready to mix again at some point in the future, regardless of what plug-ins your system might then have available.

Workaround

Good though the first iteration of RIP was — it was introduced with Cubase v8 — there were a few catches. Steinberg tackled the most obviously problematic of these (that RIP automatically rendered mono channels as stereo audio files) in the v8.0.20 update. Render In Place can now handle both mono and stereo source material and the format is retained in the rendered version. As vocals are generally recorded in mono, this was an important practical ‘fix’ and this kind of fine-tuning is very welcome.

At the time of writing, some other challenges remain, though. For example, RIP can’t currently handle plug-ins whose side-chain input is in use. Some users have also reported problems when working with VST instruments where multiple MIDI tracks feed the same instrument but multiple output channels are used. Let’s hope Steinberg attend to issues like this sooner or later, but in the meantime you can always use the Export Audio Mixdown feature for any such problematic rendering tasks. 


Published October 2015

Friday, July 26, 2024

Space Race

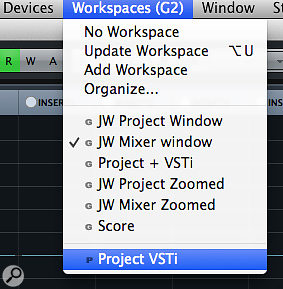
The Cubase Workspace system allows you to master your workflow even on the most compact of monitor systems.The Cubase Workspace system allows you to master your workflow even on the most compact of monitor systems.


Efficient management of Cubase’s Workspaces can be a great help when you need to work quickly.

Sometimes, when you need to be able to work quickly in Cubase, you find yourself instead bogged down with what feels like a gazillion windows. If you wish to achieve Cubase Ninja Master status, you’ll need to put some time and effort into designing an efficient workflow. There are many ways in which Cubase can help you with this — customisable keyboard shortcuts, macros, the Project Logical Editor and so on. Another, and the subject of this workshop, is Cubase’s Workspaces facility, which is a significant time-saver. It gives you instant recall to fixed (and familiar) screen layouts: even if you resize things or make other adjustments, unless you ‘update’ the Workspace to reflect those tweaks, it will default to its original settings the next time you switch to it. Neat!

Back To Work(space)

We last looked at this topic way back in SOS July 2005, when Cubase SX3 was still in diapers, but Steinberg have tweaked this functionality in each release since. In v8 Workspaces were given their own entry on the main menu and the ‘global’ versus ‘project’ Workspace concept has been refreshed and refined. As will become clearer below, these two types of Workspace may be better tools for different purposes.

Creating a new Workspace is simply a matter of organising the various window layouts as you desire, and then selecting the Workspaces/Add Workspace command to ‘capture’ the current layout. Having created a Workspace, if you change it and wish to save it, overwriting the current entry, use the Workspaces/Update Workspace command. This is assigned, by default, as an Option+U (Mac) or Alt+U (Windows) keyboard shortcut.

Any Workspace(s) you create will appear in the Workspaces menu, with Global ones positioned above a horizontal line and Project-level ones below. You can switch between Workspaces either via this menu or using key commands. The first nine Workspaces are automatically assigned default key commands starting at Option (Alt)+Num 1 and continuing up to Option (Alt)+Num 9. If using a laptop without a numeric keypad it’s well worth acquiring one, or else customising these commands.

Another option is to use the Workspace Organiser dialogue, accessible via the Workspace menu, but the main function of this is to let you manage (re-order or delete) your Workspaces. Note that you can’t move a Workspace between the Global and Project categories in this way; the easiest way to achieve this is to create a new Workspace based on an existing one and assign it to the other Workspace group. Note also that the Workspace Organiser shows the key command associated with each Workspace. These commands are defined dynamically, so moving a Workspace or adding a new one may change the key commands assigned to other Workspaces in the list. I’ll come back to this later.

Elect Your Candidates

Creating a Workspace, then, is easy enough, but if you want to improve the way you work with Cubase you’re going to have to develop some sort of strategy or system for using them. Perhaps the first thing to consider is which windows you most commonly find yourself using in a typical project, as these make obvious candidates for inclusion in a Workspace. My ‘top two’ Global Workspace choices are likely to include ‘as much as I can see’ of both the Project and MixConsole windows; essentially full-screen Project or MixConsole windows but with (for my personal preference) the Transport Panel occupying a thin strip at the base of the screen. I suspect most people have a default layout that’s something like this. Beyond that, though, it will depend a little on the way you make music.

For example, I regularly use both multiple VST instruments and audio loops in my projects. I’ve therefore set up a Global Workspace that combines a more compact Project window with the VST Instrument Rack and MediaBay open. Note that you can include these windows either as separate ‘floating’ windows or by toggling on the Racks display option for the Project window. I prefer the latter, as I can then easily get at my VSTi windows for editing, have easy access the VSTi Quick Controls and can get at my audio sample library from the MediaBay.

The Workspace system now has its own entry on the main menu system.The Workspace system now has its own entry on the main menu system.If you regularly work on music-to-picture projects, assigning the Video Player, Tempo Track and Markers windows to a dedicated Workspace would probably be useful. Similarly, if you use the Score facility, then defining a Workspace featuring the Scores window should be helpful. That way, if you select a specific MIDI part and switch to your ‘Scores’ Workspace, the selected part will automatically be displayed as notation.

The Workspace organiser allows you to select, reorder or delete Global or Project Workspaces.The Workspace organiser allows you to select, reorder or delete Global or Project Workspaces.These Global-level Workspaces will be built around your most frequently used window arrangements, but you might find that you need some more specific layouts within an individual project, and this is where Project-level Workspaces come in handy. I frequently assign two types of tool to these: VST instruments and VST effects plug-ins. If any are a key Project component and I need regular access, I find that it’s worth creating one or two Project-level Workspaces for easy recall.

Workspaces can be defined for Global- or Project-level applications.Workspaces can be defined for Global- or Project-level applications.In practice, you can often fit two or more VSTi GUIs in a single Workspace. For example, Halion Sonic, Groove Agent (two of my go-to instruments) and the VST Instruments Rack all sit nicely together on my single-screen system — depending on your screen setup different things will be possible. It’s possible to arrange a number VST effects windows in a single Workspace so you can instantly get at the parameters for what might be your key send or creative effects for a specific project. What you don’t appear to be able to do is bring up insert effects for the currently selected channel. (To achieve that, configure the Generic Remote along the lines described by Matt Houghton in SOS Jan 2015 (http://sosm.ag/cubase-channelstrip).

Workspace Wiz

I’ll finish off with a few tips to help you make the most of Workspaces. First, while Cubase offers various ways to zoom in and out of your Project and Mixer windows, Workspaces can be used to quickly switch between zoom levels. For example, in the Project window a Workspace will store the zoom level used when the Workspace was created or last updated. Thus, I have Global Workspaces based for ‘zoomed out’ and ‘zoomed in’ views. This is really useful if you often find yourself wanting to switch between, say, sample-level and full arrangement views.

While the same is not true of the Mixer, Cubase (unlike most other DAWs) has long offered you three different MixConsole windows, each of which can be set to different ‘zoom widths’. These can be accessed from the Devices menu and assigned a keyboard shortcut. On my system, I’ve set the first MixConsole to have fairly narrow channel widths, so I see plenty of channels, and have configured MixConsole 2 to have much wider channels, so I can see more detail in each channel. By building separate Workspaces around these different MixConsoles, I can easily switch between two otherwise identical Mixer window screen layouts to see different channel resolutions on the mixer.

By exploiting the three alternative MixConsole views, you can easily create Workspaces that allow you to switch between different channel-width settings for different mixing tasks.By exploiting the three alternative MixConsole views, you can easily create Workspaces that allow you to switch between different channel-width settings for different mixing tasks.Second, once you’ve established your top Global Workspaces, don’t change the number and/or order of them unless you really have to. As mentioned earlier, the key commands for Workspaces are dynamic, which makes them potentially volatile: if you delete one at the top of your list, everything else can get shuffled up the key command sequence. This isn’t particularly helpful for a time-saving feature, as you can suddenly find a significant number of Workspaces don’t appear exactly as you expect them to! You’d be better off overwriting ones you no longer need with a new option.

Third, Global Workspace presets are stored in the Window Layout XML file. You can search for this in your file system (I’m on OS X, so for me this is in the /Users/username/Library/Preferences/Cubase 8/Presets folder) and it’s worth making a backup of this file once you have spent time crafting your Global Workspace presets. If you want to take your Workspace layouts to a different system you can overwrite this file with your own (remember to back up the original before you overwrite it!), although how well your Workspaces will travel depends on how closely the two systems’ screen resolutions match.

Finally, while Steinberg have ironed many of the previous wrinkles out of the Workspace feature set in Cubase Pro 8, there’s still the odd quirk. Even so, as part of your own Cubase efficiency drive, Workspaces can be an essential tool, particularly for anyone working on laptops or single-screen systems. 


Published November 2015

Wednesday, July 24, 2024

Backup To The Future

Your Cubase project is recorded, mixed and mastered... but is it secure?

Any long-standing SOS reader will be only too aware of the evolutionary nature of recording technology. Whether it’s two-inch multitrack tape, four-track cassettes, ADAT, dedicated hard-disk systems, SD cards or — as is currently the case for most of us — hard drives or solid-state storage within desktop computers, this evolution includes changes and redundancy in recording formats over time. This is a significant issue and, while digital hard-disk-based recording might be ‘better’ in terms of convenience and flexibility, I’m not so sure it is ‘better’ in terms of longevity or portability. Fortunately, Cubase 8 has a pretty comprehensive set of tools to both back up and future-proof your projects. Matt Houghton last looked at this topic in September 2010, when Cubase was at version 5.5. Five years is a long time in Cubase and computing terms and while some things have remained the same, there are some new options. So, if you’re using Cubase 8 and want to back things up so you can revisit them in the future, read on...

The Prepare Archive command will ensure you have (almost!) all your project data in one place.The Prepare Archive command will ensure you have (almost!) all your project data in one place.

Strategy Meeting

When it comes to your (recording) data security, there are two aspects to address. First, you want to ensure that your entire recording project exists in a self-contained form in at least two discrete places (that is, on your primary computer’s hard drive and on a second, physically separate, hard drive) in case the primary drive fails; in other words, you need a backup. Ideally, you want a third backup somewhere off-site — otherwise, if, perish the thought, your studio suffered a fire, you’d lose everything.

Second, you need protection against incompatibilities caused by upgrades or casualties with your OS, audio plug-ins and virtual instruments; you need to future-proof your project. Creating an audio-only render of each track within your original project is probably the best current solution. It also brings the added benefit that you would also have a version of your project that could, with minimum fuss, be imported into another DAW should you need to work with it on another computer system or in a different studio.

Copy Right

The backup phase can, itself, be split into two main stages. Before you can actually create the backup copy, you have to ensure all the media (audio, MIDI and video) associated with the project resides in a single folder. With the project open, execute the Media/Prepare Archive command. When executed, Cubase checks to ensure that all the media files used within the project actually reside within the project folder and, if not, you are offered the opportunity to copy them to the project folder.

Music-to-picture composers often stream their video files from a dedicated drive so, by default, they may not reside within the project folder. If that’s the case, a ‘copy to project folder?’ prompt appears. Be careful though; video files can be large and, once copied, if you continue to work on the project, the clip will stream from the project folder rather than any dedicated video drive.

Having formed your self-contained project folder, the second step is to execute the File/Back up Project command. The dialogue box allows you to specify a new folder location for your backup copy (preferably on a dedicated, separate drive used for backup purposes) and to rename the backup copy of the project. It also provides an opportunity to spring clean the project’s media files. The combination of the Minimise Audio Files option (which excludes any portions of audio files not currently used in the project) and Remove Unused Files option (unused media files are removed from the working project and, therefore, are also not included within the backup version) can pare the project’s size down considerably. The downside is that the process is non-reversible; once those unused takes are gone, they’re gone. Whether you apply these options will depend on how decisive/ruthless you are about a project being ‘finished’.

The Back up Project dialogue can both create a  backup and tidy up some media-file clutter.The Back up Project dialogue can both create a backup and tidy up some media-file clutter.There’s a further catch. If your project contains any of Steinberg’s VST Sound content (held in the VST Sound folders you can view from MediaBay and including, for example, any Steinberg loop packs or LoopMash content), note that this is copy-protected and not present in either your project folder or any backup copy. If you eventually have to use the backup copy on your own system, this should not be an issue. However, if you try to open it on a different host system, you will need to ensure that the same VST Sound content is installed for things to work smoothly.

Limited Shelf Life

The backup process described above provides you with security against hard-drive failure. However, it will not protect you — a few years down the line, perhaps — from the possibility that several of the virtual instruments or effects plug-ins used in a project may no longer exist.

While it’s not a completely future-proof solution, rendering out each track of your finished project as a standard audio file (including any track-level plug-ins) is probably as good as it currently gets. If you use the ‘Pro’ version, Cubase offers you two ways of doing this; the channel batch option within the Export Audio Mixdown (EAM) system or the newer Render In Place (RIP) options. I touched on the latter in SOS October 2015 and as I mentioned then, there’s some overlap between the older EAM and newer RIP functions, so let’s consider their differences for the task at hand — a track-level audio archive of our project. (Incidentally, Cubase also has the Track Archive function but this is a somewhat different beast and a topic for another day.)

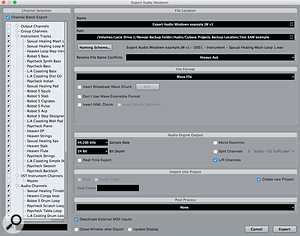
The Channel Batch Export option in the Export Audio Mixdown dialogue box makes audio-only archives very easy to generate.The Channel Batch Export option in the Export Audio Mixdown dialogue box makes audio-only archives very easy to generate.While EAM provides a suitable means of generating your final stereo mix file from a finished project, or for creating stems from any Group Channels, it can also be used to generate a full, track-level, audio-only version of your project. And, if you’re using the full (Pro) version of Cubase, the Channel Batch Export option within EAM allows you to create all those channels in a single pass.

In the example shown in the screenshot, I’ve enabled Channel Batch Export and selected all the Instrument Tracks and Audio Channels for export. I’ve also selected a new folder in the Path field. With a new folder, you get a Create New Project option in the Import Into Project section. Select this and, when you hit the Export button, Cubase will create a new version of your project in the folder you specify and open it in Cubase. Each of the original tracks will have been replaced by an audio track running from bar 1 beat 1 to the end of the project. While this means you get lots of sections of silence in the audio files, it’s about as universal a format as it’s possible to have — if you had to open the files within another DAW, it would be very easy to line everything up to start with.

There are a few things worth noting. First, the EAM dialogue doesn’t allow you to mix and match audio file formats. In the screenshot, I’ve created stereo files for each track but you can also opt for mono or split stereo. If your original project includes a mixture of stereo and mono audio tracks, you could easily do two passes to render the stereo and mono tracks separately in their correct formats. Second, note that this is an audio-only process so, while it works with Audio, Instrument, Group and FX tracks, if your project includes a video track, you’ll have to handle that manually.

Render In Place gives you more control than Export Audio Mixdown but is perhaps better suited to audio-only archives that are only intended for use in Cubase itself.Render In Place gives you more control than Export Audio Mixdown but is perhaps better suited to audio-only archives that are only intended for use in Cubase itself.Finally, it’s worth noting that the created audio files are rendered with all the track-level processing (Pre-section, Inserts, EQ and Channel Strip) applied but without any send effects or master channel processing. This is probably a good thing but it does mean that, should you have to use this audio-only archive at some stage, you will need to reapply any main stereo output processing in order to fully recreate the original mix, and that you’ll not have access to the send effects for individual tracks — if two vocal parts have been sent to a reverb, you can print that FX channel, but you can’t separate the reverb for the two parts.

I covered the basics of the alternative RIP approach in SOS October 2015 so I’ll not repeat that here, but it’s worth highlighting the differences between the two methods. On the plus side, RIP provides more control over how far you can go down the effects processing food chain than EAM (although, that said, the Channel Settings option is still the most sensible for this application) when rendering. In addition, RIP handles the mono/stereo status of the original tracks in a single pass.

On the downside (well, a downside if you’re looking to create an audio-only archive to open in something other than Cubase), unlike EAM, the rendered audio files don’t all start at bar 1 and finish at the end of the project; they only span their length/position in the original project. Cubase will time-stamp WAV files, so they can be aligned in another DAW, but relying on this method will make your backup that bit less bullet-proof! Finally, like EAM, RIP will not deal with any video files used in the project so you’ll need to manage these manually. On the whole, while I like the direction that Steinberg are heading with RIP, for this kind of total project audio rendering, at present, I think EAM is still the more efficient solution.

Insurance Policy

Bad stuff beginning with ’s’ happens even in the most well-looked-after computer recording system. When it does, if your projects are securely backed up, and also exist as audio-only archives, at least you can ensure that ‘bad’ doesn’t go to ‘worse’. The one loose end to tie up is to recommend that you also export all the MIDI data from Cubase as a MIDI file. Amongst other things, that will enable you to revisit instrument sounds in the future, and to quickly establish the project’s tempo, should you wish to add new parts to your audio project. 


Published December 2015

Monday, July 22, 2024

VCA Team

VCA faders have been created for each sub-section of a drum kit, with these VCA faders then ‘nested’ underneath a ‘Drums master’ VCA fader on the far-right.VCA faders have been created for each sub-section of a drum kit, with these VCA faders then ‘nested’ underneath a ‘Drums master’ VCA fader on the far-right.

Make mixing in Cubase Pro 8 that little bit easier with VCA Faders.

Back in SOS October 2014 (http://sosm.ag/cubase-vca-1), Matt Houghton expressed a wish for a true VCA-style fader/automation system in what was then Cubase 7.5. Matt devised a workaround solution that still applies for anyone using a ‘lite’ or older version of Cubase, but Cubase Pro 8, which was released shortly after that article was published, includes VCA fader facilities. These provide some useful options for streamlining your mix and automation processes, and are well worth exploring.

VCA Rules!

There’s no great mystery to the advantages of voltage-controlled amplifier (VCA) faders. In suitably equipped mixers (hardware or software) you can link any group of standard channel faders to a VCA fader: adjust the VCA fader and it automatically applies the same gain change to any of the linked channels while preserving the relative level differences between those linked channels. Used to manage levels of particular instrument groups (drums, guitars, bass, vocals and so on), it means far fewer faders to worry about when setting your overall mix balance. And, in systems where the VCA faders can be automated, the process of creating your mix automation is also made that much easier.

You can achieve similar things by using sub-group channels, and Cubase has had its Group Channels for quite some time. There’s one important distinction to note, though: Group Channels involve the routing of audio from the various standard channels through to the new submix/group channel and, from that submix channel, on to the master output. With VCA faders, there is no additional routing involved; all the VCA fader does is control the gain of the standard channels that are linked to it.

The combination of Groups and VCA faders presents you with some useful choices. For example, consider a typical multi-channel drum recording. If you use the individual channels just to balance the kit (with or without insert effects on individual channels) but wish to apply some kit-level compression and reverb, a Group Channel might work best. The audio from your individual drum channels will all be routed to the Group Channel, onto which you can (a) place a compressor insert effect and (b) set a send to your reverb effect — job done, and your Group Channel fader will control the overall level of the kit quite happily.

The Link Group Settings panel allows you to configure your Link Group and to add a VCA Fader to it.The Link Group Settings panel allows you to configure your Link Group and to add a VCA Fader to it.However, if you want to apply send effects only to specific individual channels of the drum kit (for example, reverb to the snare and toms but not to the kick), the Group Channel approach is perhaps not ideal. As you adjust the Group Channel fader to adjust the overall level of your kit, the amount of post-fader send levels in the individual channels are not changed. Lowering the Group Channel fader to zero will silence the kit, but the individual channels will still be sending audio to any send effects — so you’d still hear elements of the kit on the reverb on the effects channel.

Using a VCA fader rather than a Group Channel fader to control the overall volume brings a different, and in this case, more desirable result. As the VCA fader directly changes the audio levels for the individual drum channels, when the VCA fader is lowered, so is the audio contribution to any post-fader sends that you’ve configured on the individual channels. Lower the VCA fader to zero and, not only do you silence the kit, you also stop any signal from the individual channels reaching the reverb effect via their sends.

The VCA Way

Behind the scenes, the new VCA faders aren’t entirely new: they’re actually an extension of the existing channel-linking features in Cubase Pro 8. Having selected a series of channels in the Mix Console, right-clicking opens a pop-up menu from which you can select Link Selected Channels. This opens the Link Group Settings panel where you can configure which channel properties will become linked. The panel also includes the ‘Use VCA Fader’ option and, if selected, a new VCA fader channel (with a green fader head) will be added to the project. If you want to bypass the Link Group Settings panel, there is also an ‘Add VCA Fader to Selected Channels’ option in the pop-up menu.

New link groups are numbered by default but you can rename the link (at the top of the VCA fader channel) and rename the VCA fader channel itself (in the standard virtual scribble strip at the base of the channel). You can also re-position a VCA fader channel in the Mix Console by moving it within the Project Window’s Track List. It’s also worth noting that VCA faders are not just for use with audio channels; instrument and MIDI channels can also be included in a Link Group and controlled via a VCA fader.Level automation data can be created both for the individual channels and for the VCA faders, with both displayed on the GUI. This applies even with nested VCA faders.Level automation data can be created both for the individual channels and for the VCA faders, with both displayed on the GUI. This applies even with nested VCA faders.

Build A Nest

An individual channel can only be linked to one Link Group (and therefore one VCA fader) at any one time. However, you can still ‘nest’ VCA faders. For example, taking our multitrack drum kit example again, if you assigned your various snare mics to one VCA fader and your multiple kick mics to a second VCA fader (and so on), this provides you with a series of VCA faders for easy balancing of your various drum kit elements.

You can then select these VCA faders and, via the same process as described above, control these VCA fader channels using a further VCA fader, which becomes your ‘drum master fader’ for balancing the overall kit level relative to other elements (guitars, vocals, bass and so forth) in your mix. With complex projects featuring lots of tracks, using VCA faders — nested or otherwise — provides an excellent means of reducing the number of individual faders you have to deal with during the mixing stage.

Mix Magic

It would be great if every mix was simply a case of pushing faders until each instrument was at a suitable level, but in most cases these days some mix automation is required. This might require you to automate levels (or other settings) for your individual channels, of course, but you can also automate VCA faders.

If you apply level automation to both individual channels and VCA faders linked to those individual channels, the automation data is ‘summed’ to produce a level envelope (a feature that wasn’t easy with Matt’s workaround). This can take a little while to get your head around but, as shown in the screenshot, for the individual channel (in this case a kick drum) you see both the individual channel’s automation data (the thin — editable — line within the lane) and a thick line that shows the resultant volume changes once any VCA fader automation is added to the individual channel automation data.

VCA fader tracks also display volume-envelopes automation lanes, and you can edit these. As you do so, you can watch the thicker resultant automation curve change within any linked individual channel.If you want to tidy up the appearance of your level automation data, the ‘Combine Automation of VCA and Linked Channels’ option will do the trick.If you want to tidy up the appearance of your level automation data, the ‘Combine Automation of VCA and Linked Channels’ option will do the trick.

There are three further things to be aware of. First, if you have ‘nested’ VCA faders (as I have in the screenshot with an individual kick drum channel, a ‘kick master’ VCA fader and a ‘drum master’ VCA fader that controls the whole drum kit), the top-level VCA fader shows a single (editable) automation envelope while the nested VCA fader shows both its (editable) automation envelope and a resultant automation envelope (in this case, the result of the ‘kick master’ and ‘drum master’ VCA faders). However, in the individual channel (in this case the kick drum), you still only see two automation curves; one from the individual channel and the resultant envelope which, in this case, is the resultant of the individual envelope plus a combination of all of the nested VCA faders.

Second, if looking at all these multiple volume envelopes gets your head spinning, you can clean up the display of the data. From the VCA fader’s pop-up menu, simply select the ‘Combine Automation of VCA and Linked Channels’ option. This converts any individual channel’s resultant volume envelope into the actual (editable) automation data for that channel and resets the VCA fader’s automation data to a static value of zero. This is actually quite useful if you like to do your VCA level automation in a number of passes in that it allows you to visualise more clearly the changes you are making with each pass.

Third, some care is needed if you use VCA faders for automating mute or solo operations. When adding volume automation via a VCA fader, you only need to activate the ‘write’ status for the VCA fader concerned. That automation data will automatically be applied to any channel linked beneath that VCA fader. However, if you want to use the VCA fader’s mute and solo buttons to add automation to the individual linked channels, you have to also engage the ‘write’ status of any of the linked channels that you wish that automation to apply to. I’m not sure if this is ‘by design’ or just something of a quirk, and I’ll leave better minds than mine to work that one out! 


Published January 2016