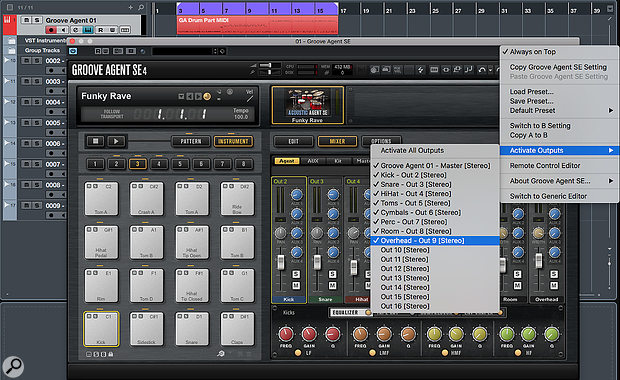
 Groove Agent SE allows you to activate multiple output channels and route each drum sound to a different output.
Want to convert your multi-channel instruments into audio? Here’s how to do it in Cubase.
VST Instruments are wonderful things, but sometimes converting them to good old-fashioned audio is helpful. When using several heavy-duty virtual instruments it’s easy to push your computer beyond its CPU, RAM and disk-streaming comfort zones; converting your virtual instruments’ outputs to audio tracks when you’re ready to mix can free up resources. Alternatively, when porting the project to another system (be it a Cubase one or another DAW) for mixing, you can’t guarantee access to the same instrument plug-ins, and providing the audio files is the next best thing. And when archiving your project, it makes sense to include a version of everything in as future proof a format as possible — at present there’s nothing more future proof than audio files.
Going All Out
When the VSTi has only a single stereo output, the process is fairly straightforward, but if you’ve enabled multiple output channels, things can become more complex. Note that there are a number of different possible approaches, and their availability depends on which version of Cubase you’re using.
To illustrate the different approaches here, I’ll use Steinberg’s Groove Agent SE (GA SE, which is bundled with most versions of Cubase), but the same principles apply to lots of multi-out VSTis, such as NI Kontakt 5, Toontrack EZ Drummer and Steinberg’s Halion Sonic SE. Like most virtual drum instruments, GA SE features its own internal mixing environment, where you can balance and process the individual kit pieces before mixing them and outputting everything on a stereo channel. But many users prefer to do their drum mixing in Cubase’s main MixConsole, where they have access to all their favourite plug-ins and can automate the levels of kit pieces and route them to send effects, just like any other audio source. To make this possible, activate GA SE’s additional audio outputs using a pop-up menu, opened via the small downward arrow icon (located top-right of the VSTi’s window). In the first screenshot, I’ve activated outputs 2 to 9 as well as output pair 1 (the main stereo output).
 Output busses can be used to route audio from a VSTi’s output to a stereo Audio Track, where it can be recorded in real-time. I’ve shown a single example here, but with lots of VSTi output channels the MixConsole can get messy, and you don’t get much control over the track layout.Once activated, go to the MixConsole, where it’s quick and easy to rename these output channels to something more meaningful (the edited names will then shown in the Activate Outputs pop-up menu). Next, in GA SE’s internal Mixer, set the routing of each drum/mic to the appropriate GA SE output channel. If all goes to plan, when you play back your GA SE MIDI track, the sounds should appear on the appropriate channel in the MixConsole.
Recording Via Groups
So far, so good: our VSTi multi-channel audio is routed to suitably labelled tracks in the MixConsole. But if we want to ‘capture’ each channel as separate audio files, how would we go about it? One thing we can’t do is use Cubase’s Track Freeze. While track freezing is useful in relieving some system resources, it doesn’t allow you to create separate files for each of the VSTi’s output channels. Cubase doesn’t allow you to directly record the audio from a VSTi onto these output channels, either. Indeed, the relevant MixConsole channels don’t feature record-enable buttons — only the default VSTi stereo output channel has one, and that’s to enable MIDI recording.
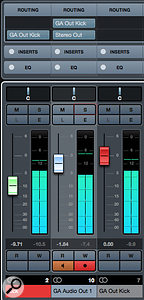
 MixConsole’s Routing panel.However, you can ‘capture’ the various VSTi output channels to regular Audio tracks. And, while newer versions of Cubase offer more elegant solutions, which I’ll discuss below, there’s a (slightly clunky) routing workaround for older verions. In Devices/VST Connections, create a new Output Bus for each of the additional VSTi outputs you wish to record from. The Device Port setting for each of these should be ‘Not Connected’. Then create the same number of stereo Audio Tracks. With eight GA SE VSTi output ports in use, eight new Output Busses created and eight new stereo Audio Tracks also created, things can get a bit busy in the MixConsole, so some suitable track labels are also useful at this point!
In the MixConsole’s Routing panel, set the output destination of the appropriate VSTi channel to the respective Output Bus. Then set the input of the respective stereo Audio Track to that Output Bus. Enable the Audio Track’s Monitor button and — via the Output Bus — the VSTi’s output gets routed to the Audio Track. Record-enable the Audio Track, and you can capture the VSTi output. Yep, it’s a bit of a faff... but it works!
Rendered Useful
More recent versions of Cubase Pro or Artist offer a more elegant option: Render In Place, which can create audio channels in place of all your VSTi’s active audio outputs. For our GA SE example, you’d simply select the MIDI clip and choose Edit/Render In Place. The Render Settings panel allows you to customise how the rendering is handled, but the default settings should work well enough. With the ‘dry’ render-in-place option, the VSTi’s audio is unprocessed, and any inserts and sends you’ve added to your VSTi’s output channels will be copied to the new audio tracks — so you’ll have an identical set of mixer channels, ready to be mixed or exported/archived.
This process works very well with Steinberg’s GA SE or Halion Sonic SE but, for some third-party plug-ins (and Kontakt is an example) it has a tendency to generate rather more audio tracks than you might expect! That said, such ‘bonus’ tracks will contain only empty audio clips, so they’re easy to spot and remove.
 When applied to an Instrument track with multiple outputs, the Render In Place facility creates an audio track for each activated output.
Export Business
For Cubase Pro users, the Channel Batch Export feature is another option. Choosing File/Export/Audio Mixdown opens the usual Audio Export Mixdown dialogue box; the Channel Selection Panel hosts most of the options we need. Here, amongst all the other track output options you’ll see a section devoted to VST Instrument Channels, and if you expand this then all the VSTi outputs you activated will be displayed. If you then activate the Channel Batch Export option at the top of the panel, you can select as many of the VSTi output channels as you like, enabling the rendering of all the outputs in a single-pass operation.
 The Channel Batch Export options.
As when creating your project’s final stereo bounce, before you hit the Export button, you can tweak some settings to define the properties of the audio that’s ‘exported’. One option worth exploring is the Naming Scheme. Via this, you can ensure that the resulting audio files — and any new Audio Tracks created, if you activate the Import Into Project option — are given memorable names. Whether for later audio-only mixing sessions, or for archive purposes, this will make life much easier.
Lessen Obsolesence
As mentioned earlier, transforming your multi-channel VSTi outputs into audio tracks can be useful for both mixing and project portability. But it’s also a sad fact of modern music technology that software instruments inevitably evolve into something new (and can’t be relied upon to play in older projects), lose links to sample long-forgotten libraries, or disappear completely with old, obsolete or broken computers. Rendering audio from your multi-channel VST instruments gives you both flexibility (for mixing) and security (for archiving). Your future self will thank you for being so well prepared!
No comments:
Post a Comment