By John Walden
 Making a clean and compact backup of your current project is easy in all versions of Cubase.
Future-proof your projects. We examine the archival options for users of Cubase Elements, Artist or Pro.
While archiving your projects is perhaps not the most exciting aspect of working with Cubase, you'll one day thank your younger self for having put in the effort, so in this month's column I'll examine the archival options for users of Cubase Elements, Artist or Pro. Archiving isn't just about saving your project to another hard drive; it should ensure that you have a backup copy should the original project be lost or become corrupted. It should also ensure that you can access your project even without the current versions of Cubase or the plug‑ins you used.
The first step is to decide on the balance between your desired degree of future-proofing and the time and effort required to achieve it. I tend towards pragmatism rather than perfectionism, and will focus on the former here. But hopefully there will be enough ideas here that you can develop a more comprehensive strategy if you prefer.
All Backed Up
A sensible first step is to create a self-contained backup copy of a project that would restore the project on your own host system in the event of data loss. It's a two-step process and can be done in an identical fashion in Pro, Artist and Elements.
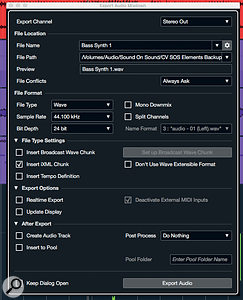
 Using the Audio Mixdown dialogue (shown here in Cubase Elements) allows you to render your virtual instrument tracks to audio, albeit one at a time.
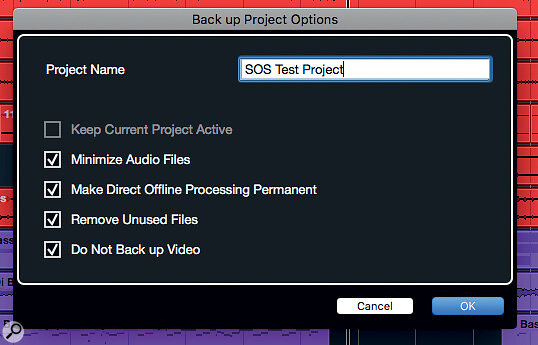
First, execute the Media/Prepare Archive command. This will check whether all files referenced by your project reside in the project folder, and will place copies of them in there if not. Second, from the menu, select File/Back Up Project, and you'll be prompted to specify a new folder for the backup copy. A few tickbox options dictate exactly what gets placed in the new folder. Minimise Audio Files (only copy those portions of any audio files actually used on the timeline) and Remove Unused Files will help keep your backup compact. Provided everything else (plug‑ins, sample content locations) remains the same on your host system, this backup project should open fully intact and ready to go if your original working copy is lost.
The Future Is Now
While useful in the short term, the above process won't protect you from plug‑ins that might go missing in the longer term. The most straightforward insurance against this problem is to render all the project's audio and virtual instruments tracks as audio files, with all channel-level processing included. If you like, you can do the same with all the channel processing bypassed, so you have a version of your audio files with any edits, for example, but free from processing, which is handy if you want to revamp your project in the future.
What follows will work in all versions of Cubase. It's a little clunky, though, and users of Pro have a better option in the Export Audio Mixdown dialogue, on which more later. First, save a copy of your project with a suitable 'version for future-proofing' name. If the Freeze button isn't already visible, right-click on any track in the Track List to open the Track Controls Panel and make it visible for both Audio and MIDI tracks. Track freezing is actually designed for reducing CPU loads, but it also happens to create an audio render of the frozen track, and places this in a new folder (sensibly named Freeze) in your main Project folder. The render file 'captures' both the audio and the results of any channel processing, but there is a catch. In order to keep the file sizes compact, the Freeze function only captures those sections of your track where something is actually happening, and without a little further intervention before freezing, the format of these renders doesn't really meet our 'archiving' needs.
 If you are not using Cubase Pro, a workaround combining the track Freeze and Audio Mixdown dialogue features can let you create an audio-only render of all audio and virtual instrument tracks within a project.For audio tracks, the workaround is simple. First, find a short (a single bar or beat) section of one of your audio tracks that contains silence. Second, copy this clip to the very start of every audio track that doesn't already start at bar 1, beat 1. Third, select all the audio events on a track (or tracks; you can handle multiple tracks simultaneously) and from the file menu execute Audio/Bounce Selection. This replaces all the separate audio events on each track with a single contiguous event starting at bar 1, beat 1. Finally, if you now Freeze each audio track, the Freeze files will all start from bar 1, beat 1 and can be dragged into a new project.
For virtual instrument tracks, a different workaround is required, and must be done one track at a time. In the MixConsole, make sure the output of every virtual instrument track is set to the main Stereo Output. Next, bypass any plug‑ins on the Stereo Output bus (so you don't end up capturing a 'mastered' version of the instrument's audio). Then set the left locator to bar 1, beat 1 and the right locator to a point just beyond the end of your project.
Finally, one VSTi track at a time, solo the track and execute the File/Export/Audio Mixdown command. In the Audio Mixdown dialogue box, specify a filename to reflect the track's contents and point the File Path to the Freeze folder (which, assuming you've already dealt with your audio tracks as described above, will already be there). In the After Export section, deselect the Create Audio Track and Insert To Pool options (so you don't get extra tracks or audio file entries cluttering up your project) and hit Export Audio. Repeat as required for each virtual instrument track.
Then there's the MIDI: the audio might give you all you need, but you may want to consider archiving the MIDI information used to trigger any virtual or hardware instruments so that you can, for example, choose different voices or layer different parts and so forth at a later date. To do this go to File/Export/MIDI File. You'll find a few options here, so you should feel free to explore them, but the defaults should suffice.
Go Pro?
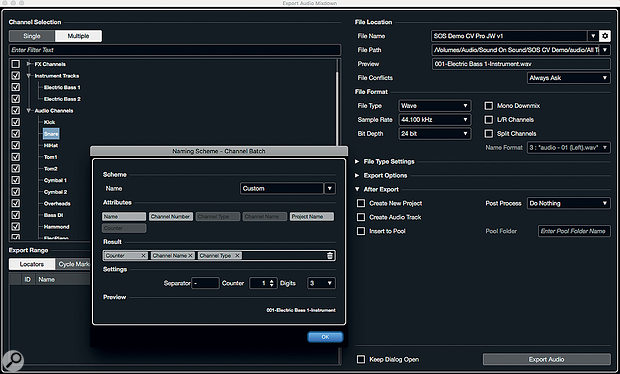
Cubase Pro makes this all much easier as it allows the simultaneous export of multiple tracks (any track type that uses audio) over a time range defined by the left and right locators, so every audio file created starts at the same time point and is exactly the same length. You can define a dedicated folder for the exported files and a naming scheme that can number and name the tracks. (Note that I've also deselected the Create Audio Track and Insert To Pool options.)
 Cubase Pro's Audio Mixdown includes batch processing, making it easier to create a render of all the audio and virtual instrument tracks within a project.
Perhaps the only catch is that you have to choose stereo (the default) or mono bounces; you can't do both at once. So either choose to live with stereo (no real hardship, unless you're trying to create a particularly compact archive) or perform the export in a couple of passes, dealing with stereo and mono (tick the Mono Downmix box) separately. Either way, Pro makes this process incredibly efficient, and for users of other Cubase versions, this might be reason enough to upgrade.
Peace Of Mind
Yes, it's fiddly, but if you've followed all these steps, you'll have access not only to a backup of your project, but also a version of the project's tracks where you can drag and drop all the files to bar 1, beat 1 of a new project. You'll have a pretty good working version of the original audio, the processed audio, the MIDI information — including the project tempo — and to virtual instrument tracks. Together, these files should meet pretty much any need when it comes to resurrecting a project, be it tomorrow or many years down the line.
Whichever route you took, it's now time to copy your archive to an external drive, and ideally somewhere off-site too. Next time, I'll expand on these ideas and look at additional export options to help ensure a smooth workflow when collaborating with other musicians or mix engineers. Until then, keep your data safe.
No comments:
Post a Comment