 Some freeware plug‑ins that can enhance your DIY mastering experience in Cubase Elements.
Want to try a spot of DIY mastering? You can do so in any version of Cubase 11, including Elements.
Realistically, we can’t all get every track we write mastered professionally. But we still want our material to sound ‘finished’ so it’s natural that many of us look to dabble in a little DIY mastering. Our recent six‑part video series on the subject by mastering engineer Ian Shepherd (https://sosm.ag/MasteringTechniques1) is a great introduction to the topic, and I’d encourage you to watch it. One of the key things Ian explains is that, for the basics of mastering, his processing chain is always simple: it consists only of gain adjustment, EQ, compression and limiting, although he also makes use of various meters. That got me wondering how someone might attempt DIY mastering for the first time if using a relatively basic DAW such as Cubase Elements 11, perhaps with the help of a few freebie plug‑ins.
Seeing Is Believing
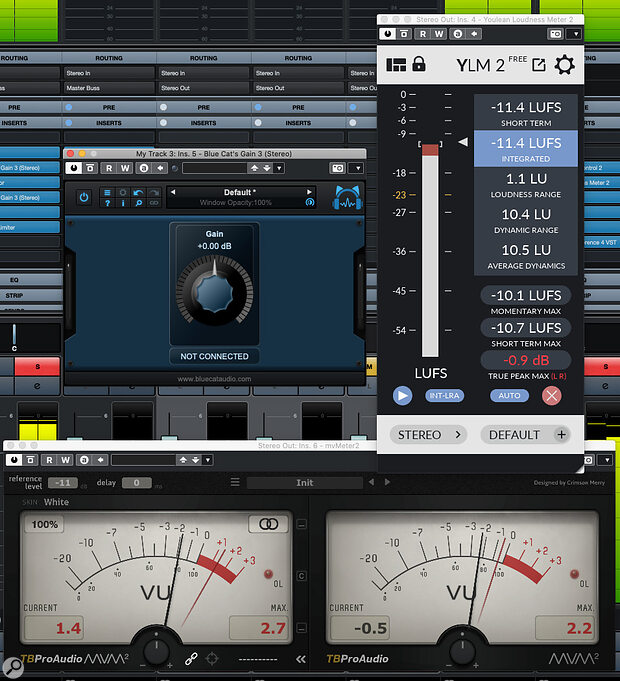
Ian discussed how useful he finds it to be able to visualise both the spectral balance and loudness of the audio. Cubase Pro 11 has comprehensive loudness metering, courtesy of its SuperVision plug‑in, but users of Elements or Artist don’t have that and nor does it provide us with one of Ian’s favourite tools: a virtual VU meter. Happily, you can add one of those for free (eg. TBProaudio’s mvMeter and PreSonus’ VU Meter). Elements and Artist users might also want to investigate Youlean’s Loudness Meter 2 Free (there’s also a paid version with more features but the free one should do just fine).
Loudness targets can be a matter of personal taste, musical genre and where you intend the final master to be played (vinyl, CD or a streaming service, for example) but in the audio examples that accompany this article (on the SOS website at https://sosm.ag/cubase-0421) I’ll not veer too far away from Ian’s suggestions of ‑11dB on my VU meter (by calibrating the zero point on the meter to ‑11dB) and ‑10 LUFS for short‑term loudness of the loudest part of my mix. For visualisation that can help you achieve a ‘balanced EQ’ (rather than EQ matching), I’m not sure Cubase (or any other DAW) really has anything to match something like iZotope’s excellent Tonal Balance 2 plug‑in, but there are nonetheless some simple, pragmatic workarounds that I’ll touch on below.
Simple Steps
Even though it’s technically possible to mix and master a single track in the same Cubase project, I recommend handling them as two separate processes — partly for the clarity of thought this forces upon you, and partly so that you can master multiple tracks together (eg. for a compilation such as an album or EP). Each track will still require different mastering treatments, of course, so place each finished mix on its own stereo audio track in a new Cubase project. You can still use the same insert plug‑in chain for each, but this way you can tailor the settings to suit each track. You can also import any reference tracks you want to audition, again putting them on their own stereo track.
The first screen (above) shows the plug‑ins I used in Cubase Elements 11 to recreate Ian’s basic signal chain, and these are the settings I used for the first audio example. My first step was to use freebie VU and loudness meters to adjust the Pre‑Gain in the Channel Settings dialogue. I aimed for something with average/peak levels 2‑3 dB below Ian’s suggested final targets, because I knew my EQ, compression and limiting would likely add some gain.
My second step was to compare the frequency spectrum displays of a reference track (using the Channel Settings dialogue for that track) with my track (using the StudioEQ plug‑in). This way, the two frequency displays can be seen on screen at the same time, so it’s relatively easy to see any broad ranges where the balance is noticeably different. In this case, that lead me to make a broad 2dB gain increase centred at 5kHz (to add some brightness) and a smaller 1dB boost at around 125Hz, for just a touch more low‑end umph. For the sorts of subtle, broad, EQ moves Ian recommends, StudioEQ’s four bands are generally sufficient but you could always use a second instance if more complex correction is required.
Third, with a gentle 2:1 ratio on Cubase’s Compressor plug‑in, I gradually lowered the Threshold until I could see at most around 3dB of gain reduction, which generally sounded ‘transparent’. The Compressor plug‑in includes a Dry Mix control, so you can blend the unprocessed and processed signals, and with modest compression like this, that can be a useful way to adjust the severity of the compression; I quite liked the blend set at 50:50 so left it there.
Finally, I used Cubase’s Limiter with the Output set to ‑1dB. In this case, I didn’t need to adjust the Input level to achieve my fairly conservative target of 3‑4 dB maximum gain reduction of the peaks. The screenshot also shows an instance of Brickwall Limiter inserted after Limiter; I’m not 100‑percent sure why anything above ‑1dB gets past the Limiter to reach the Brickwall Limiter (answers on a postcard please) but as it does, this additional limiting stage takes care of any stray ‘overs’.
 For basic DIY mastering, a simple chain of StudioEQ, Compressor and Limiter is a good place to start. (The Brickwall Limiter simply acts as a final safety net to prevent clipping.)
How High?
Toggling on/off the Insert Rack in the track’s Mixer channel allows you compare your original mix with your master‑in‑progress. Note, though, that the difference you perceive will be influenced by any overall loudness changes (that you can also check via the VU and loudness meters). You can, if you wish, add a freeware gain plug‑in such as Blue Cat Audio’s Gain 3, at the end of the chain to attenuate your master, for more meaningful loudness‑matched comparison — but you must remember to bypass it when you bounce your master!
For the example, the settings in the main screenshot got me pretty much exactly where I wanted to be in terms of Ian’s suggested loudness ‘targets’. But being able to adjust the gain between StudioEQ and Compressor, or between Compressor and Limiter, can be useful: you can experiment with how hard you can drive either the Compressor or the Limiter before the mastering becomes overcooked. Again, a separate gain plug‑in can be useful here, as it allows you to toggle on/off the gain change without adjusting any parameters in the StudioEQ or Compressor plug‑ins. It’s an interesting experiment and one I’ve included in the audio examples that accompany this workshop.
Easy Squeezy
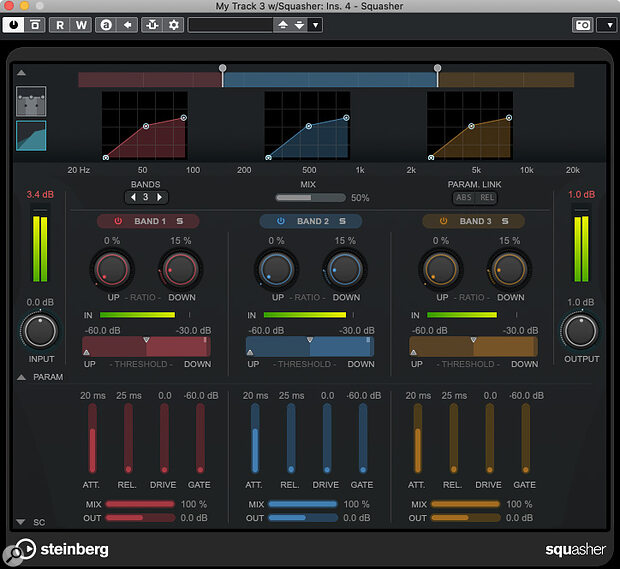
One obvious difference so far between my keep‑it‑simple Cubase Elements signal‑processing chain and Ian’s chain in Wavelab is that the latter included a three‑band compressor. All versions of Cubase 11 include the new Squasher plug‑in, though, so if you’re feeling adventurous you might use an instance of Squasher in place of Compressor. The final screenshot shows the settings I used to do this.
 If you feel brave enough to use multiband compression, you can try putting Squasher in place of Compressor in your mastering chain.
First, I set all Squasher’s upwards compression features so that they were essentially bypassed, and put all the Drive controls to zero too. I then followed Ian’s advice, configuring each band with identical settings and, where possible, I used similar settings to those I used with Compressor earlier. The obvious exceptions are the Down Ratio and Down Threshold, which are a little unconventional in Squasher. I simply used the mini‑graphs at the top of the display to set the Down Ratios to find a gentle(ish) compression slope (to match the relatively low ratio setting used in Compressor), and then adjusted the Thresholds until I could see just a few dB of gain reduction in each band. Note that I also set Squasher’s global Mix control to 50 percent, as I’d done in Compressor, just to back off the overall compression a little.
Once configured, I could again experiment with my freebie gain plug‑ins pre‑ and post‑Squasher, to control how hard the compression or limiting (or both) were driven. I’ve included a further set of audio examples so that you can hear the differences between the two alternative processing chains.
Final Thoughts
It’s well worth creating presets for each plug‑in that you use, as well as a preset for the full Insert signal chain (do this in the MixConsole’s Insert Rack), and even creating a basic project template for mastering. The fully configured processing chain(s) can then be quickly reloaded when you need them. You’ll always have to fine‑tune the settings for every mix you want to master, but the basic chain will still provide you with a solid starting point and save you time.
Hopefully, the above examples show that it’s possible to attempt some basic DIY mastering even with the modestly priced Elements version of Cubase 11 and just a few freeware plug‑ins. But if you have Cubase Pro, you’ll have more sophisticated tools at your disposal, which are capable of better results — or, if misused, worse ones — and we’ll investigate all that in a future workshop.
Published April 2021
No comments:
Post a Comment