Welcome to No Limit Sound Productions

Company Founded
2005
Overview

Our services include Sound Engineering, Audio Post-Production, System Upgrades and Equipment Consulting.
Mission
Our mission is to provide excellent quality and service to our customers. We do customized service.

Friday, April 30, 2021

VST Expression

 By John Walden


VST Expression, introduced in Cubase 5, enables you to extract the best from multi‑articulation sample libraries.

Expression can be added via the Articulation Lane in the Key Editor.

As anyone who plays a 'real' instrument (one that doesn't generate its sound by entirely electronic means) knows, recreating a convincing performance of the same instrument using samples can be a difficult task. The process is made somewhat easier if you're using a sampled instrument that includes a range of performance articulations, and this is most commonly controlled via 'keyswitches'. These are used to trigger different sample layers that contain the various performance options, but although this can work well, it can take a lot of work to become really fluent with it.

Steinberg designed their VST Expression system to make things simpler. Similar in concept to drum maps, this new function was first unleashed in Cubase 5 and is targeted at multiple articulations for a single instrument. The key strengths of this approach are twofold: it allows you to combine different approaches to generating articulations; and it gives you the ability to 'add' expression after the basic performance has been recorded. Steinberg included a small number of new instruments in HalionOne that support VST Expression but, as with drum maps, it's also possible to create bespoke VST Expression presets for third-party instruments.

Performance Enhancement

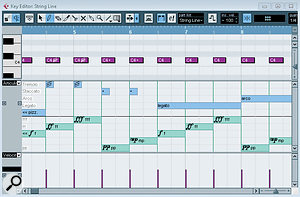
The screenshot above shows a MIDI part being edited in the Key Editor (the Cubase 5 Project containing this part can be downloaded from /sos/jan10/articles/cubasetechmedia.htm), played using the new HalionOne VST Expression-ready Tenor Sax instrument. (The new instruments have a 'VX' in the preset name, so it's easy to spot them.) If an instrument has an Expression Map assigned to it, the articulations can be added and edited in the Articulation Lane. For example, in this case, I've used the 'growl' and 'fall' articulations for particular notes in the phrase.

Adding articulations 'after the fact' as part of the editing process is often easier than trying to play keyswitches in 'live' via your keyboard. While the Key Editor's Articulation Lane provides the most obvious route to do this, another option is the Score Editor. Indeed, for those using Cubase to generate a score for other musicians, the fact that Expression Map articulations will appear in the printed score could prove very handy.

Map Reading

VST Expression articulations appear in the Score editor: a great facility for composers.

In order to use any of these articulation editing tools, the instrument needs an Expression Map. The basics of Expression Map creation is explained in the Cubase 5 Operation Manual, so I won't cover all that ground here. However, the manual deals with some significant details in rather a terse fashion (it's very much a manual rather than a tutorial). Perhaps the most useful of these is how articulations can adjust MIDI data in real time, so I'll focus on that.

The HalionOne Tenor Sax Expression Map contains five articulations, each based on a keyswitch that accesses a different performance layer (such as 'growl' or 'fall'), but Expression Maps aren't just about keyswitch options. They can be used to generate other forms of 'expression' by applying changes to the recorded MIDI data — and this allows you to get much more out of your sampled instrument, whether it has keyswitch articulations or not.

For example, let's imagine you wanted a phrase to be both staccato (short notes) and fortissimo (relatively loud). If you were using just keyswitched articulation changes, you might need an instrument with three sample layers: one for just staccato, a second for fortissimo, and a third for staccato and fortissimo. However, only the most detailed sample libraries are going to provide this degree of sample layer coverage for all the possible combinations of performance characteristics — and even then, it would eat up a lot of RAM to hold all the layers active.

You could, of course, emulate some of these performance variations via MIDI in the way you play; shorter notes for staccato and higher velocities for fortissimo. While you can do this as part of your performance, you can also add it after the fact via an Expression Map.

The screenshot (right) shows an example where five different performance types have been built from three articulations. In each case, the Output Mapping section has been used to change the MIDI data in real time on playback. For fortissimo (ff), I've increased the MIDI velocity to 150 percent of its actual value, while for staccato, I've shortened the length of the MIDI note to 20 percent of its actual value. And where both fortissimo and staccato are required, I've applied both of these changes.

Play, Then Shape

When using Expression Maps, the simplest method to build a performance uses four steps. Using the simple Expression Map described above (and which is also available from the link given earlier), the approach might be as follows.

1. Having created your MIDI track and linked it to the appropriate synth patch, open the VST Expression slot in the track's Inspector panel to select the Expression Map — or load it from a disk folder via the VST Expression Setup window if it doesn't already appear in the Inspector list.

2. Record the basic performance via your MIDI keyboard. Focus just on getting the right notes for now, rather than building expression into the performance.

3. Now for a couple of clean‑up tasks. First, apply any MIDI quantising you wish to use, to make expression elements within the Articulation Lane a little neater. Then, more importantly, use the MIDI/Functions/Velocity menu option to scale your overall MIDI velocity to somewhere in the middle of the velocity range. As any performance articulations you subsequently apply can include both increases and decreases in the MIDI velocity (to generate softer and louder passages), you need to make sure you have some room for manoeuvre: a fortissimo articulation won't work if you're already at the maximum MIDI velocity value before you apply it!

4. The final stage involves adding in your 'expression' using one of the MIDI editors — and the Articulation Lane in the Key Editor is the most obvious choice. If your Expression Map is set up correctly, this is easy to do and should help bring the performance to life.

The Right Direction

This Expression Map uses real‑time adjustment of MIDI data to create five articulations from three keyswitched sample layers.

As shown in the Articulations section in the VST Expression window, an articulation can be set as either a Direction or an Attribute. Attributes apply to single notes, whereas Directions apply to all notes until the next Direction is received.

In our example, fortissimo is specified as a Direction and, once placed in the Articulation Lane, it will apply to all notes until a different Direction is applied. In contrast, I configured the staccato articulation as an Attribute, so it only applies to specific individual notes: once that note is played, the next note is played at its original length. Clearly, only one Direction can apply at any one time, but multiple Attributes can be combined with a Direction (just as I've added the staccato Attribute to the fortissimo Direction), to build different performance options. I'm sure there are some musical rules that, strictly speaking, dictate which performance options are conventionally regarded as Directions and which are regarded as Attributes, but when constructing your own VST Expression Maps, you might need to be a little more flexible in how you assign them in the Articulations panel, if you're to create the performance combinations you require.

Just An Expression?

Space precludes me delving more deeply into some of the other Expression Map options (for example, the use of Groups) in this month's column, but it's a subject I'll come back to. Meanwhile, combining the MIDI options described above with a sampled instrument that already includes keyswitched performance options, provides tremendous flexibility. For example, if your sampled instrument includes a staccato layer accessed via a keyswitch, you could use the MIDI‑based technique described above to generate different levels of dynamics (soft, normal, loud, very loud...), and the same principle could be applied to all of the keyswitch layers — which means that the potential for creating more believable sounding performances is considerable.

Steinberg's web site hosts a selection of Expression Maps for some third-party sample libraries (www.steinberg.net/index.php?id=1944&L=1), and this list should grow over time. Until then, building your own Expression Maps for particular instruments isn't that difficult, provided you're prepared for some initial experimentation until you get your head around the way that various elements slot together. As a starting point, I've placed a second — and rather more detailed — MIDI‑based Expression Map on the SOS web site (see web address given earlier), so go on: express yourself!


Published January 2010

Wednesday, April 28, 2021

Building Your Own Multi-articulation Instrument

 By John Walden


Last month, we introduced Cubase's VST Expression facility. Now it's time to build your own multi‑articulation instrument.

Five string sounds loaded into Kontakt Player 4, ready for some Expression Map magic.

In last month's column, I introduced Cubase's VST Expression system and looked at how Expression Maps can be used to adjust MIDI data in real time. With this follow‑up article, I want to show how you can use Expression Maps to enhance your simple sample‑based instruments — by combining them to create multi‑articulation instruments with keyswitching.

This technique has three benefits: first, a more sophisticated and expressive version of an instrument can be created and controlled from a single MIDI track, so you'll no longer require separate MIDI tracks for different articulations; second, you'll be able to add and edit performance variations after the performance has been recorded; and third, because you're now using a single MIDI track, you'll be able to add expression marks to a printed score. The most obvious context in which you might wish to do this is with orchestral sounds, such as strings — so I'll use this as my main example — but the same principles can be applied to any instrument.

Simple Doesn't Mean Bad

A top‑of‑the‑range orchestral sample library with keyswitching built in doesn't come cheap. A cheaper instrument is likely to be simpler, but that doesn't mean it can't get the job done. In fact, many decent 'all‑in‑one' libraries or hardware synths now include some very respectable orchestral sounds, and you may have access to some perfectly good ones already.

For example, if you have any orchestral instruments, you'll probably have at least some of the following string performance styles: arco (normal bowing), legato (where notes run smoothly into one another), staccato (short, clipped notes), pizzicato (plucked with the fingers) and tremolo (a rapidly repeated note). The problem is that these are likely to be single instruments, and won't be key‑switchable — which is where VST Expression comes in, because by constructing a suitable Expression Map you can use the different expressions together as if they were a single instrument.

Fully Loaded

Let's break the process down into steps. The first requires that you have both a suitable set of sampled instruments and a multitimbral sample‑playback tool (one where different instruments are accessed via different MIDI channels). This rules out Cubase's HalionOne, which only allows one instrument per instance, but the full version of Halion would be fine, as would many third-party instruments.

I'll base my example around Native Instrument's widely used Kontakt Player 4 (which is available as a free download from NI's web site). As shown in the first screenshot, I've loaded five string patches, and in this case I've used 'light' versions of each patch from Peter Siedlaczek's String Essentials 2 library. Don't worry if you don't have it, because the whole process could just as easily be based around five patches from a basic GM‑style synth. If you want to replicate my example on your own system, simply match the performance articulations and MIDI channel numbers that I've used: arco (channel 1), legato (channel 2), pizzicato (channel 3), staccato (channel 4) and tremolo (channel 5). I chose these simply because they cover the most obvious styles for a general string performance.

The next step is to create an empty MIDI track and set its output routing to your multitimbral sample‑playback tool (ie. Kontakt Player in this example). It's probably best to set the output MIDI channel to that of your default sound, although the Expression Map we're about to create will change the final MIDI channel sent to the sample player, according to the articulation we wish to play.

On The Map

A single MIDI track can be used to control all five performance styles.

Of course, the next step is the creation of the Expression Map. As described last month, go to the VST Expression panel in the Inspector and open the VST Expression Setup window, then start a new Expression Map. The screen opposite shows the Map I created for this example, which uses the five sampled performance articulations and, for each one, defines five levels of dynamics (going from a relatively soft pp up to a loud fff). This gives a total of 25 sound slots used in the central panel and 10 entries in the Articulations panel.

The dynamics levels have been created using the same approach as last month, so, for each level, the Output Mapping panel's MIDI velocity setting is used to adjust the actual velocity of the note by a fixed percentage (I used a range from 70 percent for the soft pp up to 160 percent for the loud fff, but the exact settings are a matter of personal taste). For some articulations, you can also use the MIDI note Length setting to change the note length. For example, I used 150 percent for all the legato articulations, as this seemed to work nicely with my samples, and seemed to help them 'run together'. In contrast (and unlike last month's example), the staccato samples I used were suitably short and snappy already, so I didn't need to use the Length setting in this case.

The key element in completing this Expression map is the Output Mapping panel's Channel setting. For each of the five performance styles, the Channel setting must match the MIDI channel number for the sampled instrument in your playback tool. This allows the Expression Map to automatically remap the incoming MIDI data and send it out to the right MIDI channel, in order to select the performance style required.

Directions & Attributes

The completed Expression Map. Note the use of the Channel, Length and Velocity settings in the Output Mapping panel for the currently selected Legato fff Sound Slot.

The only other key consideration is what to define as a 'Direction' and what as an 'Attribute', and I've tried to follow convention. When notating string parts, performance styles such as arco, legato and pizzicato tend to be written as 'directions' — and once you see the symbol for one of these styles, it will apply to all subsequent notes until you see a different symbol. In contrast, staccato and tremolo are more commonly written as 'attributes': they apply only to the notes that are marked, after which the player will return to the previous playing style.

With the exceptions of features such as accents (which I've avoided here to keep the example relatively straightforward), dynamic levels such as pp, mp and f are always noted as 'directions', which apply until the next dynamic level is noted.

Remote Control

The final step — which is optional — is to define Remote Keys for each articulation. If you intend to add your expression via one of the MIDI editors after playing the part, rather than during performance, you can leave the Remote Key settings blank, but if you want to be able to switch between articulations via your MIDI keyboard (that is, create key switches), then a note can be assigned to a particular Sound Slot in the central panel of the VST Expression Setup window. As these keyswitches are only likely to be used while playing 'live', there's no need to define one for every Sound Slot (although you can if you want to). In this case, I've simply defined one key switch for each of the five main performance styles and done this for the mp dynamic level in each case. These would be perfectly adequate while playing in a part, allowing me to switch between performance styles, and then add my full range of dynamics expression after recording, using one of the MIDI editor windows.

Usefully, once a note is used as a Remote Key, it doesn't generate a sound in the sample player (the Expression Map automatically mutes it): this is helpful if your sampled instrument has sounds mapped across the entire key range but you still want to use key switches. I also tend to engage Latch Mode, as this means you don't have to hold down the key switch: just press it once, then release, and it will stay active until the next key switch is pressed. Finally, if you want to move your key switches to another area of the keyboard (perhaps to use them with a different MIDI keyboard controller), the Root Note setting allows this to be done automatically, without remapping the individual switching notes.

No Strings Attached

Once the Expression Map is in place, the Key Editor's Articulation lanes can be used to add expression to the performance.

The example uses orchestral strings, but there's no reason to limit yourself to orchestral instruments, and a good candidate for this technique is electric bass. There are lots of good, single‑articulation, sampled bass instruments that could be used to create a comprehensive, keyswitched version. To get you started, I've put a map based on four playing styles (sustained, muted, staccato and slapped), along with my main strings example, on the SOS web site at /sos/feb10/articles/cubasetechmedia.htm. Simply add your own samples and experiment!   


Published February 2010

Monday, April 26, 2021

Cubeat Detective

 By Sam Inglis


Unlike other DAWs, Cubase has no dedicated support for phase‑locked timing correction of multitrack drums. But with a little imagination, it is possible...

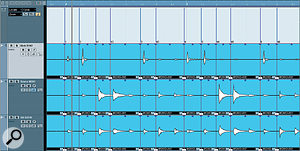
One of the plus points of the method described in this article is that it will work with any number of drum tracks, but for this example I'm using a simple recording with kick and snare close mics and a mono overhead. Here, I've created copies of the kick and snare parts (purple), which will be hard gated to prevent false triggers in the Hitpoint detection.

Despite all the features that Steinberg have added to Cubase over the years, it has always lacked a direct equivalent to Pro Tools' venerable Beat Detective. We have Audio Warp, which can do amazing things to audio on a single track, but we still have no easy way to correct timing across a multitrack drum recording. Surf the Web and you'll find workarounds, but most of them involve tricking Cubase's Sample Editor into believing your multitracked drums are actually a single multi‑channel file — which is messy, and as Cubase only officially supports surround up to 5.1, useless if you have too many drum tracks. In this workshop I'm going to share an alternative approach to recreating Beat Detective‑like functionality in Cubase.

In case you're not familiar with Beat Detective, its great advantage is that allows you to derive a single 'collected' set of triggers and apply this set to any number of tracks. This means that you can analyse, say, your kick and snare drum tracks to find out where the hits are, then use this information to apply exactly the same edits to overheads, toms and room mics too. The consistency is crucial, because it avoids messing up the phase relationships between your carefully placed drum mics, as inevitably happens when you Audio Warp each track individually. Some people also like the fact that Beat Detective doesn't use time‑stretching, as drums are very prone to generating audible artifacts when stretched.

Before we start, I should warn you that this method makes extensive use of Cubase's markers, so if your Project already contains markers, it would be a good idea to export the drum tracks to a fresh Project for editing. I'm also assuming that your Project tempo (or tempo track) is set to the actual tempo of the song, so that your drum parts correspond at least roughly to Cubase's bars and beats grid.

It's A Hit

Having generated Hitpoints on my duplicate kick part, I now hit 'Create Markers' to copy them to the Marker track.After repeating the Hitpoint generation on my duplicate snare part, I now have markers corresponding to every kick and snare hit.

Even Cubase's biggest fans will, I think, have to acknowledge that its Hitpoint detection has always been a weakness. For some reason it never quite seems to get things right, even on a well recorded close‑miked drum track with minimal spill. So the first stage is to help it out by using the Duplicate Tracks command to create copies of the drum tracks from which you want to generate triggers. This would normally mean the kick and snare, though you could include other important close‑miked tracks. Right‑click on the audio events on these duplicate tracks and you'll be able to apply Cubase's Gate plug‑in off‑line. The aim is not to create something listenable, but to eliminate absolutely everything that might provoke false triggering in the Hitpoint detection algorithm, so be brutal, with a very fast attack and release. Alternatively, you could use the Detect Silence function to remove spill.

When you're confident that your duplicate kick and snare events contain nothing whatsoever apart from kick and snare, double‑click the duplicate kick event to open the Sample Editor. Click Hitpoints on the left‑hand pane to open the Hitpoints panel (assuming you are using Cubase 4.5 or later), then raise the Sensitivity slider until Cubase detects and shows Hitpoints at every drum hit. Now hit the button labelled Create Markers. The Marker track will appear, if it's not already visible, showing markers that line up with all your kick‑drum hits. Repeat the process with the duplicate snare part, and when you hit Create Markers again, you'll have a single Marker track containing markers at every kick and snare hit.

Chop Chop

Because Macros can contain other Macros, it's easy to set up one that repeatedly moves to the next marker and slices there.The next stage: I've moved my drum parts slightly to the right, and my Macro has chopped them at each marker.

The next stage is to translate those markers into edits, and for this purpose we'll need to use a Macro. The creation of Macros is covered pretty well in the Cubase documentation, so I won't go into detail, but in essence, what you need is a Macro that consists of two commands — 'Locate Next Marker' from the Transport section, followed by 'Split at Cursor' from the Edit section — repeated over and over again. The easiest way of doing this is to create a Macro with these two commands in it, a second Macro that repeats the first 10 times, and a third that repeats the second, say, five times, as in the screenshot to the left. Give this last Macro a suitable key combination and it will allow you to create 50 edits at a stroke.

At this point, it's a good idea to select and group (Ctrl-G) all the drum events to which you want to apply the editing. And for pragmatic reasons, it's also a good idea to temporarily shift them all a little to the right within the Project window, so that each marker falls into the space just before a drum hit, rather than actually on the transient at its start. (This will make it easier to apply natural‑sounding crossfades later.) Now return the transport cursor to the start of the song and hit your Macro keystroke. You should see Cubase work its way along the drum parts, chopping them up at every marker point. Repeat the Macro until the section of song you want to edit is fully chopped (as with Beat Detective, it's a good idea to work in manageable sections of a few bars at a time, rather than attempting to tackle an entire song at once).

I hit the 'Q' key and voila! My chopped‑up events have been quantised exactly as if they were MIDI notes.The end result: I've hit 'X' to generate crossfades automatically, then slid the parts slightly to the left. My wonky drumming is now perfectly in time with the grid.Now comes the magic part. Select all of these chopped‑up fragments of drum recording, choose Over Quantise from the MIDI menu, and hey presto! You should see all of the events jump into line. Note that it's vital to use MIDI quantise rather than the Audio Quantise command, as the latter will attempt to analyse and apply Audio Warping to your carefully chopped files. Visit the Quantise Setup dialogue and you can even apply swing and randomisation to your quantised drums. 

Unfortunately, though, you can't use the Iterative Quantise command, which would allow us to recreate Beat Detective's graduated timing correction. (A theoretical limitation of the MIDI quantise function is that the quantise resolution is parts per quarter note rather than samples, but I suspect that the margin of error in Cubase's Hitpoint detection is greater than 1ppqn in any case.)

If you play back your multitrack drums at this stage, they should now be in time, but there will probably be lots of gaps and clicks where the edits have been made. It's at this stage that Beat Detective's 'Fill Gaps and Crossfade' command is so useful. Cubase has no direct equivalent, but does at least make it easy to create many crossfades in one go. Select all the chopped, quantised events and hit 'X'. Cubase will crossfade between all adjacent events, filling any gaps. However, unlike Beat Detective, it will deal with long gaps by creating long crossfades, which isn't always what you want. 

Depending on how badly out of time your drums were in the first place, then, you'll probably need to go in and do a bit of manual tidying up at crossfade boundaries. You'll also need to slide them all back in time, to compensate for having moved them forward prior to slicing. However, with a couple of minutes' work, you should end up with results very similar to what you get from Beat Detective: multitrack drums that are not only perfectly in time, but perfectly in phase. Result! 


Published March 2010

Friday, April 23, 2021

Using Cubase's Chorder Plug-in

Chorder configured for open chord voicings on a guitar: the notes used in the four layers for the C-major chord are shown.Chorder configured for open chord voicings on a guitar: the notes used in the four layers for the C-major chord are shown.

We show you how to coax a more convincing performance from your VST instruments using Cubases Chorder plug-in.

Even with high‑quality sampled instruments, a good deal of skill is required to create realistic performances. For chord parts, one of the key issues is ensuring that the voicing of the chord (the number of notes used to construct the chord) reflects that used on the actual acoustic instrument. While a C-major chord will consist of the notes C, E and G on any instrument, the way each chord falls under the hand on a piano can be different from the way it's constructed on a guitar, or an orchestral string section. Thankfully, Cubase's Chorder MIDI plug‑in can help with such voicings, even if (like me) your keyboard skills are somewhat limited. By way of example, I'll show you how Chorder can be used to create more realistic chord voicing for guitar and string‑based instruments.

Chorder Basics

Chorder allows you to assign any combination of notes to a single MIDI note, so the whole chord can be triggered with one finger. Programming Chorder with all the chords in your song makes it very easy to play complex progressions. The basic mechanics of the plug‑in are explained in Cubase's Plug‑In Reference PDF, so for Chorder newbies I'll simply outline the key points here.

A similar configuration for orchestral strings, with 'dense', 'open' and 'narrow' C-major chord voicing defined in the three layers.A similar configuration for orchestral strings, with 'dense', 'open' and 'narrow' C-major chord voicing defined in the three layers.There are three modes: All Keys, One Octave and Global Key. The All Keys mode allows you to to define a different chord for each key, while Global Key mode allocates a single chord to one key and replicates it at different pitches for all other keys. Sitting between them, One Octave mode allows you to define chords for the 12 keys of a single octave: Chorder automatically pitch‑shifts the same chords for every other octave.

In some cases, this basic functionality might be all that's required, but Chorder also includes 'layers', allowing definition of up to eight different chords for each trigger note. During a performance, the required layer can be triggered either via velocity or what's known as 'interval' mode, which requires two keys to be pressed to generate a single chord. The lower of the two keys is the trigger note, while the upper key controls which layer is played. For example, if our lower key was a C, playing C# as our second key would force the chord in layer one of the C key to be played, D would play layer two, D# layer three and so on. The sound is only generated when the second key is pressed. This takes a little getting used to, but it opens the door to a wealth of options.

No Barre Guitar

Chorder comes with a small number of guitar‑based presets, but they're somewhat limited. However, a DIY configuration I regularly use programs all the 'open' chords (the non‑barre chords in position one of the guitar neck) for the key of my song into layer one of Chorder, with layers two and three containing first and second inversions of those chords, and a basic barre-chord in layer 4. As a full example, the table on the opposite page summarises all the notes that might be required if my song was in the key of C and was only based around a sub‑set of the standard chords (C, Dm, Em, F, G and Am) for that key. Note that I've included a Bb chord (the bVII chord) rather than the more musically correct, but rarely used, Bdim chord (the VII chord). For the various inversions, I've used the simplest forms possible on a guitar that are closest to the open position. You can, of course, adjust your chord set in whichever way your song requires, to accommodate more creative chord combinations or key changes.

I've configured Chorder to use One Octave mode and to employ Interval mode to switch between these layers (the number of layers can be adjusted by the slider that appears under the Layers pop‑up when either Interval or Velocity modes are selected). So that you can hear the difference between the standard 'piano' voicing of these chords and these Chorder‑generated, more authentic, 'guitar' voicings, there is an audio demo on the SOS web site (at /sos/apr10/articles/cubastechmedia.htm). While the piano voicings sound fine, the guitar‑based ones create a greater sense of realism. A Chorder preset XML file containing the chord voicings used in this example is available for download from the same page.

Convincing Strings

This column is not the place for a detailed discussion of the finer points of sample‑based orchestral arranging (if interested, see Paul Gilreath's excellent book The Guide To MIDI Orchestration). However, one concept worth considering is what makes a 'good' orchestral chord voicing. While this is, in part, down to the instrument combinations and the specific notes used, which of those notes are doubled and how spread out or bunched the note range is will all influence the final character of the timbre. A simple rule of thumb is to more frequently double the root and 5th notes within the chord, while placing less emphasis on the 3rd or 'colour' note (such as a 7th or 9th if the chord is not a simple major or minor chord).

As most orchestral instruments play a single note at a time, chords have to be constructed across several instruments, either within the same section (for example, the various strings) or across the sections. Given the pitch range of the string section or full orchestra, chords often spread over several octaves, and Chorder can provide a useful starting point when initially laying out parts. As an example, let's consider a full string section. As illustrated in the screenshot, I've constructed a Chorder preset, again around the basic chords for the key of C. This example uses three layers and, like the guitar example used earlier, the same chord is voiced differently in each layer. However, rather than chord inversions, I've provided dense (lots of notes over a wide range), more open (fewer notes but also with quite a wide range) and narrow (fewer notes and narrower range) voicings respectively. You can, of course, add further variations to these, and if you want to introduce 7th, 9th or other chord types, simply adapt what's here.

Having created the basic Chorder preset, you can perform your basic chord sequence, switching between chords and voicings as required. This two‑fingered playing can be recorded just like any other MIDI performance. If you're happy to use a generic 'full string section' sample patch, this might be all that's required. However, if you then want to assign your different notes to particular string instruments (bass, cello, viola, first and second violins, for example), a couple of extra steps are required.

The Merge MIDI In Loop function has converted the two-fingered Chorder part (on the left) into the full note output (on the right).The Merge MIDI In Loop function has converted the two-fingered Chorder part (on the left) into the full note output (on the right).

The first step requires you to convert the notes used to trigger Chorder into the MIDI notes generated by Chorder's ouput. This can be achieved via the Merge MIDI In Loop function. If you solo the Chorder MIDI track and then set the Left and Right locators around this part, the MIDI/Merge MIDI In Loop menu option will bring up a small dialogue box. After you tick the 'Include Inserts' and 'Erase Destination' options, Cubase will replace the existing MIDI part (the notes used to trigger Chorder) with the actual notes created by Chorder. Very neat!

The second step simply involves copying the new MIDI part to a series of MIDI tracks linked to your various sampled string instruments. Each of these parts can then be edited so that each instrument is responsible for just part of the chord. I find the easiest way to do this is simply to mute notes I don't want a particular instrument to play. For example, I might mute all the higher notes in the chord for the bass or cello parts, leaving these instruments to support the bottom end of the chord, as they tend to do in a real orchestra. By muting, rather than deleting, you can tinker with the selections until you get the balance that you want. As with the guitar example above, a Chorder preset and an audio example of its use with a string patch have been placed on the SOS web site.

A Helping Hand

It's all too easy to overlook some of the humble MIDI plug‑ins included in Cubase. In the case of Chorder, whether you need something to compensate for less than spectacular keyboard skills or, as here, to make the creation of some realistic chord voicings more straightforward, this little plug‑in is well worth exploring.  

ChordLayer 1 ('open' chords)Layer 2 (first inversion)Layer 2 (second inversion)Layer 3 (basic barre chord using 'E' or 'A' shape)
CC2, E2, G2, C3, E3E1, C2, E2, G2, C3, E3G1, C2, E2, G2, C3, E3C2, G2, C3, E3, G3
DmD2, A2, D3, F3F2, A2, D3, F3A1, D2, A2, D3, F3D2, A2, D3, F3, A3
EmE1, B1, E2, G2, B2, E3G1, B1, E2, G2, B2, E3B1, E2, G2, B2, E3E2, B2, E3, G3, B3
FF2, A2, C3, F3A1, F2, A2, C3, F3C2, F2, A2, C3, F3F1, C2, F2, A2, C3, F3
GG1, B1, D2, G2, B2, G3B1, D2, G2, D3D2, G2, B2, D3, G3G1, D2. G2, B2, D3, G3
AmA1, E2, A2, C3, E3C2, E2, A2, C3, E3E1, A1, E2, A2, C3, E3A1, E2, A2, C3, E3, A3
BbBb1, F2, Bb2, D3D2, F2, Bb2, D3F1, Bb1, F2, Bb2, D3Bb1, F2, Bb2, D3, F3, Bb3


Published April 2010

Wednesday, April 21, 2021

Dance Music Filter Effects with Cubase 5

 By John Walden


Using an Instrument Track to host your VST Instrument (as shown here in green for the Embracer synth) gives you access both to audio insert effects and to the Quick Control system.Using an Instrument Track to host your VST Instrument (as shown here in green for the Embracer synth) gives you access both to audio insert effects and to the Quick Control system.

Whether it's Donna Summer's 'I Feel Love', Modjo's 'Lady', Shapeshifters' 'Lola's Theme', Madonna's 'Future Lovers', or any number of dance classics, filter sweeps abound — and Cubase 5 features a number of tools that can, in combination, make configuring and controlling such effects very easy.

To illustrate the mechanics involved, let's consider some examples: a combination of three ought to do the trick. The first example involves basic filter‑sweep processing that's sync'ed to the project tempo; the second requires filter sweeping under manual control — which allows you to use automation and a MIDI controller to alter the effect in real time; and the third uses a gate to give the filter processing a stronger rhythmic component.

If you'd like to hear some short audio clips to help you understand the effects and sounds I'm describing, you can find them at /sos/may10/articles/cubasetechaudio.htm.

First Steps

For a basic filter sweep in Tonic, keep things simple: set the Env controls to neutral.For a basic filter sweep in Tonic, keep things simple: set the Env controls to neutral.

The principles of what follows can be applied to any audio track, whether an individual instrument, a group channel or a complete mix. I'm going to use a VST synth as my sound source, because this is one of the most common sources to which such effects will be applied.

Cubase includes a number of filter effect plug‑ins, but Tonic is the most flexible and interesting. As with any insert plug‑in effect, Tonic needs to be placed across the audio output channel of your VST instrument. So you could take the traditional approach to create your instrument — which is to add it directly to the VST Instruments panel, create a suitable MIDI channel and assign its output to the VST Instrument, and then insert Tonic on the audio output channel of the Instrument in the Inspector (or the Mixer). At the time of writing, this approach has an important limitation: like Group Channels and FX Channels, VST Instrument audio channels set up in this way do not support the very useful Quick Controls, which I explored back in SOS July 2009. I'm told that this may be addressed in the forthcoming Cubase 5.5 update, which has just been announced. Meanwhile, a better option is to use dedicated Instrument Tracks, as these do support Quick Controls. (Unfortunately, they allow only a single stereo output, so you can't take different outputs from a multi‑output instrument such as Kontakt when working in this way.)

To create your Instrument track, go to Project / Add Track / Instrument, and select your choice of Instrument in the dialogue box that appears. You should now have a track that combines the recording/playback of MIDI data with an audio output for your Instrument, the ability to place audio Insert effects on its output, and access to Quick Controls in the Inspector.

Clean Sweep

Quick Controls on the Instrument Track give you easy access to key parameters of your audio plug‑ins, as illustrated here for Tonic.Quick Controls on the Instrument Track give you easy access to key parameters of your audio plug‑ins, as illustrated here for Tonic.

With our VST Instrument configured, we can build our processing chain. For our first example, a simple filter sweep that's automatically sync'ed to the project tempo, all we need to add is our filter plug‑in (in this case Tonic, pictured left). With all the Env Mod controls set to minimum or neutral, this section is effectively bypassed, and the filter, which I've set to Band Pass (BP), simply sweeps at a speed set by the Rate control (two steps per beat here) in the LFO Mod section.

The 16-step, sine‑wave-shaped LFO pattern produces a gradual change in the filter, while the high Smooth control smooths out transitions between steps of the LFO pattern. The Mix level, which adjusts the blend of unprocessed and filtered sounds, and the Depth knob, which controls how extreme the filtering gets, now become your two main ways of controlling the effect.

Hands On

If all you want is a simple filter sweep in sync with your song, it needn't get any more complicated, but Tonic offers plenty more variety.

For our second example, a more hands‑on approach, with a hardware MIDI controller, is required. Link your chosen controller(s) to Cubase's Quick Controls via Devices / Device Setup / Quick Controls. (This process was covered in the Cubase workshop in SOS July 2009, so I'll not retread that ground here.) Once you've done this, specific Tonic controls can be linked to a QC slot via the Inspector. The obvious targets are Cutoff, Resonance, Drive and Mix. The automation Read and Write buttons in the Inspector's QC panel make it very easy to record and fine‑tune your handiwork.

If you choose to use Tonic, as I've done here, make sure that you initially set the Depth control to zero (the 12 o'clock position), as this will stop the LFO getting in the way of your manual control of the filter. It's also a good idea to set the Smooth control to a minimum, because this control smooths any changes to the filter setting, not just those driven by the LFO: if you leave it in the fully clockwise position, you might be left wondering why your rapid twiddling isn't producing a correspondingly speedy change in the filter's sound. With that done, you can then twiddle your controllers to taste.

Rhythm Is A Dancer

Audio from the hi‑hat track is routed to the gate plug‑in on our synth track via the gate's side‑chain input (the side‑chain button lights in orange when activated).Audio from the hi‑hat track is routed to the gate plug‑in on our synth track via the gate's side‑chain input (the side‑chain button lights in orange when activated).

While you can make your filter processing 'fit' into the overall arrangement and dynamics of your track via MIDI controllers, a stronger sense of rhythm can be achieved by adding a gate to the signal chain — which brings me on to our third example. Cubase offers a choice between the MIDI Gate and the standard audio gate plug-ins. The former, discussed in detail in SOS June 2007, is essentially an audio gate plug‑in whose gate can be controlled using MIDI note information from a separate MIDI track, rather than the incoming audio. With the MIDI Gate inserted after the filter on our Instrument Track, notes on this separate MIDI track can open and close the gate to create a rhythmic pattern.

The other approach is to use the side‑chain input on Cubase's standard Gate plug‑in. As described by Matt Houghton in the June 2008 Cubase workshop, a common trick is to use another rhythmic element in the mix as the side‑chain input signal. This could be a full drum mix, for example, or, more usually, a single element from the drum performance, such as the kick, snare or hi‑hat. Imagine that you have an interesting hi‑hat pattern recorded on a separate audio track. Insert the Gate plug‑in after the filter on your Instrument Track and enable the side‑chain input. Next, go to the hi‑hat track, select the Gate's side‑chain input in a send-effect slot, and increase the send amount until you can see the gate triggering. The Gate will now open and close as the hi‑hat plays (you might need to tweak the send level or the Gate's threshold, to fine‑tune the triggering), and the filtered synth should now sound much more rhythmic. Finally, adjusting the attack, hold and release of the Gate gives you more control over the rhythmic feel.

Delaying Tactics

Creating a Track Preset containing all the plug‑ins required for a task, which can be activated as required, enables you to repeat your filtering setup in double-quick time.Creating a Track Preset containing all the plug‑ins required for a task, which can be activated as required, enables you to repeat your filtering setup in double-quick time.

A hi‑hat trigger can often produce a busy rhythmic result, and using a kick or snare part will generally trigger the gate less frequently, leaving space to add some further ear candy using a delay plug‑in. For something full on, choose Cubase's PingPongDelay, which will bounce your filtered synth part around the stereo field in sync with your track.

Having combined the use of an Instrument Track and a filter plug‑in, perhaps added gate and delay plug‑ins and configured your Quick Controls, save your chain as a track preset. Right‑click on your Instrument Track and select 'Create Track Preset': next time you want to filter and chop a synth sound, you'll be up and running in no time.

Beyond Cubase

Given the range of controls and the huge number of synth sounds that Cubase now offers, there are almost limitless possibilities when it comes to filter sweeps, and they can be expanded further with any of the excellent third‑party VST filter plug‑ins that are available (such as the freeware Classic Auto‑Filter from www.kjaerhusaudio.com). 


Published May 2010