Cubase 7 includes the Voxengo CurveEQ plug-in, which matches the frequency responses of different sounds.
An equaliser can help with all sorts of mix problems. You can use it to 'correct' individual instruments or final mixes that just don't sound like your favourite commercial tracks, or to make instrument parts that were tracked at different times or in different studios sound more similar. Perhaps you want to give a series of final mixes for a CD/album project a more consistent sound. In each of these cases, EQ might help you get closer to that 'ideal' sound you are aiming for.
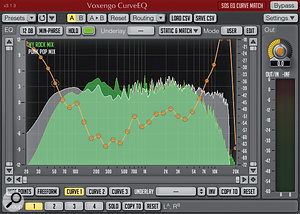
 The main spectrum display of CurveEQ. As described in the main text, frequency spectrums for two different audio examples are shown here, as well as the EQ curve that the plug-in has generated to make the 'My Rock Mix' frequency response sound closer to that of 'Punk Pop Mix' (in this case, Green Day's 'American Idiot').Cubase includes a powerful suite of equalisers, but none of them can tell you which EQ settings are required! If that question bamboozles you, Voxengo's excellent CurveEQ plug-in might help. Installed as part of Cubase 7, one of its key features is the ability to 'EQ match': you capture the frequency response of two recordings, one of which becomes your 'reference' (with the frequency characteristics that you think are ideal) and the other your 'target' (the audio with the frequency response you wish to change). CurveEQ calculates an EQ curve that will, when applied to the target audio, make its overall frequency response match that of the reference audio. In short, the plug-in is automatically generating the EQ boosts and cuts required to achieve the desired sound. I'll use three examples to demonstrate this EQ matching process in greater detail.
Kick Me
A very simple example can illustrate the basics. Imagine you have a drum-kit recording where the kick-drum track lacks a little something. A little bit of EQ matching might allow you to shape the tone of this track to ape a much better-sounding kick from another recording.
The first step is to place an instance of CurveEQ as an insert effect on your imperfect kick-drum track. When you first open the plug-in, its main display is blank, and a flat EQ curve is displayed as a straight horizontal line with a control point at each end. You can add, move and delete control points to create an EQ curve manually, but for EQ matching you need to open CurveEQ's Edit dialogue box, using the button located at the top right, and select AVG from the Type drop-down menu. This setting means that the plug-in builds a frequency distribution based upon the average frequency content of the audio playback, rather than continuously displaying instantaneous snapshots.
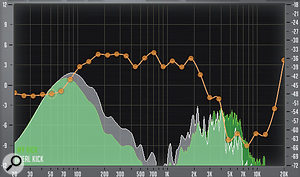
Then, import or paste a section of audio containing your 'ideal' kick drum to the same audio track — perhaps at some point beyond the end of the project — and play back a few seconds of that. A stable frequency-spectrum curve will build up in the display. You can then open the Static & Match dialogue box and temporarily store the captured frequency spectrum in one of the four main slots by pressing the appropriate Take button. These slots can be named and colour-coded for ease of reference. The frequency spectrums for my two kick drums and the EQ curve created to 'match' my kick recording to an 'ideal' target.
Now return to the Project window, play back a short section of your deficient kick-drum track, and capture its spectrum in the same way, placing it in a second slot within the Static & Match dialogue. While this is happening, you should see a second frequency response build up, and this gives you an immediate visual cue as to any obvious frequency differences. As shown in the screenshot, my 'ideal' kick has more energy in the 300-400Hz and 2kHz areas than the unsatisfactory kick recording, and the latter also has more energy above 5kHz.
To create the matching EQ curve, engage the Reference button for the 'ideal' kick-drum spectrum in the Static & Match dialogue, and press the Apply To button for the kick sound to be EQ'ed. If you then press the Match Spectrums button, the required EQ curve will be calculated and displayed in the main plug-in window. Then all you need to do is audition your kick with and without this EQ, and decide whether the curve-matching process has delivered a significant improvement.
Acoustic Alignment
The second example is very similar, in that it involves curve-matching an individual instrument, but it provides a means of exploring more of CurveEQ's features. Here, I have an acoustic guitar that I'm not quite happy with, and a reference audio sample that contains my desired acoustic guitar sound (bear in mind that what's ideal in one context may not be so in another). There's one problem, though: the reference has been taken from a commercial track and never appears in total isolation, but only in combination with a kick drum. The Static & Match dialogue where the EQ matching can be configured.
 The automatic EQ curve created by the matching process can be tweaked manually if required, as I've done here for my acoustic guitar example described in the main text. The upper curve is that produced automatically but contains low-end frequencies from the included kick drum. The lower curve shows the result of my manual edits, where I've reduced the kick drum's influence below 400Hz. I could apply the curve-matching process described earlier, but the reference frequency spectrum contains information from the kick drum, which won't be ideal. Thankfully, CurveEQ provides comprehensive curve editing options, and as the majority of the kick energy will be in the sub-250Hz range, I can simply edit the appropriate EQ points by hand to try to remove the influence of the kick. In this example, the most obvious approach is simply to flatten this portion of the EQ curve — meaning that no EQ matching is applied in that region — and to fine-tune from there. Note that as well as individual control points, you can also select multiple points and drag these up or down together, retaining their relative positions while changing their gain by the same amount. In other cases where the reference isn't a 'pure' example of the instrument that you want, this type of hands-on editing may require a little more work, but at least the matched curve provides a reasonable starting point.
Fixing It After The Mix
Another obvious application of EQ matching is at the mixing or mastering stage, when you're either trying to get your mix closer to the tonality of a commercial track you like in the same musical style, or trying to get all your tracks on a CD project to have a more consistent frequency balance.
The principles here are identical to EQ-matching an individual instrument and, as illustrated by the first screenshot, simply looking at the frequency content of commercial tracks can be an education in itself. In this third example, I'm trying to get the mix of a rock project to sound more like a specific commercial mix (in this case, Green Day's 'American Idiot'); as you can see, my mix lacks energy in the sub-100Hz area and top-end sparkle above 7kHz, and perhaps has too much going on in the 200-400Hz range. Whatever your own musical genre, this kind of EQ comparison between tracks can really encourage you to think about how to construct your mix in the first place.
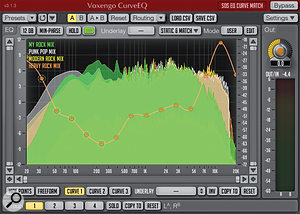
Moreover, CurveEQ doesn't have to stop with an A/B track comparison. The final screenshot Here is the result of applying (a) multiple 'reference' tracks (three different commercial rock mixes) and (b) limiting the curve to 15 control points to generate a smoother EQ matching curve for my own rock track. shows three 'reference' tracks, with a 'classic rock' and a 'heavy rock' spectrum added to the Green Day track. If you engage the Reference button for all three and then execute the Match Spectrums function, CurveEQ evenly blends the frequency responses of the three references, before creating the EQ curve required to match your mix to that blend. Using a 'blended' reference spectrum in this way means that the end result is much less dependent upon the idiosyncrasies of an individual mix.
In the example shown in the screenshot, there are, broad trends aside, some adjacent bands where the corrective EQ curve jumps about a bit. The smoothness (or otherwise) of the curve can be controlled via the Points setting in the Static & Match dialogue. I've used the default setting of 30 control points, but using a lower number will produce a smoother curve. While this might make the match less tight, it's also less likely to generate audible oddities caused by narrow peaks or troughs in the spectrum of either the reference mix or your own. Note that if you change the number of control points, you'll need to reapply the Match Spectrums function to generate the new curve.
Of course, CurveEQ has many more applications, but I hope these examples demonstrate what a powerful corrective EQ tool it is, and the educational possibilities it presents to anyone who finds the whole process of EQ'ing a challenge.
Example 3: EQ matching a full rock mix to Green Day's 'American Idiot' track. This audio example contains three sections, each separated by a short silence; (1) my original rock mix prior to EQ matching; (2) my rock mix after applying the matching EQ curve produced by CurveEQ using American Idiot as the reference audio; (3) my rock mix with the matched EQ curve off to start with and then being toggled on/off so you can more easily hear the difference. Obviously, we have not included an extract of 'American Idiot' here for copyright reasons so you will need to audition that for yourself (via iTunes, for example). In comparison to the Green Day track, my mix lacked both bottom end and top end. However, perhaps the most noticeable difference is the presence of too much low-mid range (200-400Hz), which the matched EQ curve has attempted to scoop out. While the matched EQ version is a significant improvement over the original, in this case what the exercise has really revealed is that the original mix needs revisiting. As with any mix comparisons you make with your favourite commercial tracks, this is a very useful lesson in itself but, with CurveEQ, you also get very useful visual data from the EQ curve as a starting point for your mix revisions.
Published August 2013
No comments:
Post a Comment