By John Walden
Cubase’s Track Lanes system is great for speedy comping, but Track Versions brings plenty more to the party...
In previous workshops, I took you through the process for recording, and ‘comping’ both lead vocals (SOS August 2011) and multi-track drum recordings (SOS February 2012) using Cubase’s Track Lanes facility. But Cubase 7.5 introduced a feature called Track Versions, which our reviewer Mark Wherry likened very favourably to Pro Tools’ Playlists. It makes the recording and management of multiple takes from a multiple microphone configuration much more efficient in some scenarios. Yet both Track Lanes and the newer Track Versions have their uses.
Comping Compared
Whether working with MIDI or audio, if you’re dealing with a single performer and working on a single section of a song at a time (an individual verse, chorus or solo), the Track Lanes approach has its merits. The most obvious advantage is that, in cycle record mode, new lanes are created automatically. You can, therefore, let the performer cycle through the song section a number of times without interrupting the artist or any need to start and stop the recording between takes. And, as described in the August 2011 column, comping something like a lead vocal from a set of lanes is a perfectly manageable task.
Track Versions, on the other hand, doesn’t generate new versions in cycle recording mode automatically. Instead, if you want to record a new take, you must create a new (initially blank) ‘version’ prior to recording. This makes it more suitable for use with longer takes — perhaps capturing a number of whole performances from start to finish, from which you intend to comp the perfect version.
 I used a modest six-track drum recording to keep the example simple, but the more complex the recording, the more likely it is that Track Versions will be easier to work with than Track Lanes.
 New Track Versions can be created directly from the Track List.When working with a multi-mic recording, particularly when you have lots of mics and lots of takes, I find Track Versions easier to work with in the Project window. Instead of having multiple lanes spread across multiple tracks, you see a much tidier ‘one Track Version at a time’ display. While you can still easily move between the different versions, and edit sections from them into a ‘master’ take, the more compact display format is less likely to leave you lost in an endless stream of takes and tracks.
Let’s walk through a multi-miked acoustic drum kit example and see how you’d use Track Versions for this. There are two key phases: first, recording the various takes, then building your ‘comp’ from those takes.
On The Take
The first part of the process is to capture your various takes on a number of audio tracks. This can be broken down into a number of simple steps:
1. Create the required number of audio tracks for the microphone configuration that you’re using, and configure your hardware audio inputs accordingly.
2. Place all these tracks in a Folder track and enable Group Editing for that folder (using the button with the two horizontal lines that turns orange once enabled).
3. Record your first take.
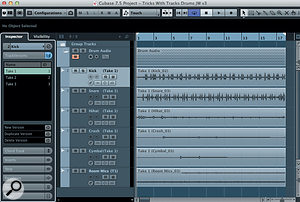
In the screenshot example, there are five mono tracks (including snare, kick and hi-hat) and a stereo track to capture some of the room ambience via a pair of mics set back from the kit. Note that, in this case, I have also created a Group Track to act as a stereo bus for the drums, and all the individual drum tracks have been routed to it. Group Editing means that any edits made to one of the tracks will be applied automatically to all tracks in the folder. This is essential for avoiding problems with phasing or mic spill that can manifest themselves if you attempt to mix and match audio from different mics in your final comp (for example, using the room mics from one take, but the kick, snare and hi-hat mics from another).
Take Two
To record a second take you need to create a new Track Version. You can do this in one of three ways: via the Project / Track Versions / New Version menu option; by hovering the mouse over any one of the track names in the Track List and selecting New Version from the drop-down menu located at the right-hand edge of the track name field; or by opening the Track Versions panel in the Inspector and clicking on the New Version button.
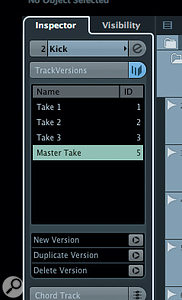
 The Track Versions panel in the Inspector allows you to select and manage your Track Versions.Once you do any of these things, the existing takes will ‘disappear’, but don’t worry — they’re just hidden and still exist! You’re now ready to record, and you can repeat the process as often as you need to until you have the takes you wish to work with.
Via the Inspector’s Track Versions tab, you can now see and select any of the takes (Versions) for playback, switching instantly between them. You can also rename, delete or duplicate a take using this panel.
Craft Your ‘Comp’
Having recorded your takes to different Track Versions, you’re ready to construct your ‘comp’ from the best bits of the individual takes. Again, this requires a number of steps.
First, find and select the Track Version you like best in general, and create a Duplicate Version via the Track Versions panel in the Inspector. This duplicate will become your final comped performance, so give it a meaningful name such as ‘Comp’ or ‘Master Take’.
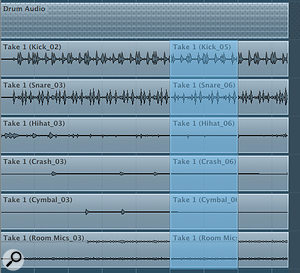
Next, audition the various takes and identify the sections in other Track Versions that are better than the corresponding parts of your ‘best’ take. For example, if bars 11-14 in Track Version 3 are better than those in your ‘master take’, select Track Version 3 and, using the Range Selection tool (an appropriate Snap setting can make selection easier) select the range you wish to copy. You only need select the range on one track because, rather wonderfully, the same range will then be selected on all tracks in the Folder automatically. Once selected, using either the Edit menu or keyboard commands (Cmd/Ctrl+C), copy this selection.
 With Group Editing enabled for a Folder, any edits you apply to one track are applied automatically to the others.You can then switch back to your ‘master take’. By default, the same range used when copying is already selected (you can, though, select a different range if you wish to paste the new audio at a different position) and then paste the copied section (again, via the Edit menu or Cmd/Ctrl+V). The standard Undo options can be used if you need to step back in the editing process for any reason.
Repeat the copy/paste process as often as is required to compile your finished ‘performance’. And if you decide that you want to start again, you can delete the master take you have created and return to the first step above — which is why I suggested working on a duplicate.
Finally, play back your new comped master take, and check that it sounds right. In particular, check for any pops or clicks at the joins between different audio clips. Cubase will automatically apply fades at the start/end of clips to smooth things out, but you can adjust these settings via the Project/Auto Fade window. You can also set fades at the track level; simply right-click on a track in the Track List and select the Auto Fade Settings option to fine tune.
And There’s More!
Three further things are worth noting. First, as illustrated by a couple of the screenshots, Track Versions are, visually, much tidier than Track Lanes (with multiple tracks, each with multiple lanes, these can get unwieldy), and this can make managing your project far easier. And the bigger your recording session, the greater the advantage of the Track Version approach over using Track Lanes.
 If you need to edit the fades for the audio clips used in your final comp, you can do so at the track level, as here for the kick drum track.Also, just as with Track Lanes, the same channel settings apply (EQ, inserts, sends, and so on) to the different Track Versions. Both systems therefore work well for alternate takes using the same basic instrument sounds. However, neither approach is going to be ideal if you wanted to experiment with different instrumentation or processing as your ‘alternate version’. If you’re creating an ‘unplugged’ acoustic version, for example, then configuring additional audio tracks within a suitable folder structure, or even creating a new dedicated project and transferring those elements that will be common to both, is a better approach.
 The Track Lanes and Track Versions systems are not mutually exclusive; you can easily switch between them.Also, if you’re unsure which is likely to be the best approach, note that you’re not tied exclusively to using one system instead of the other: you can easily convert between the two different formats (Lanes and Versions) via the Project/Track Versions menu.
Chords & Tempo Tracks
I’ve focused on using the Track Versions for recording and editing audio, but it has another trick up its sleeve that Track Lanes lacks, and which may be of particular interest to writers and composers: it can be used with track types other than audio and MIDI, including the Chord Track and the Tempo Track. Both options hold considerable creative potential, but also some practical limitations depending upon the nature of your project. These are, however, topics for another day
Published December 2014
No comments:
Post a Comment