By John Walden
Manage effects and processors more efficiently in Cubase’s MixConsole.
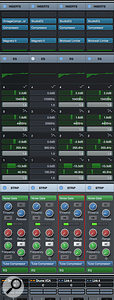
 Even with just a few elements open, the MixConsole Rack can become a very busy place!Last month, inspired by my adventures with Harrison MixBus, I looked at ways to improve your mixing workflow in Cubase’s MixConsole, using various channel display and navigation options. This time, still with the aim of making our mixing process as lean and mean as we can, I’ll focus on using the MixConsole’s Rack.
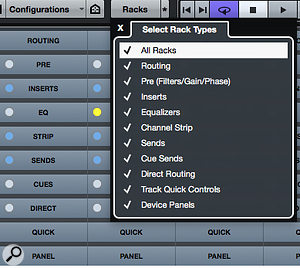
With multiple Rack sections, and lots of controls available in each, you can easily waste precious time scrolling around the MixConsole — but, thankfully, the Rack is highly customisable. A good first step is to use the Select Rack Types tool to switch off the display of any of the Racks you don’t routinely need to see. I tend to leave the Inserts, EQ, Strip and Sends sections visible, and show/hide others as required — assigning a key command to toggle the state of each section is a good idea.
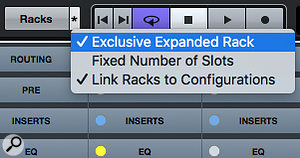
A next useful step is to enable two options in the Rack Settings drop-down menu. Exclusive Expanded Rack will automatically close an open Rack element whenever you open another, and this can reduce the amount of time you spend scrolling vertically. And if you enable the Link Racks To Configurations option, your Rack layouts will be stored with any MixConsole Configurations you create (see last month), including which Racks are visible and their open/closed status. If you find yourself switching between a few Rack layouts during a typical mix, then creating Configuration presets is a massive time saver.
Exceptional View
 While mixing, hiding any Rack elements you don’t need constant access to can help you focus.As MixBus provided the inspiration for this column, how about hiding all the Rack elements other than the Channel Strip? This is a great setup with which to start your routine dynamics and EQ moves, even if you eventually turn to other options for certain channels/tracks. You can keep things particularly compact by enabling ‘Show One Channel Strip Type’ (via the Rack Settings drop-down menu when the Channel Strip Rack is open); only one Channel Strip section will be expanded at a time. Another space-saving option in this menu is Show All Channel Strip Controls. This gives you a more comprehensive control set for each element of the Channel Strip, and you can toggle this setting off to leave you with just the most commonly tweaked controls.
 The Racks Settings drop-down menu can help you keep the Rack display under control.Before we move on, do you remember all the MixConsole zoom options from last month? Provided your eyesight is up to it, the vertical zoom allows you to get more Channel Strip (or, indeed, other Rack) elements onto the screen, and can reduce the time spent on vertical scrolling.
In The Q‑Link
Something I didn’t manage to explore last month was channel linking. In Cubase Pro you can configure sets of channels as permanently Linked Groups (and, if you wish, assign a VCA Fader to them). For Link Groups, as shown in the screenshot, there’s also a dialogue box via which you can specify which parameters are linked. It’s powerful stuff and perhaps deserves a tutorial all of its own, but there’s also a temporary ‘Quick Link’ facility, for Pro and non-Pro users alike. To start work with either system, make sure you have the Link Group section of the MixConsole Toolbar visible — you can set this via the Set Up Toolbar drop-down menu.
 Cubase Pro’s Link Group features are very powerful, but the Q‑Link system that’s in all versions of Cubase can be very handy too.Select a number of MixConsole channels and click the Q‑Link button, and these channels will be linked until you toggle Q‑Link off via the same button. If you can perform a task on one channel it will be applied to all the linked channels. For example, enable the Tube Compressor in the Channel Strip’s Comp section and it will be added to all linked channels. Adjust the Tube Compressor’s controls, and the same settings are applied to the corresponding compressor on the other channels. When configuring initial processing settings on, for example, all your drum channels, this can be a big time saver.
The same linking functions work in other Racks. For example, having selected your channels and enabled Q‑Link, you could quickly add an Insert effect to all the linked channels, and tweak some of the plug-in’s parameters. The same is true of adjustments made in the EQ Rack.
A really useful application of Q‑Link is the quick comparison of plug-ins. For example, you might try two different compressor plug-ins in the Insert Rack across a set of drum channels. Having placed both plug-ins in different slots on each of the Q‑Linked channels, toggling bypass on one compressor will bypass the corresponding compressor on the other channels (you don’t need Q‑Link to be active when inserting the plug-in on the different channels, but they must be in the same number insert slot for Q‑Linking tweaks to apply). This makes it very easy to flip between the two compressor types on multiple tracks to A/B their different sonic results.
 Four Q‑Linked channels (note the light grey shading): changes made in the Rack of one channel are applied to linked channels.It’s also worth noting that the Rack bypass buttons of Q‑Linked channels are linked. You can, for example, toggle the EQ Rack’s bypass on for a selection of channels (globally if you select all channels). In fact, it works across all the Rack sections, including sends and the Routing Rack, where it’s useful for configuring things such as bus routing for channel groups. It’s well worth assigning a keyboard shortcut for toggling Q‑Link on/off!
Rack ‘Em Up
For some reason, when loading a preset into one of the MixConsole Rack sections this isn’t applied across Q‑Linked channels, but there’s a quick way to copy all the settings in a Rack section between channels, without resorting to a Track or Rack section preset. For example, to copy the Channel Strip settings from one channel to another, hover the mouse over the Rack section header (where it says ‘Strip’) on the channel you wish to copy, hold down Cmd (MacOS) or Ctrl (Windows), and click and drag to the destination channel. Any existing settings in the destination channel will be overwritten with the settings from the source channel. The same trick works just as well in the Insert or EQ racks; it’s great if you have settings or plug-in chains you wish to duplicate to other channels.
Now You See Me...
I’ll finish with three handy shortcuts that can speed up your work in the Rack. First, once into the detailed work of mixing, I find myself constantly opening and closing Insert plug-in windows. If you hold down Shift+Alt while clicking on the E channel editor button (just beneath the Solo button), the windows for all Insert plug-ins on the channel will open; you can close them all just as quickly by holding Shift and clicking the E. (Incidentally, this shortcut also works in the Project window’s Inspector.) Second, the Windows: Close All Plugins key command is set to Ctrl-Q by default. If, like me, you eventually end up with a screen full of open plug-ins, this is a very helpful, quick way to declutter!
Finally, if you decide your various Inserts, Sends, EQ and Channel Strip settings are getting you nowhere with your mix, and you wish to wipe the slate clean, select Reset All Channels from the MixConsole’s drop-down Function menu. This strips out all Insert effects, clears all the settings in the Channel Strip, and offers the choice of resetting all channels or those currently selected — so you can reset, say, just your drum channels or you can ‘blank’ your mixer completely, which could be really useful if you often ‘inherit’ mixes from someone else! It’s powerful stuff but it goes without saying that it’s also something to use with care!
Published February 2018
No comments:
Post a Comment