With so much focus on computer workstations these days, wiring up analogue gear is becoming a bit of a lost art, but don't fear: all you need to know is here.
Despite the prevalence of digital audio in today's home studios, we still rely on analogue connections at some points in our signal chains. Analogue interfacing formats are stable and mature, but nevertheless it's surprising how often I am asked questions about connecting. This article is therefore intended to serve as a definitive guide to the basics.
Levels
The first thing to deal with is the topic of analogue signal levels. There are, fundamentally, five distinct nominal signal levels to be aware of. Starting at the lowest, we have 'microphone level' — the typical level you could expect to come from a typical microphone placed in a typical position in front of a typical instrument. Of course, there is no such thing: the actual level can vary wildly from microvolts (if you put a ribbon microphone at the back of a hall while someone plays quietly on a piano), to whole volts (from a capacitor mic inside a kick drum)! In general, though, most people would consider something like -50dBu to be a typical starting point for a nominal microphone level, and that equates to about 2.5mV rms. The 'rms' stands for 'root mean square,' a shorthand way of conveying the slightly involved method of describing an 'average signal voltage,' which is necessary because we are talking about varying AC signals here, rather than a steady-state DC voltage.
Hopefully, the use of the decibel is already familiar to most readers. The decibel is simply a logarithmic ratio of two signal amplitudes: one is the signal we are interested in, and the other is a stated reference value. The standard reference in professional audio is 0.775V rms, and we use the term dBu to denote it. The 'u' means 'unterminated' and refers to the absence of 600Ω terminations that used to be mandatory back when dinosaurs ruled the audio industry!
In broadcasting circles, the nominal 'line level' is called the standard 'alignment level,' and is defined as 0dBu, or a signal of 0.775V rms. However, most professional audio equipment actually employs a slightly higher nominal line-level of +4dBu, or 1.223V rms. You will often see and hear references to professional equipment as having "+4" interfaces.
Semi-professional and domestic equipment is generally designed to use a lower standard line-level, which is described as "-10." However, there is a trap here: a different level reference is used — this is -10dBV. The 'V' denotes a reference of one volt instead of 0.775V, and that means that the semi-pro line level of -10dBV equates to 0.316V.
The important practical point of this is that a -10dBV signal is almost exactly 12dB lower than the +4dBu professional line level. Which explains why, if you connect a semi-pro device to a professional one, the average signal level is about 12dB quieter than expected and, going the other way, a professional signal peaks roughly 12dB higher than a semi-pro device expects!
Another important signal level to be aware of is the maximum 'headroom'. Well designed professional equipment will run out of headroom and start to clip at about +28dBu, which means a whopping signal level of about 20V rms — although I've seen some really impressive equipment that can cope with more than +36dBu! Less well designed audio devices usually have lower headroom margins. For example, +22dB is fairly typical, and semi-pro devices will have even lower margins because of their lower nominal line level.
Balanced Or Unbalanced?
The next key concept is that of the balanced interface, which is probably the most misunderstood concept in the entire world of audio! Most people know that a balanced interface involves three wires: hot and cold signal wires, plus a screen connection; and an unbalanced interface has just two: signal and screen/ground. Most people also know that whereas the screen/ground is essential in an unbalanced connection because it provides the signal return path, it plays no part in the signal path for a balanced interface, and is purely a screen to reduce interference. That's why you can remove the screen connection of a balanced interface to prevent a ground loop, without losing the signal.
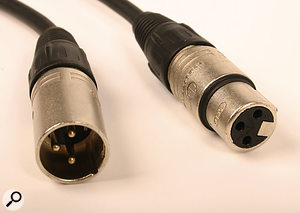
 The familiar XLR, used extensively in professional audio. It offers a sturdy connection, and because it locks in place it is difficult to disconnect accidentally, which makes it perfect for connecting devices that use phantom power.
There is an element of truth in there somewhere, but it is not the whole story and it is rather misleading.
In fact, the operation of the balanced line relates directly to the Wheatsone Bridge... I expect you wished you had paid more attention in school physics lessons now! The critical aspect of any balanced interface is that its design forces any interfering signals to have as near as possible the same amplitude on both wires. That is the essential aspect that allows the differential input to cancel out the interference — and that condition is ensured by arranging for each signal wire to have an equal impedance to ground.
So it doesn't actually matter to the operation of the balanced interface whether there is a pair of symmetrical and inverted signals or not. The point is that given equal impedances to ground from each signal wire, any interference will be presented to the differential receiver as a 'common mode' signal, which means equal in polarity and amplitude on the two signal wires. The differential receiver (whether a passive transformer or an active electronic input) inherently rejects common-mode signals — removing the interference — while passing any differential signal, which should be the wanted audio.
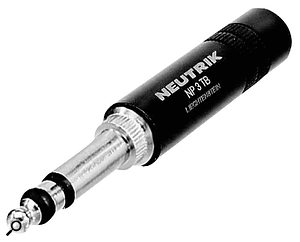
 A TRS B-gauge connector. Though the diameter is the same as instrument jacks it has a different tip, so don't mix and match!
This kind of configuration is often referred to as an 'impedance-balanced' or 'ground compensated output' and, typically, the hot side of the balanced interface is driven to carry the required output signal, while the cold side is connected to ground at the source end via a resistor which is carefully chosen to make sure that both wires have the same impedance to ground. (A true 'ground-compensated' output also monitors the voltage on the cold side and feeds that into the driving amp to cancel out any ground-loop noise.) I know many people look at impedance-balanced and ground-compensated outputs with scepticism, and don't believe they are a true balanced output at all — but they really are perfectly functional balanced interfaces, with exactly the same interference-rejecting properties as the more familiar, symmetrically driven system.
The only practical difference is in terms of the signal amplitude on the wires. The hot side of an impedance-balanced or ground-compensated output typically carries a signal which is 6dB larger than the level carried on each wire of a fully symmetrical balanced output. If you think about it, it has to be that way to ensure compatible output levels from a differential line receiver. The fact that only one line is driven in a ground-compensated output is also advantageous in situations where the output is likely to be connected to an unbalanced input, since the signal level remains as expected. If you connect a symmetrical output to an unbalanced input you normally lose the cold side contribution, and the signal level ends up 6dB lower than it should be!
Connectors
There are five commonly used general-purpose analogue audio connectors: the XLR, the B-gauge jack plug, the Bantam/TT plug, the A-gauge jack plug, and the RCA phono plug.
The three-pin XLR is probably the connector most strongly associated with professional audio equipment, used for both mic and line-level interfaces. The name actually refers to the original Cannon X-series connector, which was then upgraded with a Latch and a Rubber insulator — hence the XLR. Although now made by many alternative suppliers, the XLR-format connector has been the standard for most microphones since the late 1970s, and the AES organisation eventually managed to standardise the wiring convention worldwide in 1992, in a document called AES14.
 The Bantam TT jack is a miniature version of the B-gauge jack. Though they are more delicate, and a little more fiddly to solder, you can fit more connections in a 19-inch patchbay, which has made them common for applications such as built-in patchbays for large consoles.
Balanced, stereo microphone and line-level signals can also be conveyed using a five-pin version of the XLR. Again, the screen is on pin 1, with the left channel on 2/3, and the right channel on 4/5. The even pin-numbers carry the hot side of the balanced interface and the odd numbers carry the cold side. The same connector convention is used, with female for inputs and male for outputs.
XLRs are very rugged connectors, with self-cleaning and gas-tight contacts in the best designs, and provide excellent screening properties. However, they are quite bulky and impractical where many connectors have to be squeezed into a small space. The original solution to this problem was the Post Office 316 plug, known generically as the B-gauge plug. Developed for manual telephone switchboards, this brass quarter-inch plug has three contacts arranged as a rounded tip, a ring and a longer sleeve. The tip normally carries the hot side of a balanced signal, the ring carries the cold side, and the sleeve carries the screen.
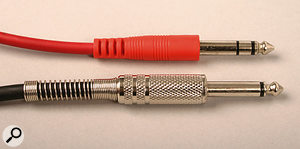
 Quarter-inch, A-gauge jacks generally come in two flavours: TS (Tip, Sleeve) and TRS (Tip, Ring, Sleeve). You can identify these easily, as there are two plastic bands on the tip of the latter and only one on the former.
For even greater socket density — such as might be required on built-in console patchbays — there is a miniature version of the PO316, called the Bantam or TT (Tiny Telephone) jack plug. Essentially, the Bantam is a scaled-down version of the PO316 with a 4.4mm diameter instead of the latter's 6.35mm diameter. That allows 48 sockets per row, doubling the socket density compared with a standard PO316 patchbay. Largely because of the smaller size, Bantam patchbays don't tend to be quite as reliable as the full size B-gauge version, but in most cases this shortcoming is outweighed by the space-saving convenience. Bantam plugs are usually employed for line levels at +4dBu.
 Phono connectors are used extensively in domestic hi-fi applications, but generally are only found in professional studios for digital S/PDIF connections.In the semi-professional world, the A-gauge jack plug is often used in an equivalent way to the B-gauge for balanced circuits. Again, the TRS (tip, ring, sleeve) version carries hot, cold and screen connections, respectively. When used for balanced line-level signals, A-gauge plugs and sockets could work at either +4dBu or -10dBV, depending on the intended market for the equipment. Some equipment even allows the level to be switched to suit the application.
A-gauge jacks are also used for unbalanced circuits, but in a simpler TS (tip-sleeve) version, typically used for guitars and keyboards. The TRS version is also used for unbalanced stereo connections, most commonly on headphones. In this case, the wiring convention is left channel to tip, right channel to ring, and the commoned returns to the sleeve — and that applies to the miniature 3.5mm TRS plugs on stereo earpieces and headphones too.
Although the A-gauge and B-gauge plugs have the same overall shaft diameter, they have completely different tip shapes and the dimensions and positions of the insulators between conductors is also different, which makes them completely incompatible with each other. The most significant difference is that the B-gauge has a small, rounded tip, while the A-gauge has a larger, diamond-shaped tip. If a B-gauge plug is inserted in an A-gauge socket, it is unlikely to make reliable contact because of the smaller tip, whereas if an A-gauge plug is inserted into a B-gauge socket its oversized tip is likely to strain and bend the contacts, such that they then become unreliable with proper B-gauge plugs. So the golden rule is to never insert the incorrect type of plug for the socket: a handy rule of thumb for life, I find!
 As well as the basic connectors described in this article, a number of others are sometimes used in commercial studios. The D-sub snake pictured here, for example, is often used to provide an eight-channel breakout cable from rack equipment. Others, such as EDAC, are often used in fixed installations where cables are not likely to need plugging and unplugging on a regular basis.
The outer ring of the RCA phono plug and socket are used for the screen connection, while the central pin/socket is used for the hot signal connection. The spring action of the outer contact is all that holds the RCA connector in place, and cheap phono plugs have a nasty habit of losing their grip over time. This makes the screen connection unreliable, and sometimes the plugs can even fall out of the socket!
I've only described the five most common connectors here, but there are many other types used for specific applications. For example, vintage mics and some older audio equipment use variations on the multi-pin DIN connector (Tuchel, Preh and Binder), while loudspeakers are usually connected via 4mm banana plugs, or Speakon connectors. Multicore cables are typically equipped with Plusconnection, Contact or MIL connectors, and multi-channel interfaces to tape recorders and DAWs are often via D-sub (see photo above) or EDAC connectors. There are also numerous variations on wiring standards and pin-outs, just to add to the confusion. Hopefully, though, this article will have clarified the most important aspects of analogue interconnection. Happy plugging!
Published May 2007


No comments:
Post a Comment