The crack team of Paul White and Hugh Robjohns have
travelled the world solving readers' problems. Here, they down the Hob
Nobs and answer some of your recording queries in our Q&A
mini-series, Sound Advice.
Hugh: What we're talking about here is sound arriving at different mics at different times due to the different physical distances between the sound source and the mics. Sound travels relatively slowly at around 340m/s (roughly one foot per millisecond or one metre in three milliseconds). So if you place one microphone a foot behind the other, the more distant mic will capture that sound roughly 1ms after the closer one.
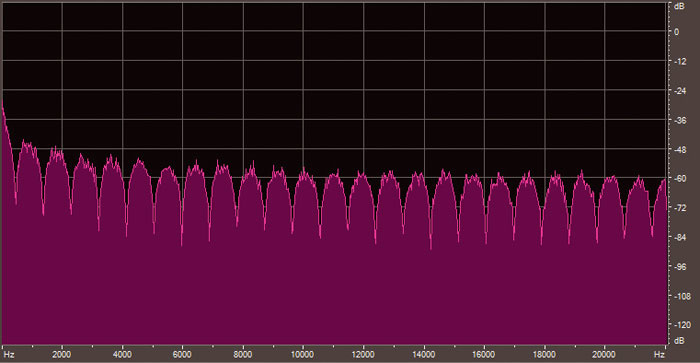
Paul: In these situations, complex filtering occurs whereby some frequencies are enhanced and others attenuated, depending on the exact time difference between the two signals. A graph of such an affected waveform shows lots of sharp peaks and troughs that look not unlike the teeth of a comb (as shown below). Hence the term comb filtering is commonly applied to the phenomenon. The filter notches and peaks are strongest when the two signals are exactly the same level, and once you're familiar with the rather coloured sound that comb filtering creates, you'll always recognise it when you hear it again.

Hugh: So how can you prevent this from happening? Well, the simple answer is not to use multiple mics on the same source in the first place, and to minimise any spill from a loud sources that could reach several mics in the room. If that is not physically possible, or if you deliberately want to combine the outputs of two or more mics, then you need to be prepared to spend some time optimising the combined sound. As Paul mentioned, the comb filter effect is at its worst when the signal level from the two (or more) mics is the same. So it helps if you make one mic's contribution much less than the other's. That way you'll get some of the tonal flavour, without nasty 'phasiness'. Something more than 10dB of level difference is typically needed, although you may get away with less in some situations.
Paul: Minimising spill between microphones is also key to keeping unwanted phase effects at bay, so cardioid mics can sometimes be used in place of omnis where their directional characteristics may be exploited to reduce the amount of unwanted sound getting into the mic. Acoustic screening between microphones, where practical, will also help and, in some situations, such as with tom mics on drums, you can use gating to mute the mics' signals, so they don't contribute the mix when not being hit.
Hugh: You can also often improve the situation by time-slipping one of the microphone signals inside your DAW to re-establish time alignment. If you anticipate having to do this, it is helpful if you have a timing reference to work with on the recording. The simplest way is to record a sharp click at the start of the take — a bit like the classic sync clapper board used in old film shoots. Simply tap the instrument once with something to generate a simple, clear click, wait a few seconds to make sure the reflections from that sound have died down, and start the performance. When everything is finished, it will then be easy to find that click at the start of the appropriate tracks and use it as a reference marker when time aligning the relevant tracks. Whether you slide the more distant mic track forward, or the closer one back depends on how the overall source timing works with the other tracks.
Paul: Sometimes, the precision of time slipping tracks isn't necessary or required, and a simpler approach will suffice. If you fade up two or more channels, flipping the signal polarity of one with the preamps's 'phase' button will be sufficient to confirm whether that mic's contribution is constructive to the mix or not. You will usually find that there is obviously more bass in one signal polarity than the other you would normally select the position that provides the most bass.
Hugh: Most larger consoles incorporate a 'Phase Meter' to try to provide warning of this situation, and most DAWs will have a similar facility somewhere. Phase meters are scaled from +1, through zero and on to -1. If the two channels are perfectly time-aligned and carrying identical levels, the meter will show +1. Perfect mono! In general terms, when listening to a normal stereo mix, anything on the positive side of zero will produce acceptable mono without audible phasing problems. If the needle (or LED marker) dips below zero and stays there, you have some kind of timing/phasing problem, and listening in mono will reveal that. It's not uncommon to find the phase meter dip briefly under the zero mark — especially when there are complex reverbs involved — and as long as it is only a brief dip towards -1, there is probably nothing to worry about.
Published February 2008
No comments:
Post a Comment