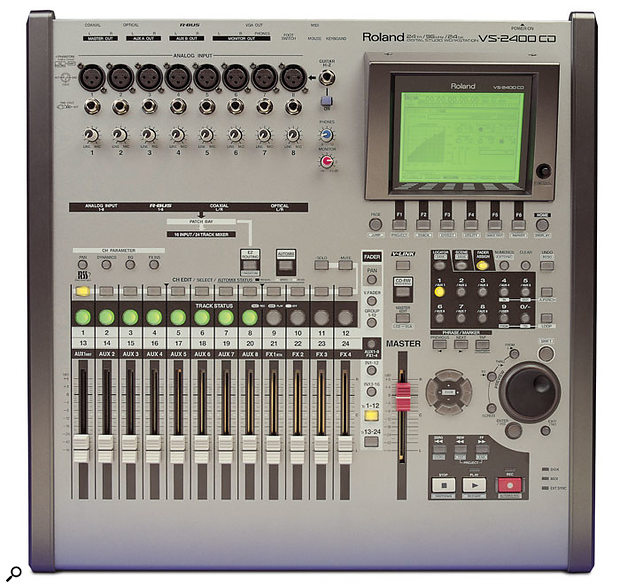
The Roland VS2400CD's flexible routing system can seem complicated at first.
Please can you help me understand the effects routing on my Roland VS2400CD? Is it possible to have effects on all tracks with only one effects card installed? Can you explain (in idiot's terms) how to 'print' an effect to a track? Also, would this free up the effect for use on other tracks?
Helen Adams
Reviews Editor Mike Senior replies: First of all, let's clarify some things about setting up effects routing in general, regardless of which system or machine you're using. Basically, there are two ways you can add effects to a single track. The simplest is to just shove the effect directly into the signal path, something referred to as 'inserting' the effect. This is the best approach for any of the algorithms which invlove compression, and anything which is designed to change the character of the whole signal, such as track-specific EQ treatments and modelling or modulation processors.
The disadvantage of using your onboard effects as inserts is that you need a separate effects processor for each track you want to add effects to. It is to get around this problem that you're given compression and equalisation as standard on every channel — if you had to add these using the effects board, one board wouldn't get you very far!
 Setting up a send effect is the best way to use an effect on multiple tracks.
The second routing approach allows you to use your choice of effect algorithm on all the tracks at once. This is done by feeding the effect's FX Return channel from one of your aux sends, such that any and all tracks can send to the effect using the channel aux send controls. You then return the output of the effect to the mixer for mixing alongside your tracks. This is the best approach for any effect which makes use of any kind of delay or reverb.
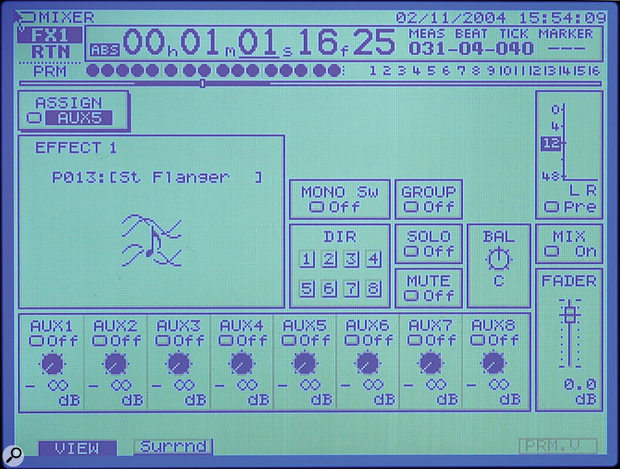
I'm guessing that you've already worked out how to insert effects, as that's much easier, so here's how to set up a send effect. Let's assume you're wanting to add reverb to every track. First push the Aux1-8/FX1-8 button to bring up the FX Return channels to the faders, and then press the Ch Edit button to bring up the settings for the FX1 Return. There will be a little box at the top left of the screen labelled Assign. Set this to a spare auxiliary send — for the purposes of this example, let's use Aux 1. While you're in that screen, check that the fader is up, the Mute switch is off, the Mix switch is on, and the Aux 1 switch is off (the last of these avoids the possibility of creating a feedback loop).
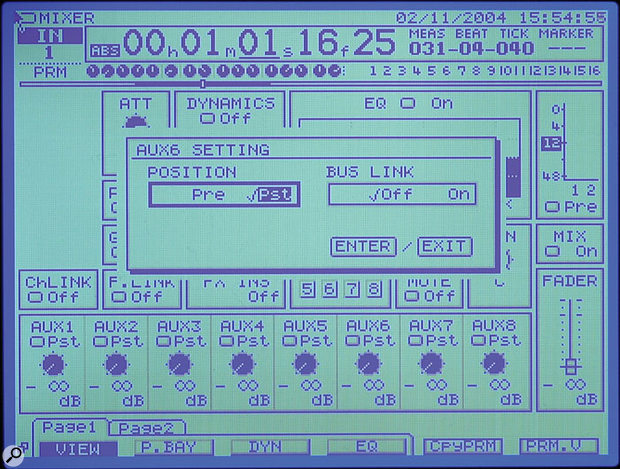
Now cursor to the large Effect 1 box and press the Enter button (below the main data wheel). This will take you to the screens where you can select the effect and change the parameters if you wish. You can also reach these effects-editing screens at any time by holding Shift and pressing F4. Now choose a channel to which you want to add effects, and press its Ch Edit button so that you can see its channel parameters. Along the bottom of the screen you'll see all the aux send controls. Cursor to Aux 1 and switch the switch to Pst. This setting means that the signal is sent to the effect from after the channel's level fader (post-fader, hence 'Pst'), which is the best choice in this case as it means that the effects level you set shouldn't need adjusting if you change the fader level. The other setting, Pre, is best when you're using the Aux send for other purposes, such as for providing monitor mixes during recording.
 Setting the channel's aux send to 'Pst' (post-fader) is best when using send effects.
Now cursor to the Aux 1 control and use the data wheel to fade it up. You should now (fingers crossed) hear the reverb effect being added. If you don't, then you should try to troubleshoot the situation by using the available metering. Go to the Home screen, where a row of meters are given at the top of the screen. The 'F' keys at the bottom let you show a variety of different signals with these meters. In this case, you could have a look at the aux buss meters to check that signal is reaching Aux 1 from the channel, and have a look at the FX Return meters to check whether signal is reaching the effect channel. The ToPre/ToPost option on the F6 key is particularly useful. If you have the metering set to Pre (the current setting is shown above the meters) you can see whether a signal is reaching the input of a given channel, whereas if you have the metering set to Pst you can tell whether it's leaving a given channel. For example, if the metering shows a signal for FX1 Return in the Pre metering mode, but not in the Pst metering mode, then you know that there's some channel setting that's not letting the signal through the FX1 Return channel — perhaps the Mute button is on, or the Mix switch is off. Learning how to troubleshoot routing problems using the metering is incredibly useful on the VS multitrackers, so do take the time to learn about how the metering works, if nothing else. It may seem a bit boring, but it really pays off when things don't go how you expect them to!
Now let's turn to printing effects. Depending on whether you're using insert or send effects, the procedure for printing effects is different. However, for both, you'll need to use the internal routing matrix. First choose the track you want to print to, and then hold down its Status button for a second or so until the patchbay screen comes up. You can also access this screen from the EZ Routing button. Hold down the Status button again and press Clear to remove any existing assignments to that track, and then press the Ch Edit button on the source track. A little line should now show up on the screen connecting the source channel on the Track Mixer block with the destination channel on the Recording Track block.
Now go back to the Home screen, arm the destination track for recording, and print the track to its new destination with its effects. If you need to, you can print a mix of several tracks, along with the output of an effects return, in the same way — just make sure that all the channels' and returns' Ch Edit buttons are lit at the relevant point. You can even bounce to a stereo track if you've got one set up.
Published October 2005
No comments:
Post a Comment