Cubase Tips & Techniques
Technique : Cubase NotesMake your Cubase mixes pack more punch with master‑bus compression.
Carsten Kaiser
Whether you realise it or not, you're probably familiar with the sound of master bus compression, by virtue of having heard so many records that have been mixed in this way! The primary aim of compressing the signal running through your stereo bus is to achieve more coherent, bigger‑sounding mixes: the compressor attenuates the loudest parts of the material and, when make-up gain is applied, the track's average (RMS) level is increased. The dynamic balance of your mix as a whole can appear considerably smoother, which is why bus compression is often described as 'mix glue'. Another desirable effect of master-bus compression is that you'll often find yourself needing to compress individual track signals far less than you otherwise would. Although it sounds a little counter-intuitive, the result is that mixes can be made to sound both more 'cohesive' and more 'transparent'.
Cubase's humble bundled Compressor plug‑in can serve perfectly well as a stereo mix‑bus compressor.
To achieve this in your DAW software, you'd typically use a dedicated bus compressor plug‑in such as SSL's Duende Native Stereo Bus Compressor, but there's no reason you can't put Cubase's own plug-ins to work in this role — so in this workshop, I'll show you how to do just that, as I explore several different master‑bus compression techniques.
Getting Started

Note that master‑bus compression yields the best outcome when you set up the compressor before making your mixing decisions — that is, the idea is to mix into the compressor. If you try to use this technique having already established all of your track levels, fader‑rides and each individual track's dynamic processing, you may be a bit disappointed by the results. With that out the way, let's explore a basic setup:
1. Insert compressor: Insert an instance of Cubase's bog‑standard Compressor plug‑in on your master stereo channel. Select a low ratio (eg. 2:1) and medium attack (50ms) and release (250ms) times.
2. Threshold: Set the threshold of the compressor so that the compressor is delivering gain reduction of about ‑2dBFS or less at the loudest parts of your track. Make sure you adjust the compressor's make‑up gain to compensate for the loss in level.
3. Attack: Now to tweak the attack and release settings to make the compressor work better with the song's groove. As a general rule, the more up‑tempo the song, the faster the attack can be. Use your ears to judge this, though, because too fast an attack will mean the signal transients get squashed and buried in the mix (especially when mixing rock and/or songs with drums, piano or prominent acoustic guitar strumming), leaving the track feeling dull and lifeless.
4. Release: If the meters of the Compressor plug‑in move in time with your song's main groove, you're probably on the right track with the release settings. But once again, make sure you use your ears and, if need be, adjust the release time to taste. If you find this difficult, try using a higher ratio while setting the release.
5. Set ratio: If you increased the ratio just now, remember to lower it again when you're done setting the release. Now's the time to tweak the ratio to taste. Aim for light compression — 2:1 or even less — because you really want bus compression to be unobtrusive.
References Required!
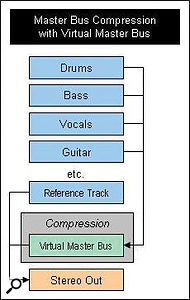
That basic setup was easy enough, wasn't it? But if you want to compare your mix with good‑sounding reference tracks, you don't want those to be compressed as well. The solution to this is to create a 'virtual master bus' through which you route all the tracks used in the mix. This virtual bus, complete with your bus compressor, and the track with your reference material are each routed directly to the 'real' stereo master bus. You'll treat the virtual master as the main master bus, as if it's the master channel itself. That way you can compare your bus‑compressed mix directly with your reference tracks. To set this up, follow these five simple steps:
1. Make a virtual master bus: Add a stereo Group Channel and drag it to the bottom of your track list on the Project page. In Cubase's mixer, this Group Channel should now appear just to the left of your main master bus (labelled 'Stereo Out' by default).
2. Rename group: Give your new Group Channel a meaningful name, such as 'VirtMaster', as in my example.
3. Routing: Route all of your project's tracks (whether audio, instrument, effects or Group tracks) that are currently routed to the master bus to your new virtual master. A quick way to do this is to select all those channels on the mixer, and shift‑click on the output routing at the top of one channel to select the new destination. It's important to leave the channel for your reference track(s) routed directly to the real stereo master.
Easily compare your mix, complete with master‑bus compression, with reference tracks by setting up a virtual master bus.
4. Reference level: Commercial reference material will have been mastered and will probably be too loud to compare with a mix in progress, so adjust the reference track fader so that the loudness is around ‑13 or -16 LUFS. To set this level, you can enable the loudness metering on the master bus while soloing the reference channel.
5. Mute references: Finally, mute the track used for your references. Now, you can play your mix as normal, but by clicking Solo on the reference track, you can toggle between hearing your references and your mix in progress. Remember, though, not to add any processing to the real Stereo Out channel from now on!
Parallel Bus Compression
 Parallel bus compression can help you craft some really smart‑sounding mixes. You can dial in compressor settings that are much more aggressive, lending solidity to your mix and intelligibility to your lyrics, without destroying the mix's transients. Some third‑party plug‑ins such as Cytomic's The Glue and the freeware TDR Feedback Compressor II include a dedicated blend control. Cubase's bundled plug-ins don't, though, so here's how to set up parallel compression with any compressor:
1. Parallel channel: Create a stereo effects channel in your project and move it next to your virtual master channel in the track list. Name the effects channel something appropriate, like VirtMasterComp.
2. Routing: Send a signal from VirtMaster to VirtMasterComp. The send control should default to a send level of 0 (no gain or attenuation in relation to the channel's signal), which is what you want. Now, activate the send's pre‑fader mode (right‑click and choose 'Move to Pre‑Fader'), so that no future fader moves on VirtMaster change the level going into VirtMasterComp.
4. Adjust levels: Lower the faders of both channels by the same amount (eg. ‑6.5dB), such that the highest peaks in the main stereo out channel do not exceed ‑0.3dBFS.
Parallel compression of the master bus signal can often sound less obtrusive, or more natural.
5. Apply compression: Remove (or bypass) any compressor on your VirtMaster channel, and insert another in the VirtMasterComp channel. Set its parameters just the way you would for a 'normal' bus compressor, and then use the faders to balance the parallel and VirtMaster channels to taste. Now's also the time to experiment with harder-hitting compression settings if you wish, all the while balancing the VirtMaster and VirtMasterComp levels.
If you're working with reference tracks, you'll need to create another virtual master bus, and route both the first one and the VirtMasterComp channel to it. Also, summing the compressed and uncompressed signals results in hotter levels: make sure the signal doesn't exceed ‑0.3dBFS (you can always bring down the input gain of your new virtual master channel).
Dual Mono Compression
 Some compressors treat stereo signals as true stereo, with a summed left and right (L+R) 'side-chain' signal for both channels. Others treat them as separate mono signals, each of which is its own side-chain source. In my experience a 'livelier' stereo signal can be achieved by compressing each channel independently. It's important not to over‑exaggerate this technique when working with very wide mixes, or mixes with substantial stereo separation (eg. classical recordings): if you do, the stereo image can fall apart or become really 'bouncy'.
If you'd like to try this technique with Cubase's compressor (which uses an L+R summed side-chain signal) you must somehow split the signal of your VirtMaster channel out to two mono channels and recombine them after the compressor(s). I'll explain how to do this in the following steps:
1. Dual effects channels: Create two stereo effects channels, and name them VirtBusL and VirtBusR. Place these channels right after your VirtMaster channel on the Project page, so that they appear at the right of the mixer window.

Used carefully, dual‑mono bus‑compression can help you achieve a livelier stereo picture — but push it too far using this technique and the stereo image can become unstable.
2. Routing: Send two identical signals from your VirtMaster channel, one to VirtBusL, another to VirtBusR. Activate the pre‑fader option for both sends.
3. Level and pan: Drag your VirtMaster fader down to ‑∞dB (minus infinity) and adjust the stereo pan setting of VirtBusL and VirtBusR to 100 percent left and 100 percent right, respectively.
4. Compress: Now you can insert a compressor on both VirtBusL and VirtBusR, and set their parameters as described previously.

More Possibilities
Some people like to use serial compression (with the signal passing through two or more compressors in series) on the bus. Feel free to try this, but listen out for pumping effects and interaction between the signal processing of the compressors. I don't recommend this approach unless you're very experienced with dynamics processing.
 Sometimes you'll find that you really want the effect of bus compression, but certain sections of the song are problematic with full‑band compression. For example, where there's only a kick and a hi‑hat in a song intro or breakdown, but the rest of the arrangement is rather 'bigger' the usual effect may be undesirable. Multi-band compression is an option here, and this can also be used in a parallel compression setup, with more aggressive gain reduction. But, again, it's very easy to screw things up with multi-band compression, so unless you know from the outset that a multi-band is likely to be beneficial, there's little to be gained 'mixing into' such a processor. This goes for techniques that compress portions of M/S signals (eg. the lower frequencies of the mid signal could be used to consolidate the stereo centre).

No comments:
Post a Comment