Welcome to No Limit Sound Productions

Company Founded
2005
Overview

Our services include Sound Engineering, Audio Post-Production, System Upgrades and Equipment Consulting.
Mission
Our mission is to provide excellent quality and service to our customers. We do customized service.

Monday, July 28, 2025

Cubase 14: Using Modulators For Automatic Vocal Level Riding

In the first stage of our DIY vocal riding, the combination of the Envelope Follower Modulator and Volume plug‑in lets us reduce the dynamic range of the original vocal.In the first stage of our DIY vocal riding, the combination of the Envelope Follower Modulator and Volume plug‑in lets us reduce the dynamic range of the original vocal.

Cubase’s new Modulator has many superpowers —  it can even ride your vocal levels for you!

Waves Audio’s Vocal Rider plug‑in has proven enduringly popular (it was introduced some 15 years ago!) with good reason — it can automate, or semi‑automate, what was once a time‑consuming task: riding a channel fader to ensure the vocal isn’t ‘lost’ at different points in a busy and dynamic mix. In this article, I’ll take you through how you can use Cubase 14’s new Modulators to achieve similar results to Vocal Rider.

Rider Essentials

Under the hood, Vocal Rider does a number of things. First, like a combination of compression and expansion, it can be used to make the overall dynamic range of vocals, dialogue or solo instruments (despite the name, it works well on various sources) more consistent. Second, as it can accept a side‑chain signal (such as a vocal‑free backing track, or specific elements from the mix) and track that source’s dynamics, it can be used to adjust how the vocal level is balanced against that mix, so that the lyrics remain clearly audible even as the arrangement changes. Third, all of its automatic level adjustments can be written as automation data to your DAW. So you’re able to finesse the result with targeted manual edits — something that’s much harder to do with a compressor.

It’s possible in most DAWs to achieve similar ends using the built in tools, but generally speaking it can be more fiddly to set up. For instance, Mike Senior outlined one such approach in a Cubase workshop back in SOS June 2010 (https://sosm.ag/cubase-0610), shortly after Vocal Rider came out. With the introduction in Cubase 14 of the new Modulator facility, though, Cubase Pro users now have another option...

On The Level

First, we’ll use Cubase’s Envelope Follower Modulator and the new Volume plug‑in (shown in the opening screenshot) in combination to reign in the dynamic range of a spoken or sung vocal. A suitable configuration is shown in the first screenshot. Next to my main lead vocal channel is a mono Group Track set to receive a pre‑fader send from the main vocal. The processing (courtesy of the Envelope Shaper Modulator and an instance of the Volume plug‑in) is done to this Group Track, before both tracks are sent to and blended on a further Group Track.


Published June 2025

Friday, July 25, 2025

Cubase 14: Using DAWproject To Exchange Projects Between Cubase & Cubasis

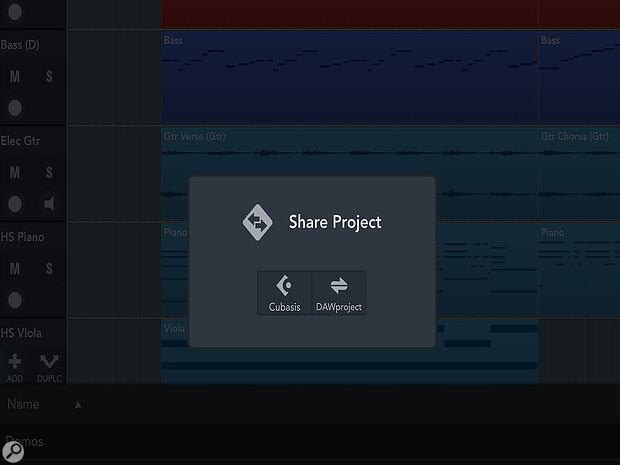
With my demo ready to be moved to Cubase, Cubasis’ Media page now offers the DAWproject format for sharing projects.With my demo ready to be moved to Cubase, Cubasis’ Media page now offers the DAWproject format for sharing projects.

The new DAWproject file format promises straightforward project transfers between Cubasis and Cubase.

The act of moving a music project between DAWs isn’t always straightforward, and even though most DAWs offer one or more project export formats the transition can still be somewhat cumbersome and frustrating — especially when it comes to configuring any virtual instruments or effects plug‑ins you want included in the process. In late 2023, Bitwig and PreSonus introduced the DAWproject file format, a new project ‘container’ designed to transfer all of the most important elements (audio tracks, MIDI tracks, mixer and plug‑in configurations included) between any DAWs that support the file format.

In late 2023, Bitwig and PreSonus introduced the DAWproject file format, a new project ‘container’ designed to transfer all of the most important elements (audio tracks, MIDI tracks, mixer and plug‑in configurations included) between any DAWs that support the file format.

While warmly welcomed by many users, relatively few developers have so far added support — but, happily, Steinberg are now one of them. DAWproject import/export was added to Cubase Pro and Artist in v14.0.20 and, wonderfully, Steinberg added the same support to Cubasis 3.7.5. So if you like the idea of moving projects between your mobile and desktop working environments, DAWproject now has the potential to make that easy. In use, it’s a remarkably straightforward process — but, understandably, there are still some ‘gotchas’ to be aware of, so below I’ll take you through the pros and more obvious cons.

To There...

A common use case is transferring an idea started on Cubasis on an iPad, while working away from your studio, to ‘full‑fat’ Cubase for development or completion in the studio. As you’ll see in a moment, the transfer process is very straightforward. But Cubasis is now a pretty feature‑rich recording environment in its own right — so, just how much detail from your Cubasis project might arrive intact in Cubase via the DAWproject container?

A common use case is transferring an idea started on Cubasis on an iPad... to ‘full‑fat’ Cubase for development or completion in the studio.

Let’s assume we’ve created a typical project in Cubasis for a new musical idea. It consists of a number of virtual instrument tracks (drums, bass, piano and synths, for example) and a few audio tracks recorded on a compact, mobile‑friendly audio interface. Perhaps a guitar part or three and a vocal demo. Within the Cubasis mixer, the tracks have been routed to Group Channels (buses for drums, bass, keyboards, guitars) to keep things organised, and to make it easier to create a static mix balance from the... 


Published July 2025

Wednesday, July 23, 2025

Cubase: Groove Agent SE4's Acoustic Agent

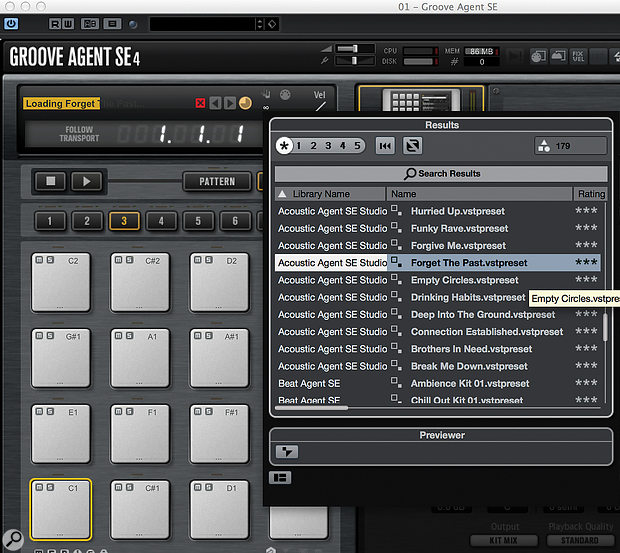
To load a kit and set of rhythms, right-click on the Agent box, top middle, and select ‘Load Kit With Patterns...’.To load a kit and set of rhythms, right-click on the Agent box, top middle, and select ‘Load Kit With Patterns...’.

Cubase’s Groove Agent SE4 isn’t the most intuitive drum machine, but it’s well worth getting to grips with.

Cubase’s Groove Agent SE4, bundled with version 8.0 onwards, is something of a hidden gem. It’s a virtual drummer along the lines of BFD, EZ Drummer and so on, with loads of good-sounding kits, a great ‘Rhythm’ library and lots of tweakability. In SE4, Steinberg added the ‘Acoustic Agent’, which enables you to vary and automate the virtual drummer’s performance with ease. Several SOS forumites, though, found it confusing enough that they asked for a step-by-step guide. So, here’s a quick guide to creating a natural-sounding acoustic drum part using SE4’s Acoustic Agent. I can’t cover everything in two pages, so it’s a topic I’ll revisit in the future.

Secret Agent

The basics are easy to understand: on the left are eight banks of 16 pads (128 pads in total, each mapped to a different MIDI note), onto which layered kit-piece samples can be loaded, either individually or a whole kit at a time. There’s another bank (there are eight banks in the full version of Groove Agent) of 16 pads for MIDI loops, which ‘play’ the kit pieces, and again these are assigned a MIDI Note. Over on the right, it’s a little more complex: there’s an Edit page for the ‘Agent’ associated with the kit (more on that later), a Mixer for balancing and processing the various kit pieces, and an Options page, which we’ll explore later.

The different Agents can be thought of as engines for customising the patterns or samples (depending which Agent you’re using). As I said, we’ll be examining the Acoustic Agent, which is all about tweaking the virtual performance. Finding a suitable kit isn’t straightforward, as the browse-by-Agent page of Groove Agent 4 is missing in SE4, but here’s a quick way to find a kit that’s compatible with the Acoustic Agent.

Groove Agent SE4 defaults to a blank preset (no kit, no patterns), but the ‘Beat Agent’ is activated. Right-click on the Beat Agent box at the top centre, and select ‘Load kit with patterns...’. A kit browser window will appear which, alas, is fixed to a narrower width than is helpful. Scroll across until you see the Library Name column — it’s a good idea to drag this column over to the left if you wish to be able to select kits by Agent easily in the future. Click on the column header and the results will be ordered alphabetically (A-Z) by Agent type, click again and you reverse the order (Z-A). As there are some kits without a dedicated Agent, the column will be empty at the top (in A-Z), but if you scroll down you’ll soon find all your Acoustic Agent SE kits (the full version of Groove Agent gives you more options). Click on one: the kit and its patterns will load, and the Beat Agent icon will be replaced by an Acoustic Agent one. Whichever you choose you’ll be able to customise it, but if in doubt try the ‘Forget The Past’ kit: it sounds decent and the rhythms are simple enough for learning the ropes. Use the Pattern and Instrument buttons (top right of the left-hand pane) to view the Instrument (kit piece) or Rhythm pads. Click any pad or use a MIDI device to trigger the sounds.

It’s helpful to drag the Library column over to the left, so you can easily find all the kits that work with Acoustic Agent, which is the newest and most sophisticated Agent in Groove Agent SE4.It’s helpful to drag the Library column over to the left, so you can easily find all the kits that work with Acoustic Agent, which is the newest and most sophisticated Agent in Groove Agent SE4.

Transport Policy

Groove Agent SE4 has its own transport but can also be set to start and stop in sync with Cubase, which is the way I prefer to work: click on the words ‘Follow Transport’ above Groove Agent’s stop and play buttons — they should turn yellow/orange. When you hit play (space bar) in Cubase, the currently selected pattern (highlighted by a yellow/orange line around the pad) will start playing. You should notice a little ‘clock’ and beat numbers displayed in the pad, which enable you to see quite easily how long/short the pattern is and when it will loop back to the beginning.

Hit another Rhythm pad and, by default, it will take over instantly. If jamming these parts to come up with ideas, I prefer to change the Trigger Mode setting for all pads from Immediately to Next Beat or Next Measure (bar), to ensure smooth transitions between different-sounding Rhythms. To do this for several pads at once, click the first pad, then shift-click the last pad to make your selection. Next, shift-click to select the desired setting from the Transport Mode drop-down list in the Edit page on the right-hand portion of the GUI. Now hit play and switch between a few patterns using your mouse. I’m sure you’ll get the idea pretty quickly. If you program MIDI Notes in Cubase’s Instrument Track to trigger these patterns, it will behave in the same way, so once you have the desired patterns mapped to pads, you can sketch a song structure out pretty swiftly.Sync’ing Groove Agent SE4’s transport with that of Cubase is a  good idea!Sync’ing Groove Agent SE4’s transport with that of Cubase is a good idea!

Pattern Tweaks

All of which brings me neatly on to tweaking those patterns. There are a number of ways you can do this, but for me, the stand-out feature of the Acoustic Agent is the X-Y pad governing the Intensity and Complexity parameters, which apply to the individual Rhythm pads — each has a different setting. Intensity dictates how hard the Agent ‘hits’ the kit, and Complexity adds little embellishments to the rhythm (or simplifies it, depending which way you go). So, set one of the Main pattern pads playing and try dragging the little ball/knob around and see how the sound changes. If you do anything to extreme too quickly it can sound a little odd, but for the most part, it’s pretty impressive.

Now for a clever feature: you can easily create variations based on just one Rhythm pad, and assign them to unused pads or pads with unwanted Rhythms. To remove a pattern, click on the offending pad and hit backspace — the rhythm will be removed and you’ll have a blank, grey-coloured pad. You don’t need to do this, but I find it helpful to see which pads are available; you could, alternatively, change the pad colour by right-clicking and selecting Set Colour, but I like to keep colour-coding for other things. Don’t worry, the usual Cmd-Z or Ctrl-Z undo facility works here: (go to the Options/Global page to set the maximum number of undo steps from zero to 20). To copy a rhythm from one pad to another, Alt+click-drag it. Then, twiddle the Intensity/Complexity controls to create a new but related part to give you a bit of believable variety.

Automation Station

As with most facilities in the right-hand Edit section, the Intensity and Complexity parameters can be automated. That said, the automation system is a little more sophisticated than for most plug-ins, partly because there are far more parameters than it’s possible to list in one place!

Thankfully, Steinberg’s approach is fairly elegant. In the right-hand pane, select the Options page and then, in the next row down, select Automation. You’ll see a long list of automation ‘slots’ that are ‘not connected’. The left column is the name given to your automation lane; the right one displays the Groove Agent parameter mapped to it. Now, go back to the Edit page and right-click on the Complexity text box (the one containing the current numeric setting; don’t select the text first, or you’ll see the wrong menu!). Select Add To Automation / Automation 1, and return to the Options/Automation page, where you’ll see your Complexity parameter for the currently selected pad has been added at the top. Back in the Cubase Project page you can now open up the automation lane for this parameter in the usual way.

I mentioned that this automation is assigned on a per-pad basis — and that’s obviously not always going to be a convenient way to work. For example, if you automated the Complexity parameter for a loop that played throughout a song, but later decided to play a different Rhythm pad at certain points, you’d have to go back and automate the same parameter for the second pad. I find that it’s often a good idea, therefore, to assign the same parameter for all pads to a single automation lane. I can’t find a way to map all pads simultaneously in one step, but it’s not too time-consuming to do it one by one: again, right-click the Complexity value for each pad in turn, assigning it to automation slot 1 as you go. You only need do this once, and you can then save the kit (right-click on the Agent icon and select Save As...), and all will be recalled. Now, you have access to a single Complexity automation lane for the entire kit.

The real power of Groove Agent lies in the automation system. Multiple parameters from different pads can be assigned to a  single automation lane, which makes it easy to introduce natural-sounding variation in the virtual performance.The real power of Groove Agent lies in the automation system. Multiple parameters from different pads can be assigned to a single automation lane, which makes it easy to introduce natural-sounding variation in the virtual performance.

If you plan on using a lot of automation in Groove Agent SE4, it can be a good idea to rename the automation slots. To do that, go to the Options/Automation pane, and double-click on the name in the left-hand column. You can change it to what you wish, and the name will be updated in the list when you try to map further pads/parameters to it.

Striking Out

Regrettably, that’s all I have space for here: there are numerous ways to tweak the drum sounds, and yet more ways to automate the performance, which as I said earlier, I’ll come back to another time. Meanwhile, I hope there’s enough here at least to get you exploring SE4.


 Published August 2016

Monday, July 21, 2025

Using Cubase iC Pro Remote Control App

By John Walden

Cubase iC Pro: touchscreen remote control of Cubase (Mac & PC) from an iOS device.Cubase iC Pro: touchscreen remote control of Cubase (Mac & PC) from an iOS device.

Steinberg’s dedicated app can turn your iPad into a fine control surface for Cubase.

Touchscreen controllers offer a versatile alternative to conventional DAW control surfaces. There are both pros and cons but the potential is obvious. If you happen to have access to an iPad (or iPhone) then, whether you run Cubase on a Windows or OS X platform, Steinberg’s iOS-only Cubase iC Pro app ($16.99) provides a very creditable option. And, as the app has recently been updated (v.1.2.1 was released in July) to support some of the newer Cubase 8.5 features, maybe it’s time to explore your touchy-feely side?

Appy Days

Essentially, Cubase iC Pro provides a touchscreen remote control surface for Cubase. It includes virtual faders, record enable, mute/solo and automation read/write buttons, project navigation, transport controls and access to the key-command system. The app requires an Apple device capable of running iOS 7.0 or later and will support Cubase versions from v6 upwards.

Communication between the app and Cubase is wireless, and just requires your computer and iOS device to be on the same Wi-Fi network. This is undoubtedly one of the big benefits of using the app and, if your studio workflow means that you are sometimes both the engineer and the performing artist, being able to trigger recording and playback while sat in front of your instrument (rather than your computer) makes life a heck of a lot easier.

As well as installing the app on your iOS hardware, you also need to download and install the (free) Steinberg SKI Remote extension for your desktop system from the Steinberg web site. Once installed, this is activated via the Device Setup window from the Devices menu, by clicking on the ‘+’ icon to add a new device and then simply selecting the Steinberg SKI Remote from the pop-up list that appears. The authentication or password options can be ignored unless you work in an environment with multiple Cubase systems active.The SKI Remote extension is a free download from Steinberg’s web site.The SKI Remote extension is a free download from Steinberg’s web site.

With the SKI extension installed, and Cubase itself running, the first launch of the app should give you an initial prompt for iC Pro to connect to your computer. Subsequent launches ought to make a connection automatically but if you do get stuck, iC Pro has some built-in help to guide you through the process.

Incidentally, although the current version of iC Pro is iOS-only, Steinberg used to offer an Android version. This is still available as a public beta (it’s compatible with Android 5 operating systems) but, while this will still function with the right Android hardware/software combination, development is no longer active and it doesn’t support some of the newer features available in the iOS version.

Control Freak

The control features offered by iC Pro are divided into three ‘panels’; the Project (timeline), MixConsole and Key Commands panels. On the iPhone, you can see one of these panels at any one time as well as a pop-up transport panel. However, on an iPad, you get to see two panels (there are four different combinations available, accessed via the buttons located bottom-left), song position/tempo information, and transport controls, all at the same time.

The Project view provides a neat overview of your project timeline. You can use standard iOS touchscreen gestures to swipe left/right to move the cursor position (although, actually, the cursor stays fixed and the project scrolls behind it) and you can also pinch/stretch to zoom in/out along the horizontal (although not vertical; that’s fixed) axis.

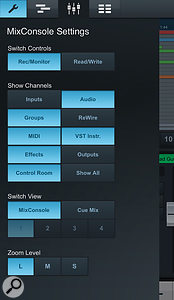
Cubase iC Pro also gives you access to, and the option to create, Markers or Cycle Markers (loop regions) in your project. This combination of scrolling, markers and transport controls makes it very easy to navigate around your project and, whether you are sat right in front of your computer, or on the other side of the room about to record a take, once you have trained yourself to reach for the touchscreen rather than the mouse, it is both simple and slick in use.The MixConsole Settings screen allows you to configure the mixer controls, including channel types and cue mix faders.The MixConsole Settings screen allows you to configure the mixer controls, including channel types and cue mix faders.

Console Yourself

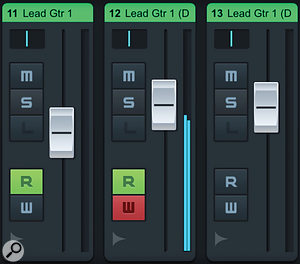
The MixConsole Settings page offers a number of ways to configure this panel. For example, three different zoom resolutions each provide access to different fader strip features. In ‘large’ mode you see eight faders on screen at any one time with track labels, chunky faders, level indicators, pan, mute and solo buttons. In this view you can also switch between seeing Record Enable or automation Read/Write buttons. If you opt for ‘medium’ view, then you get to see more faders but fewer controls per channel, abbreviated channel names, level meters and faders only. If you go for the ‘small’ view then you can see even more channels but you only see the level indicators; this view is “for information only”.

Swiping left/right allows you to scroll across the full range of your MixConsole channels. However, as with the MixConsole on the desktop, within the Settings screen, you can toggle on/off the display of specific channel types. And since the July update, this includes VCA faders.

There are a couple of further observations worth making. First, touchscreen faders are never going to be as tactile as physical faders. However, at both the large and medium zoom level, the faders are most certainly very usable and, as you can also enable automation when in large view, this is a very handy means of creating your initial mix moves.

Second, as regular iOS users will know, the touchscreen supports multi-touch functionality; provided your fingers are agile enough this is a system on which you can move multiple faders at the same time. For mixing tasks that’s potentially a big plus over using a mouse to adjust faders in the desktop MixConsole window.You can toggle between Record Enable buttons or automation Read/Write buttons (shown here) in the MixConsole.You can toggle between Record Enable buttons or automation Read/Write buttons (shown here) in the MixConsole.

Push The Button

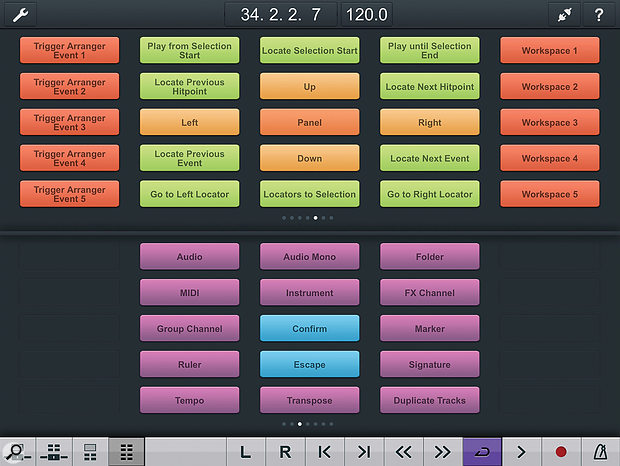
The Cubase key-commands system is something we’ve extolled the virtues of before (see SOS January 2012’s column). It’s a very powerful means of streamlining your workflow, but it does have one obvious issue: to get the best from it, you have to memorise the keyboard shortcuts themselves. Thankfully, the Key Commands panel of iC Pro not only presents you with a dedicated, fully editable set of your favourite key commands, but it also allows you to colour-code and label them. Yay — no more memory tests!

The app allows you to define up to 200 such key commands. These are organised into eight sub-panels of 25 and you can swipe left/right to move between them. And, if you pick the ‘Dual Key Command’ panel layout, you have your favourite 50 key commands all instantly available. Each slot is easily editable via the Settings screen.

iC Pro allows you to see either one or two sets of 25 key commands at the same time, all labelled and colour-coded for ease of use. iC Pro allows you to see either one or two sets of 25 key commands at the same time, all labelled and colour-coded for ease of use.

It Takes Two!

There is one other significant feature of iC Pro to mention: it allows multiple iOS devices to connect to Cubase at the same time. This is particularly useful in two contexts. The first is pretty obvious; if you happen to have two iPads (perhaps of various generations if you have upgraded, or if your bandmate has one too), then you can use them simultaneously. An obvious configuration would be one iC Pro instance showing the MixConsole/Project panels and the other showing dual Key Commands panels.

However, the other feature of iC Pro’s MixConsole support is that, if you’re using Cubase Pro, it also caters for the Control Room’s Cue Mix system. The Settings page allows you to switch the view between the MixConsole and any of the four available cue mixes. If your musicians are being fed a cue mix to their headphones, providing they have access to the Wi-Fi network and an iPad or iPhone, they can configure their own cue mix directly from the touchscreen without having a back and forth dialogue with the engineer sitting in front of the computer; very neat indeed.

Cheap At Twice The Price?

Having used Cubase iC Pro for a couple of years, it’s become a highly valued part of my personal Cubase workflow. While there are some great external controller systems out there (including dedicated touchscreen systems), and although I’m always hopeful, as yet I’ve not quite found something that seems to offer (a) a perfect fit to my personal workflow preferences or (b) is within my personal budget. And, with iC Pro now so familiar, maybe I never will?

I’m not sure I’d go so far as to say I’d buy an iPad solely to run iC Pro (there are some other music apps that I might put in that category!), but if you happen to own an iPad then iC Pro is more than worthy of its price tag.


Published October 2016

Friday, July 18, 2025

Cubase's 'Character' Compressors

 By John Walden

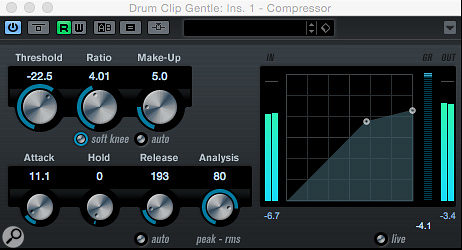
Cubase’s humble Compressor plug-in. Perhaps it’s not the most characterful software compressor, but it’s perfectly capable for routine gain-reduction tasks.Cubase’s humble Compressor plug-in. Perhaps it’s not the most characterful software compressor, but it’s perfectly capable for routine gain-reduction tasks.

Can you do ‘character’ compression with Cubase’s stock plug-ins? Let's find out...

Compression is one of the most important processes when constructing a mix, but while control over the dynamic range of a sound lies at the heart of all compressors, many hardware units have reached ‘classic’ status more due to the way they add a certain character to the sound. Partly that’s due to their attack and release behaviour, but it’s also due to the attractive-sounding harmonic distortions they add. Various plug-in developers have spent a lot of time trying to emulate some of these more esoteric hardware designs, with varying degrees of success, but what about the compressors bundled within Cubase? Can any of them do ‘character’?

Back in the day, Cubase’s stock plug-ins (and, indeed, those of many other DAWs) were perhaps best described as ‘vanilla’, but in later versions, Cubase has gained a couple of more characterful compressors: the Vintage Compressor, which is broadly speaking (they’re not intended as out-and-out clones) a Urei 1176 emulation, and the Tube Compressor, based on the UREI Teletronix LA-2A. They’re certainly decent enough to use in a mix, but how do they fare when compared with paid options from third-party developers?

Classic Compressors

The 1176 homage is plain to see in the Vintage Compressor. The attack, release and output (make-up gain) controls do exactly what you’d expect on any compressor, but the rest of the control set is akin to the 1176: you get a choice of four fixed compression ratios and an input control that adjusts how hard (or not) the audio hits the compressor against a fixed threshold.

Steinberg’s Vintage Compressor, inspired by the classic UREI 1176.Steinberg’s Vintage Compressor, inspired by the classic UREI 1176.

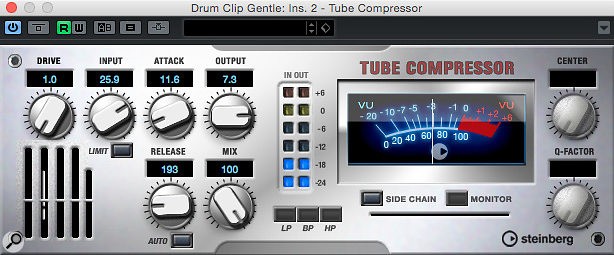
The LA-2A heritage of the Tube Compressor plug-in is a little less obvious. The hardware has a very minimalist control set, with a fixed compression ratio (around 3:1) or a ‘limiting’ mode (a much higher ratio). Cubase’s Tube Compressor mimics both the fixed compression ratio and the limiting option, but it also offers a useful side-chain feature, and attack, release and mix controls, which aren’t found on the hardware. In the LA-2A, the Peak Reduction control governs how hard the compressor is driven and the gain knob provides make-up gain adjustment. These are echoed by the Tube Compressor’s input and output controls, but there’s also a Drive control, which gives the user separate control over the amount of emulated tube saturation.

While it’s not a slavish emulation, the Tube Compressor draws inspiration from the Urei Teletronix LA-2A.While it’s not a slavish emulation, the Tube Compressor draws inspiration from the Urei Teletronix LA-2A.

Compressor Comparison

Not being lucky enough to possess either of the hardware units, I compared these two stock compressors with some other plug-in emulations performing a range of typical ‘we want character’ compression tasks. I will explain something about the results here, of course, but perhaps the best thing if for you to judge this having heard the results — with that in mind, I’ve created eight audio examples for you to audition (you can download the Zip file in the righthand sidebar of this article). To keep things simple, I’ve used a number of individual instrument sources and, in each case, processed them using five different plug-in compressors. These include three from Cubase itself (Compressor, Vintage Compressor and Tube Compressor) and two from Waves (CLA-76 and CLA-2A). Other developers make very worthy emulations too, but as I know these ones particularly well it made sense for me to use them here.

For each of the four solo instruments (drums, bass, guitar and vocals), one audio example is based around some gentle compression settings, while a second pushed each compressor plug-in harder so you might hear the ‘character’ more, but without getting into ‘special effect’ or ‘deliberately crushed’ territory.

One further, but important, point to note is this: our ears and brains typically perceive ‘louder’ as ‘better’, so having dialled in my key compression settings, I’ve done the best I can to match the overall level (volume) via the make-up gain controls on offer. Hopefully, this will allow you to focus on the character and tone of the sound rather than just any hike in the overall volume.

Finally, these are obviously limited tests, and utterly subjective, but I always find these kinds of comparisons interesting and intriguing nonetheless.

Vanilla Nice?

So, let’s begin. Listen, if you can, to the comparison with Steinberg’s ‘vanilla’ Compressor plug-in and form your own judgements. Feel free to disagree, but my own reactions were as follows.

For all four audio sources, when the compression settings were kept within the ‘gentle’ range (ratios around 3:1 or 4:1, thresholds set to just catch the obvious peaks, and a maximum gain reduction of 3-6 dB), the differences between each of the five compressors were actually very subtle, and well within the bounds of my ability to match the compression settings despite the somewhat varied control sets. Perhaps the Vintage Compressor and the CLA-76 were subjectively a little ‘warmer’ than the others, but I wouldn’t want to bet my house on being able to pick each of the five out in a ‘gentle compression’ blind test!

Is Waves’ recreation of the 1176 experience any better than Steinberg’s?Is Waves’ recreation of the 1176 experience any better than Steinberg’s?

As expected, there were more noticeable differences when each compressor was pushed a bit harder (higher ratio or ‘limiting’, lower thresholds and a maximum gain reduction closer to the 9-12dB range). For example, for the drums, I felt Steinberg’s Tube Compressor and Vintage Compressor both offered a much punchier result (the drums in particular had a bit more ‘attitude’) than the humble Compressor. I also thought both stood up pretty well against their Waves CLA counterparts but, despite the latter two offering no control over the release times, I generally preferred how they handled things; the drums still sounded punchy but somehow also a little ‘tighter’.

For the ‘pushed’ bass example, I felt both the Tube Compressor and Vintage Compressor added a subtle ‘analogue warmth’ to the sound compared with the standard Compressor and, with the vocal example, I also felt there was a nice (but, again, subtle) hint of distortion added by the Tube Compressor. Again, Steinberg’s offerings compared quite well with the two Waves plug-ins, but I found it easier to dial in a sound I liked in the CLA plug-ins. I suspect that’s because of the simpler controls, which are based on the original hardware, but it may of course have something to do with the different algorithms that lie beneath.

For the ‘pushed’ acoustic guitar part (perhaps the most unruly of the performances in terms of the dynamics), I also preferred the Tube and Vintage flavours over the standard Compressor, but I think I also found the CLA-2A and CLA-76 just a little smoother. That said, the differences were pretty modest.

Stock Or Twist?

So, on the basis of these specific examples, what conclusions can be drawn? Well, when it comes to a ‘vanilla’ compression task, I’d say that all five — even the modest Compressor — were more than up to the task. Indeed, in a complex mix, choosing the Compressor may well save you a few CPU cycles (although none of these plug-ins ask much of a modern CPU) without a particularly noticeable impact upon each sound.

When chasing a little more character, I’d undoubtedly prefer the Tube Compressor and Vintage Compressor over the standard Compressor; they’re a little warmer and punchier to my ears. But choosing between these Steinberg plug-ins and the Waves offerings is more difficult. There’s something difficult to define about the smoothness of the CLA-76 and CLA-2A, particularly for the drums and vocal examples, and it becomes more apparent the harder you push things. It’s all very subtle, though, and the differences arguably lie more within the realm of personal taste than ‘better or worse’.

Waves’ CLA-2A has fewer controls than the Tube Compressor, but that might be beneficial.Waves’ CLA-2A has fewer controls than the Tube Compressor, but that might be beneficial.

OK, the hardware LA-2A and 1176 might very well blow all of these software solutions out of the water, and there may be other applications where the differences in performance are much more obvious (‘crushed’ parallel compression or mix-bus compression for example; an experiment for a different day) but, for general compression tasks, when taken one sound at a time, all Steinberg’s bundled compressor plug-ins are capable of doing a decent job. The bottom line, then, is that if ‘stock’ is all you’ve got, don’t let that stop you cracking on with the mix — you can get great results from them.

The Good Of Small Things

While the choice of compressor plug-in might only make a very subtle difference when applied to an individual track, are those differences more noticeable when they’re accumulated across many instances in a mix? Alas, that’s too big a topic to explore in detail here, but it’s one I’d encourage you to investigate — does it sound good when you use the same compressor on everything? Perhaps there’s space for Steinberg’s offerings even if you have ‘better’ plug-ins.

Listening for the cumulative effects of all these small decisions is one of the most important but difficult-to-learn mixing skills. On a similar note, some plug-ins, including these two Waves compressors, with their simple control sets, seem to make it easier to make ‘right’ decisions. So it may be worth choosing tools you’re familiar with or find very intuitive: assuming they sound good, the consequence ought to be more ‘right’ decisions!


Published November 2016

Wednesday, July 16, 2025

Cubase: Vocal Delay Treatments

MonoDelay with the side-chain input activated. The second send is routed to the MonoDelay side-chain input to create a  ducked delay effect.MonoDelay with the side-chain input activated. The second send is routed to the MonoDelay side-chain input to create a ducked delay effect.

Are delays suffocating your vocal parts? Cubase has the answers!

In pretty much any song-based production, the vocals take centre stage, and while a well-recorded killer vocal performance is a great start you can often enhance it. Reverb and delay treatments, or a combination of both, can be part of that, but reverb often seems to move sounds ‘back’ in a busy mix, and in many contemporary styles, especially pop and EDM, the vocals need to remain up front if they’re to stand a chance of competing with everything else. Judicious use of delays can help you here, so let’s consider how you might best use Cubase’s bundled delays to add a little space and spice to your vocals, while keeping everything up front and personal.

The Cubase range features a number of delay plug-ins: MonoDelay (included in all Cubase variants); PingPongDelay (in Cubase Elements and upwards); StereoDelay (Cubase Artist and Pro only); and ModMachine (Cubase Pro only). They all have their uses. The last three are more obviously of a ‘creative’ variety, but even if you only have MonoDelay a few easy workarounds will have you teasing out some lovely creative effects.

Duck, Duck, Gone!

In a busy mix, a generic wash of spatial processing on a lead vocal adds to the wall of sound, and can make the mix as a whole feel muddled. This is where the classic ‘ducked delay’ treatment comes in: instead of applying a delay to the whole vocal, a ducked delay only makes its presence felt where there’s the ‘sonic space’ for it to do so — for instance, in the gaps at the end of one vocal phrase before the next phrase begins. During these gaps, the listener can hear the delay effect clearly, but the level of the delay is suppressed during the singing, so as not to obscure the all-important vocal part.

StereoDelay, with the send automated to add delay only at the ends of phrases. Different delay timings are used on the hard-panned left and right channels to enhance the stereo effect.StereoDelay, with the send automated to add delay only at the ends of phrases. Different delay timings are used on the hard-panned left and right channels to enhance the stereo effect.

If you’re using Cubase Artist or Pro, MonoDelay features a side-chain input that can create this ducked delay effect automatically. First, create an FX Channel and insert MonoDelay on it. Dial in some suitable settings (for starters, try a quarter-note sync’ed delay) and switch on its side-chain input, which glows orange when enabled. Now, on your lead vocal track, set up two sends (post-fader, which is the defult). The first sends the vocal to the MonoDelay effects bus — if you just enable this, you’ll simply get a delay across your whole vocal. Then add a second send from the lead vocal, this time to MonoDelay’s side-chain input. The delay will now only kick in during pauses in the lead vocal part; all you’ll hear is a delay effect applied to just the end portion of each vocal phrase.

If you’re lucky, this can sound pretty cool. Why luck? Well, more often than not, you can generally get more musical ducked-delay results via a DIY approach that uses automation data and is very easy to setup, albeit somewhat time-consuming to execute. As above, create your FX Channel with MonoDelay and enable a send from your lead vocal channel. Don’t engage the side-channel input this time but instead add an automation lane on your lead vocal track that points at the send level to the delay plug-in. All you need to do is create automation data that increases the send level to the delay at the end of each vocal phrase where you want the delay effect applied. This is more laborious, of course, but I often find I can achieve this more efficiently by draw the send envelope for my first ‘spot’ of delay and copying and pasting that data to the other spots where I want the effect applied. The upside is that you get much more precise control over the effect.

If your version of Cubase lacks StereoDelay you can use two instances of MonoDelay instead.If your version of Cubase lacks StereoDelay you can use two instances of MonoDelay instead.

Delay Out The Way

As a lead vocal is usually panned to the centre of the stereo image, a further way to ensure that the delay doesn’t step on the toes of the vocal is to pan the repeats. Artist and Pro users can simply replace MonoDelay with StereoDelay in the arrangement described above to explore this and, as shown in the screenshot, you can use StereoDelay’s pan controls to send the left/right delay lines as far to the edges as you wish. It’s a good idea to apply different delay times to each side, to separate the left/right repeats somewhat and create a nice stereo effect for the listener. If you don’t make the left and right sides different they’ll simply combine to form a phantom centre image, which rather defeats the point of using a stereo delay!

ModMachine can add some interesting filter and distortion options to the delay effect.ModMachine can add some interesting filter and distortion options to the delay effect.If you don’t have StereoDelay you can use this trick with MonoDelay. First, create an FX Channel with MonoDelay inserted. Duplicate this so you have two identical MonoDelay FX Channels. Route a send from your lead vocal track to the first FX Channel, and another to the second. If you’re building on the ducked delay example, open a further automation lane for your vocal track, set the second FX send level as its target and copy any send automation data you created for the first MonoDelay and paste it here. In the MixConsole, opposite-pan the two FX Channels containing MonoDelays, putting one hard left and the other hard right. Finally, tweak the settings of the two MonoDelay plug-ins to ensure the left and right delays have different characteristics so that you get a true stereo effect.

Colouring In

In all the earlier screenshots, I’ve used the filter options in the delay plug-ins to roll off both high and low frequencies in the delay sound. This can sound quite cool but it also helps in keeping the delay ‘further back’ in the mix — out of the lead vocal’s way, without pulling the lead vocal itself back with it. But EQ’ing the delay in this way is not the only way you can add sonic spice, and ModMachine provides more such options. Although ostensibly a delay plug-in, it also provides filter, drive and modulation options that can be varied using its LFO (via the Rate Mod setting). For example, the Width control sets the amount of modulation applied to the delay and can take you from a vibrato through to a chorus, while the Drive controls adds distortion to the feedback loop. If you apply lots of feedback (lots of repeats) then they’ll gradually get more distorted over time, which can sound great.

While ModMachine makes this sort of thing easy, you can, again, achieve similar effects using MonoDelay by inserting some additional plug-ins on the FX Channels before or after MonoDelay itself. For example, if you’re limited to using MonoDelay, adding an instance of AutoPan can get your delays moving across the stereo image, without having to use two delay sends.

MonoDelay can be combined with other stock Cubase distortion or modulations plug-ins to achieve similar results to some (but not all) ModMachine patches.MonoDelay can be combined with other stock Cubase distortion or modulations plug-ins to achieve similar results to some (but not all) ModMachine patches.If you want to get a little closer to what ModMachine delivers, a combination of a distortion plug-in and a modulation plug-in make a good starting point. In the screenshot below, I’ve gone back to basics with a combination of Distortion (left), DaTube (right) and Chopper (left and right), all of which are included from at least Elements upwards. The contrasting distortion plug-ins on the left/right MonoDelay channels added some extra spatial interest, and I also applied different settings to the two Chopper instances, both of which were used to create a sort of vibrato sound on the delay lines.

There are some limitations when working in this way — there’s no way to insert plug-ins into a delay plug-in’s feedback loop, and the internal routing in Cubase seems to prevent a workaround — but there are probably more creative options to explore here than you’ll ever need. Just to illustrate the key ideas I’ve explored here, there are some example audio files on the SOS web site for you to check out (http://sosm.ag/dec16media). So next time you’re presented with a great vocal recording, why not experiment with delay to make it even better? 


Published December 2016