Welcome to No Limit Sound Productions

Company Founded
2005
Overview

Our services include Sound Engineering, Audio Post-Production, System Upgrades and Equipment Consulting.
Mission
Our mission is to provide excellent quality and service to our customers. We do customized service.

Wednesday, April 30, 2025

Cubase Pro: Reference Tracks

 By Matt Houghton

Cubase offers various options for comparing your mixes with reference tracks.

When Sample Magic announced that they'd soon stop supporting their Magic AB plug-in, some of you asked me to recommend other mix-referencing tools. Several plug-in options exist, including Mastering The Mix's Reference, Melda's MCompare, and ADPTR's Metric AB, but you may be able to do what you want using Cubase alone...

Simple A/B'ing
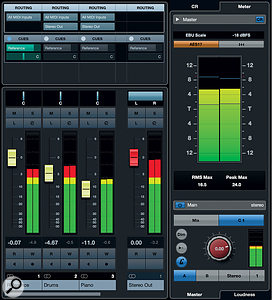
Cubase's Pro's Cue Sends can be used to monitor your reference tracks via the Control Room without the signal flowing through your project's master stereo bus — but while this side-steps any bus processing, it also skips the loudness metering, and it uses up one of only four available Cue Sends.Cubase's Pro's Cue Sends can be used to monitor your reference tracks via the Control Room without the signal flowing through your project's master stereo bus — but while this side-steps any bus processing, it also skips the loudness metering, and it uses up one of only four available Cue Sends.An obvious approach is to put references on a track in your mix project and align the clips with the relevant parts of the arrangement. If you don't use master bus processing, this can work well: keep the reference track muted, and when you solo it, it will play and all the other tracks will be muted. But if you use master-bus processing, as many of us do, you don't want to apply this processing to your references. There are a couple of ways around this.

One is to create a second stereo output in the Studio/Audio Connections window and route your reference track to that. This bypasses the processing but now your references aren't reflected on the master-bus loudness metering. If that's important to you, you could use a Group track as your master bus, and route that and your reference track to the default stereo output (on which you put no processing).

Right On Cue

Cubase Pro's Control Room offers an alternative. Although (curiously) the Control Room doesn't allow you to select different output busses, you can monitor artist cue mixes, and can route your references to one of those. Go to Studio/Audio Connections, make sure the Control Room is activated, and in the Control Room tab hit Add Channel. Select Add Cue, create a stereo Cue Mix with a meaningful name (eg. 'Reference'), and leave it routed to no output.

Again, you'll need a track in your project to host your reference tracks. Set its output to No Bus. Strangely, there's no option to display the Cue Mixes in the Track Inspector, so to send your reference track to your Cue Mix you'll need to open the track's Channel Settings window (you'll find Cue Sends in a tab adjacent to the regular sends) or the MixConsole (if Cue Sends aren't there make them visible via the Racks drop-down). Enable the Reference send and set it to unity gain. In the Control Room section of the mixer, next to the main Mix button, you'll see a button marked C1 (for Cue Mix 1). With your mix playing, hit C1 to toggle between monitoring your reference track and your mix project. If you go to Edit / Key Commands and search for Cue 1 On/Off, you can assign a keyboard shortcut to this action.

It's pretty slick, but there are a couple of down sides. First, Cubase gives you a rather meagre ration of Cue Mixes — you have a maximum of four in your project — which could be problematic if you need them for another purpose. Second, Cubase's master-bus metering continues to tell you what's happening in your mix while you listen to your references — so if you want to match the loudness of the reference to that of your mix (as you should) you'll need a separate loudness meter on your reference track, which is a bit of an inconvenience.

Although (curiously) the Control Room doesn't allow you to select different output busses, you can monitor artist cue mixes, and can route your references to one of those.

The Logical Approach

The Project Logical Editor can be used to create a  handful of basic 'building block' commands to use in Macros (see below).The Project Logical Editor can be used to create a handful of basic 'building block' commands to use in Macros (see below).What if you want to meter what you're listening to on Cubase's master meters? Here's an approach that uses Cubase's powerful Project Logical Editor (PLE) and Macro facilities. We'll use these to automate both the 'simple' A/B mute/solo approach described above, and the bypassing of the master bus processing. As with other approaches, you'll need to create a track for your references, but this time leave it and your mix routed to the main Stereo Out. Name this track 'Reference' and mute it.

Next, we'll make four simple PLE presets to use in our Macro. A little quirk of Cubase is that you need to be in the Project page to access the PLE (I have no idea why!). From here, go to Project / Project Logical Editor. The PLE can appear daunting, but we can just customise an existing preset. I started with the 'Visibility — Show Tracks containing Drum in the Name' preset. In the top section, change the second row's Condition from 'Contains not' to 'Equal' and change Parameter 1 from 'Drum' to 'Reference'. The bottom section tells the PLE what action to perform, so change the Operation from 'Hide Track' to 'Solo'. That's your first PLE preset done, so click on the + icon at the top to save this as a new preset called 'Reference — Solo'.

Next change the Operation from 'Solo' to 'Mute' and save it again, this time as 'Reference — Mute'. With the same PLE window still open, in the top section, change the second row's Parameter 1 from 'Reference' to 'Stereo Out', and in the bottom section change the Operation to 'Inserts Bypass'. Save this as a preset called 'Stereo Out — Bypass Inserts'. Finally, change Parameter 1 in the bottom section from 'Enable' to 'Disable', which does the reverse (it will reactivate the Stereo Out bus's inserts) and save this as 'Stereo Out — Activate Inserts'.

These simple Macros run the Project Logical Editor presets and bypass the master-bus processing whenever the reference track is soloed. This way, you  always have access to the built-in metering of the master stereo bus, but the bus processors will act only on the mix you're working on, not the reference track.These simple Macros run the Project Logical Editor presets and bypass the master-bus processing whenever the reference track is soloed. This way, you always have access to the built-in metering of the master stereo bus, but the bus processors will act only on the mix you're working on, not the reference track.Finally, we'll stitch these presets together using a pair of Macros that we can assign keystrokes. Go to Edit /Key Commands and open the Macro window at the bottom. Hit the New Macro button, and label your Macro 'Reference Track — On'. In the upper pane's search bar type 'Process Project' to take you to the relevant folder (I find this quicker than scrolling). Open this, and locate the PLE presets you just created. Select 'Stereo Out — Bypass Inserts' and hit the Add Command button. Then select 'Reference — Solo' and hit the Add Command button again. Create another new Macro called 'Reference Track — Off' and add the commands 'Reference — Mute' and 'Stereo Out — Activate Inserts'.

You'll find your two new Macros in the Macro folder in the upper pane, and here you can assign them shortcut keys. Sadly, I've been unable to find a way to toggle between the two Macros with a single key command, but I did find easy to remember shortcuts: Ctrl+R for 'Reference Track — On' and Shift+Ctrl+R for 'Reference Track — Off'. It's worth mentioning that I'm on a Mac, so the Ctrl key may be assigned to different functions on Windows, but you get the idea. Now, with your mix playing back, hit Ctrl+R to switch to your references, and Shift+Ctrl+R to switch back to your mix.

Checking reference mixes with this technique can be performed using just a  couple of key commands.Checking reference mixes with this technique can be performed using just a couple of key commands.Note that this won't work if you have other tracks soloed in your mix, or any automation of the master fader. If the solo issue really bothers you, put the 'Deactivate All Solo States' command at the beginning of your 'Reference Track — On' Macro, though note that you'd have to re-solo things when you switched back to your mix. Note also that you won't be able to take advantage of Cubase's Solo Defeat Mode. On the plus side, you can use Cubase's loudness metering to make sure your reference is at the same level as that particular part of your mix (using clip gain on the references is the best approach), and thus ensure that you're making objective comparisons.

Decisions, Decisions...

While none of these options for monitoring reference tracks and clips is perfect, they can all work pretty well if they fit your own workflow. Each one offers different pros and cons — hopefully there's a tactic here that will do the job for you.


Published July 2019

Monday, April 28, 2025

Cubase Pro: Audio Alignment & ADR

 By John Walden

Screen 1: The Audio Alignment Panel, primed to tighten up a  double-tracked vocal part.Screen 1: The Audio Alignment Panel, primed to tighten up a double-tracked vocal part.

Cubase Pro 10's Audio Alignment Panel can do more than just deliver tight backing vocals!

The new Audio Alignment Panel (AAP) was one of Cubase 10's most eye-catching new features — it allows you to align the timing of two (or more) audio clips almost instantly, by automating its AudioWarp and Hitpoints/Slices facilities. What was previously a time-consuming manual chore now takes just a few clicks. It holds obvious appeal for working double-tracked lead vocals and stacked backing vocals, but it can also be useful in some other scenarios, as I'll show — but let's start with the obvious...

On The Double

Screen 1 (red waveforms), above, shows a section of a double-tracked lead vocal. The waveform (and audio examples below) show that the singer actually did a pretty good job, but there was scope for improvement — and the AAP allowed us to tighten things nicely.

Open the AAP (from the Project window toolbar or via the Audio menu), select the audio clip that will act as your Reference (timing master) in the Project window, and click the '+' button for the Reference entry in the AAP. The track's name should appear. Repeat this for the Target clip (the audio whose timing you wish to adjust to match the Reference). In this example, that's our second lead vocal take.

For double-tracked vocals, the Match Words option is best; the AAP will use AudioWarp to stretch/compress the Target to more closely match its timing to that of the Reference. You can also set the Alignment Precision, which is similar in concept to quantising (higher values produce a more precise timing match). I chose 100 percent, which could be extreme for some styles, but if you take things too far you can simply undo the processing once applied. Experimenting with the Alignment Precision in this way makes it super-easy to find the setting that sounds the most musically appealing. And that's it. It takes just a few clicks and a few seconds. Typically, no further manual tweaking will be required, but you can move the AudioWarp markers by hand as normal if you feel the need to tweak any little details.

Well Stacked

Screen 2: Aligning multiple backing vocal tracks at once.Screen 2: Aligning multiple backing vocal tracks at once.

The same principles apply when dealing with more parts, as with stacked backing vocals. Screen 2 (blue) shows five vocal takes and, as before, I've identified my Reference take. But this time, I've selected and added multiple (four) Target clips. If you do this and then click Align Audio, all targets will be time-corrected relative to the Reference clip in a single operation. Again, experiment with the Alignment Precision — in this case, I opted for 80 percent, which struck a nice balance between tightness and a natural sound.

In my experience, with a reasonable vocal performance as a starting point, the AAP produces a very good result nine times out of 10. If you find that you do need to go in and manually tweak an AudioWarp marker or two, don't get frustrated: just try and remember just how much time you've saved overall!

Read My Lips

Another common application for the AAP is Automatic Dialogue Replacement (ADR), a common practice in film/TV post-production. The idea is that less-than-perfect on-set dialogue is overdubbed and replaced in a studio, but with timing correction applied so that lip-sync with the picture is maintained. There are specialist software tools for this task (notably Synchro Arts' Revoice Pro 4, reviewed in SOS April 2019), but if you can't justify the additional outlay, is the Audio Alignment Panel worth exploring?

Screen 3: Although it doesn't quite match Revoice Pro for high-end professional ADR duties, Cubase's AAP is still capable of great results.Screen 3: Although it doesn't quite match Revoice Pro for high-end professional ADR duties, Cubase's AAP is still capable of great results.

Screen 3 (purple) shows a typical case, with a section of on-set spoken dialogue (the top-most track, recorded with a boom mic and with background noise) and a version of the same dialogue recorded in more ideal studio conditions, to be used as a replacement (the middle track; no correction yet applied). As indicated by their respective waveforms, the replacement dialogue is not a disaster, but still there's scope to tighten the timing.

In the AAP, the on-set dialogue acts as our Reference and the studio version our Target. I experimented with different Alignment Precision settings and also with engaging the Prefer Time Shifting setting. The latter is well worth exploring if your voiceover artist is particularly good to start with, as it does less time stretching/compression and more slicing and moving — so, in theory, it ought to sound cleaner. In this case, despite my less-than-average voiceover skills, the default AAP settings did the best job.

One other option worth trying is to split the Target audio into separate clips for each distinct phrase and then process these independently. While this takes more time — and in this case it didn't really seem to bring any great benefits — it could be a useful approach when faced with just a few stubborn phrases.

The bottom-most track shows the AAP-corrected dialogue. The shifts in the waveform transients, while modest, are easily seen and heard; on the whole, the result is a much tighter match to the timing of the original dialogue. Would it satisfy the more exacting demands of a sound editor on a Hollywood film? Perhaps not. But for most of us it's certainly a huge time–saver, even if we find ourselves making the occasional manual edit.

Guitar's The Star

Vocals aren't the only source that's commonly double-tracked. Guitars are another popular candidate; in fact, in some genres (metal springs to mind) they can often be quadruple-tracked. A really good player can pull this feat off without breaking sweat, but us mere mortals might need a little help to get the same super-tight result. In principle, it's no different from tightening vocals, but if the part is busy, or the sound overdriven, or if the player uses techniques such as palm muting or slides, it's not difficult to imagine Cubase struggling to determine where the AudioWarp markers should sit. So, is the AAP a viable option here?

Screen 4: It might be primarily intended for vocal alignment, but the AAP can also work well on other instruments, such as double-tracked guitars.Screen 4: It might be primarily intended for vocal alignment, but the AAP can also work well on other instruments, such as double-tracked guitars.

In Screen 4 (green) there are again three waveforms. Top and middle are the original, unprocessed, double-tracked guitar parts (a grungy riff followed by a short chord sequence) and, as the marker positions indicate, the performances were not a million miles apart but the note/chord transient positions are consistently different. The bottom track shows the result of applying the AAP to the middle track, using the top one as a Reference. While some transients don't line up perfectly with the Reference, the match is certainly closer — and if you check out the audio examples, you'll hear that the riff section in particular feels much tighter.

Having tried the same approach with a range of other guitar parts, the results were generally pretty good. Yes, you can defeat the AAP with performance/sound combinations that are rhythmically very complex, or the sounds slathered in effects, both of which understandably make automatic identification and matching of transients more challenging. And if you usually DI your guitar parts, it's perhaps worth using the clean DI signal for alignment, before adding distortion or amp-sim effects. But given that the process takes only a few seconds, it's well worth seeing if the results are usable or not.

So, for vocals, this new facility is a huge time-saver that delivers great results. And even for non-vocal applications the Audio Alignment Panel can be well worth a try.


Published August 2019

Friday, April 25, 2025

Cubase Pro: Workflow Benefits Of Melodyne With ARA 2

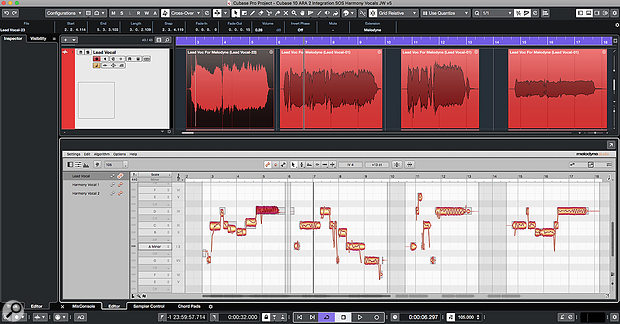
ARA 2 integrates Melodyne much more deeply into the Cubase Pro editing environment.ARA 2 integrates Melodyne much more deeply into the Cubase Pro editing environment.

With ARA 2, Melodyne can be just another part of Cubase...

When Cubase Pro 10 was released, Steinberg also announced that support for the Audio Random Access 2 (ARA 2) plug-in format would follow soon, and June 2019's free v10.0.30 update delivered it. A few plug-ins now support ARA (Celemony Melodyne, Synchro Arts Revoice Pro and Vocalign, and — recently acquired by Steinberg — SpectraLayers), but the format is Celemony's creation — so this month I'll consider how ARA 2 might improve the workflow of anyone using both Cubase Pro 10 and Melodyne.

Easy Access

Previously, Cubase users could already insert Melodyne as a VST plug-in, and you still can work that way. But that approach requires an initial 'transfer' of audio data into the Melodyne plug-in before you can make pitch/timing changes in Melodyne, and those changes aren't updated in the waveform in Cubase — so if you try to perform editing of said audio on the Cubase timeline, those changes are not made to the audio in Melodyne unless/until you repeat the transfer process. So it's essential with this VST approach that you adhere very carefully to a certain workflow.

ARA 2 overcomes these problems, and it all feels much more deeply integrated — which it is! To access this new ARA 2 connectivity, you'll need Melodyne v4.2.2 (or later) installed. Select the audio clip(s) you wish to process in Melodyne, go to Audio / Extensions on the main menu, and select Melodyne. (You can unload the Melodyne Extension in the same fashion.) Alternatively, depending on what details you've set Cubase to display in the main Project Window's Info Line, you can load/unload Melodyne via an Extensions option here. After some very brief behind-the-scenes analysis, Melodyne's editor opens in Cubase's Lower Zone — complete with its usual menus, editing options and note blobs ready for action.

Four things are worth noting at this stage. First, while the Melodyne Extension is active, you can't access the usual Cubase Sample Editor options (including VariAudio and AudioWarp). Second, the Extension (Melodyne in this instance) is pre any conventional VST insert plug-ins in the signal path. Third, as with any Lower Zone editor, you can float the Melodyne plug-in window if you prefer. Fourth, a Compare button on the left side of the Melodyne toolbar allows you to toggle between the original audio and the 'Melodyned' version, making it easy to check whether your changes are for the better.

Sing Something Simple

The actual editing tools available are the same as in the VST version of Melodyne. As we've reviewed Melodyne on a number of occasions (most recently v4 in SOS February 2016: https://sosm.ag/celemony-melodyne-4) I'll not describe all that here; instead, I'll focus on the significant workflow advantages that ARA 2 brings to the table.

A very welcome change is that Cubase and Melodyne now communicate with each other in a much more integrated way as you perform edits. For example, if you move, or adjust the length of, an audio clip on the Cubase timeline, those changes are immediately reflected in Melodyne. Equally welcome is that the cursor display in Melodyne doesn't just reflect the cursor position in Cubase's Project Window — it can be used to adjust the playback position of Cubase in real-time. It might seem a small behaviour difference, but it really does make working with Melodyne much more efficient.

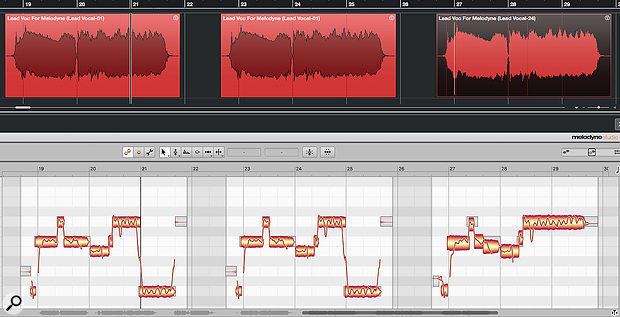
Melodyne editing is sync'ed between copies of the same audio clip (as in the first two clips shown here), but you can break that link if you want to perform clip-specific editing (as in the third clip, where the Melodyne Extension has been unloaded and then reloaded).Melodyne editing is sync'ed between copies of the same audio clip (as in the first two clips shown here), but you can break that link if you want to perform clip-specific editing (as in the third clip, where the Melodyne Extension has been unloaded and then reloaded).

The Melodyne Extension can be used to process multiple clips on a single audio track simultaneously. Usefully, the Melodyne toolbar now includes buttons (located top-centre) to toggle between 'track mode' (the two–blob icon) or 'clip mode' (single–blob icon). In the former mode, Melodyne displays all clips on the current Cubase track which have the Extension applied, whereas in the latter it shows only the currently selected clip.

Cubase and Melodyne now communicate with each other in a much more integrated way as you perform edits.

Copy That!

The handling of audio clips that have been copied is interesting. If, for example, you've copied a vocal performance from one chorus section to another and apply the Melodyne Extension to both, or duplicate a clip to which the Extension has already been applied, Melodyne editing for the two clips is linked — as you edit one clip, the edits automatically apply to any copies. You won't want exactly the same vocal performance in every chorus, of course, but this could be a big timesaver for some tasks — especially when working on elements such as oft-repeated backing vocals.

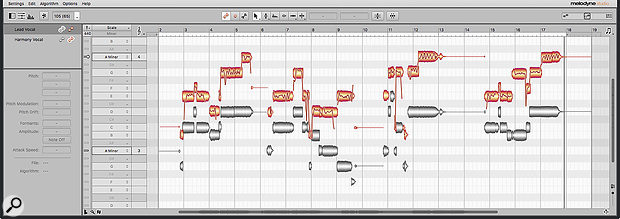
All Melodyne's editing features are retained under ARA 2, including the option to display blobs for multiple tracks in the editor, for easy reference while editing.All Melodyne's editing features are retained under ARA 2, including the option to display blobs for multiple tracks in the editor, for easy reference while editing.

If you use the Convert To Real Copy function on a duplicate audio clip in Cubase and then apply the Melodyne Extension to both clips, their editing won't be linked, so you can choose which way you'd like to work. And if you've already applied the Extension to a clip and its duplicate, but then remove the Extension from one of copy, Melodyne edits won't be linked.

After ARA

Should you decide you need to undo some of your changes, the Melodyne editor window includes the usual options for resetting any edits. And if you remove the Melodyne Extension from an audio clip, all of your Melodyne edits will disappear, returning your Cubase clip to its original state. If you want to lock your edits in place (for example, to unload Melodyne to save resources), a quick Render In Place prior to unloading the Extension will achieve that.

A further welcome change is in how Melodyne's data is handled by ARA 2: the data is now saved within your Cubase project. This is different from how the VST plug-in (which uses a dedicated folder elsewhere in your file system) behaves, and should make project transfer and archival much easier.

All Present & Correct

It's also worth noting that two of Melodyne's key features are present and correct via ARA 2 in Cubase. First, the option to overlay blobs from multiple tracks in the editor's display via the track list on the left side of the window. The blobs of the currently selected clip are shown in the usual orange, and others appear in grey. This provides an incredibly useful visual reference, particularly when editing things like vocal doubles or harmonies.

Second, assuming you have the full version of Melodyne, the audio miracle that is polyphonic audio editing is possible. Success with things like pitch adjustments in polyphonic audio is highly dependent on the nature of your audio source and its role within the mix. ARA 2 integration doesn't change that, but as with monophonic sources such as a lead vocal, it does streamline the editing process, thus allowing you to determine what's possible quickly and easily.

Are We There Yet?

So far, so good, but there are a few teething issues and limitations. First, it's worth mentioning one VariAudio feature that ARA 2 doesn't make possible via Melodyne: its note blobs cannot be made to 'follow' the Chord Track. (Well, at least not yet... how cool would that be?).

Steinberg hope to improve their ARA 2 implementation in the next update, with support for clip-level fade/volume envelopes and Lane-based comping.Steinberg hope to improve their ARA 2 implementation in the next update, with support for clip-level fade/volume envelopes and Lane-based comping.

Currently, Cubase's ARA 2 implementation doesn't support comping via the Track Lanes system. You can activate the Melodyne Extension, but on playback you'll hear a mix of audio from all Lanes simultaneously, rather than just your comp. The simple workflow solution is to comp and render to a new track before applying Melodyne. But there are sometimes merits to pitch correcting while comping.

There's been some chatter on the Steinberg Forums concerning the occasional bit of odd behaviour. For example, users have reported problems when working with 64-bit audio, and with playback of 'Melodyned' audio losing sync with the project. On my own system, though, I didn't experience any obvious gremlins, though I did note that fades/volume adjustments applied to clips in Cubase's Project Window seem to be ignored while the Melodyne Extension is active.

But all that said, ARA 2 is already a huge step forward for regular users of Melodyne and Cubase Pro 10 — Melodyne now feels like part of the in-house Cubase editing system rather than a plug-in. And while the ARA 2 implementation might not yet be quite fully formed, Steinberg have indicated that there's more to come, and that the next update (v10.0.40) should resolve the Lanes workflow as well as some of the reported issues.


Published September 2019

Wednesday, April 23, 2025

Cubase Pro: Key Commander

 By John Walden

The Key Editor is packed with MIDI editing features but the trick to a faster workflow is training yourself to access them as efficiently as possible.The Key Editor is packed with MIDI editing features but the trick to a faster workflow is training yourself to access them as efficiently as possible.

With some DIY Smart Controls for Cubase's Key Editor, you could become a MIDI-editing ninja.

Cubase Pro 10's VariAudio Smart Controls bring all the main VariAudio functions within easy reach when you hover the cursor over a pitch segment. It saves you time, and makes you less likely to lose your musical focus. Seeing the concept applied so brilliantly in VariAudio made me hanker after a similar 'smart toolset' for the MIDI Key Editor. When editing MIDI data here, repetitive tasks include: entering and selecting notes, changing note positions or lengths, transposing notes and muting or deleting notes. The potential for streamlining things is obvious, so — in the absence of VariAudio-style Smart Controls here — just how close to hand can we bring the tools and settings required to perform these sorts of tasks?

Tool Utility Belt

The most frequently used MIDI editing tools (eg. Draw, Erase, Trim) are available in the Tool Buttons Palette of the Key Editor's toolbar. This is easy to access, but going back and forth between this Palette (to select each tool) and the notes you wish to edit means a lot of 'mouse travel', particularly if you're working in a floating Key Editor, perhaps expanded to give you more screen space in which to work (rather than the compact Lower Zone).

The Key Editor already has a more immediate option that's similar to 'smart tools' — the Toolbox pop-up menu. Right-click and hold while hovering the cursor in the MIDI note grid, and a pop-up Tool Buttons Palette will appear, allowing swift tool selections. If this is the only thing you retrain yourself to do, you'll already have saved yourself a lot of time!

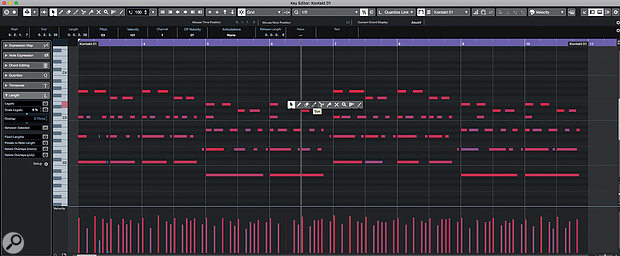
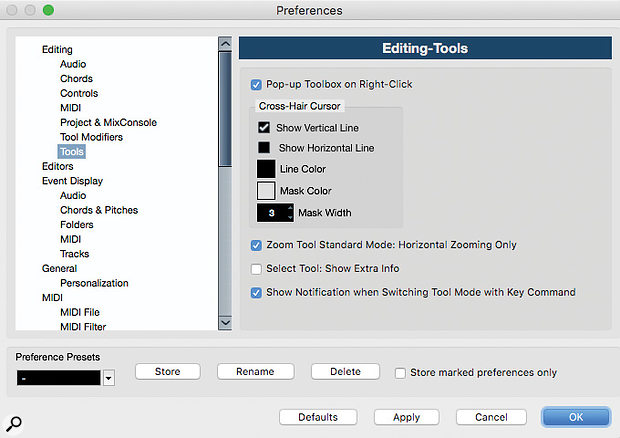
Enabling the right-click pop-up Tool Buttons Palette is an instant time-saver.Enabling the right-click pop-up Tool Buttons Palette is an instant time-saver.

This pop-up only appears when the 'Pop-up Toolbox on Right-Click' option is enabled in the Tools section of Cubase's Preferences. Otherwise, right-clicking opens a subset of the main MIDI menu. There are all sorts of useful commands here, particularly in the Functions submenu, and it can be good to have easy access to this. I prefer the Toolbox as the default right-click action, but you can have the best of both worlds: press the Cmd (Mac) or Ctrl (Windows) key when right-clicking and the MIDI menu will be displayed instead of the Toolbox.

Keyboard shortcuts are another option for rapid-fire tool changes. Many tools are already assigned (in the Tools section of the Key Commands panel) to the number keys. I rejigged these to put the tools I use most frequently (Object, Draw, Mute and Erase) on keys 1 to 4. With one hand on my mouse and the other hovering over these keys, I can select these tools rapidly.

If you right-click and hold while the mouse is hovering in the MIDI note grid, a pop-up version of the Tool Buttons Palette appears.

Snap To It

Using the Object Selection tool to select notes doesn't require you to leave the note editing grid, but controlling subsequent movement of notes might. I find that for most note movements along the timeline I want to snap to the grid, move the note relative to the grid, or turn snap off altogether. You can change between these different modes in the Snap section of the Key Editor's Toolbar.

There are no smart-tool-style pop-up options, but there are still faster ways to move between these modes. By default, for example, you can toggle Snap on/off using the J key — or, probably better, defeat Snap temporarily by holding Cmd (Mac) or Ctrl (Windows) as you move one or more MIDI notes. In the Key Command dialogue's Edit section, you can also define Key Commands for each of the Snap types. I tend to favour Grid and Grid Relative, so I've created easy-to-use key combinations for these.

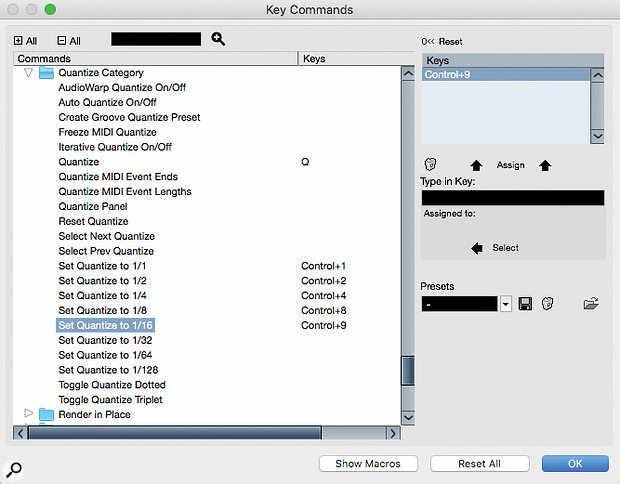
Key Commands make it super-easy to flip between different quantise resolutions as you enter or move notes within the Key Editor.Key Commands make it super-easy to flip between different quantise resolutions as you enter or move notes within the Key Editor.

Whether inserting new notes with the Draw tool or moving notes with the Object Selection tool, if you want their position to snap in some way to the grid, you'll often find yourself moving between different grid resolutions. The grid resolution can be set via the Quantize section of the Key Editor's Toolbar but, again, this involves navigating to the Toolbar, clicking and selecting the required resolution from the drop-down menu. To speed things up, the Quantize Category in the Key Commands windows comes with all the common grid divisions pre-defined, using Ctrl+number combinations. So, for example, quarter-note or 16th-note quantise settings can be selected with Ctrl+4 and Ctrl+9, respectively.

Nudge, Nudge

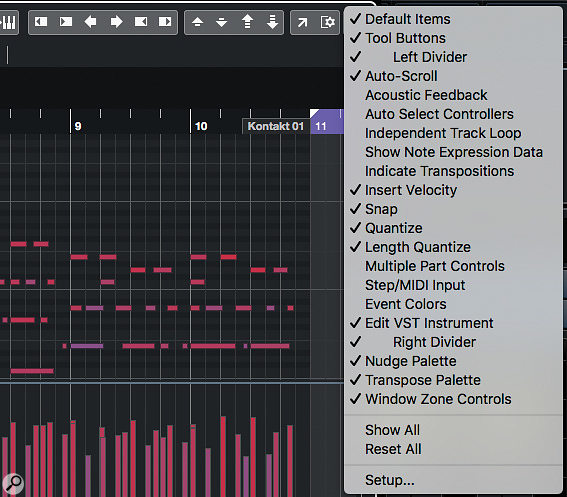
Two further useful Key Editor facilities are the Nudge Palette and the Transpose Palette. They aren't shown by default, but you can toggle their display on via the Settings options at the far-right of the Key Editor's Toolbar string (the cogwheel icon). Collectively, these palettes provide options to move and trim the lengths of selected notes in a speedy fashion. For example, in the Nudge Palette, you can trim the start or end of selected notes relative to the current quantise settings.

Of course, if you configure and master the appropriate Key Commands you may never need to turn on the display of the Nudge and Transpose palettes in the first place; you'll have much quicker access to the same functions. The Nudge section of the Key Commands window has options for moving notes left/right along the timeline or up/down in pitch. Some of these have keyboard shortcuts assigned by default, while others need assigning manually if you use them often enough to make a shortcut worthwhile. Nudge Left/Right are great for moving notes along the timeline but the Up/Down and Up/Down Larger Step commands are also worth considering — these transpose selected MIDI notes by a semitone or an octave, respectively, without requiring any fiddly mouse work.

Adding the Nudge Palette and Transpose Palette to the Key Editor Toolbar brings some useful editing options, but you can also access the same tools via Key Commands.Adding the Nudge Palette and Transpose Palette to the Key Editor Toolbar brings some useful editing options, but you can also access the same tools via Key Commands.

Looking at the Key Command's Nudge section, you could be forgiven for thinking that the various Trim commands aren't available for assignment. Actually, they are, but for some reason Steinberg have listed them as Start Left, Start Right, End Left and End Right. If you're unfamiliar with the MIDI note Trim options, these are well worth exploring, especially if you frequently need to tidy up less-than-stellar keyboard performances!

Work Smarter

If you do a lot of MIDI editing, committing only these few key commands and modifiers to finger-muscle memory should save you a massive amount of time in most projects. And not only can you finish projects more quickly (which is obviously great if you have clients with deadlines), but getting what are otherwise tedious editing tasks out of the way rapidly allows you to retain a sharper focus on the creative side of things.

Given just how rich Cubase's MIDI editing features are, the examples I've suggested only scratch the surface, and there are more than enough options for me to revisit the theme in a future column. Of course, if someone in Steinberg's Cubase development team is trying to work out how to bring VariAudio-style Smart Controls to the MIDI Key Editor, there'd be no need for such an article. In the meantime, if you're prepared to train your fingers to fully exploit them, there are plenty of shortcuts available.


Published October 2019

Monday, April 21, 2025

Cubase Pro: Riff Maker

By John Walden

Don't fear the Logical Editor! Even a  simple preset can help generate some interesting musical ideas.Don't fear the Logical Editor! Even a simple preset can help generate some interesting musical ideas.

Stuck in a musical rut? Cubase Pro might just be able to provide the inspiration you need.

A number of third-party tools aim to offer the spark of musical inspiration around which you can build a project. Nobody expects them to cough up the sort of fully formed melody that could grace the next chart-topping hit, but by combining elements of key/scale 'rules', a dose of randomisation and a little user input — to influence the general direction of the riff-making process — they can be a great source of new melodic ideas. Happily, Cubase Pro 10 users need look no further than their own DAW for a toolset that allows you to experiment with this sort of random-but-guided riff generation. To follow the examples, you'll need a MIDI clip as a starting point. Anything will do; a simple two-bar sequence of 16th notes, all set to C3 and a velocity of 80, will suffice. Use this MIDI to trigger a staccato-style synth patch.

Iterative Inspiration

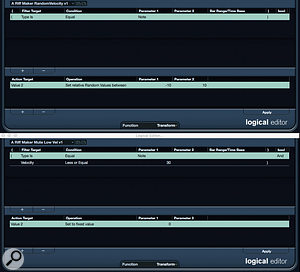
You can manipulate note velocity in various ways using the Logical Editor, whether that's subtle randomisation (above) or note muting (below).You can manipulate note velocity in various ways using the Logical Editor, whether that's subtle randomisation (above) or note muting (below).Many third-party plug-ins work by applying iterative changes to note pitches and velocities, often snapping notes to a specific key/scale combination. The hope, in repeating this sort of 'guided randomisation', is that something musically interesting will grab your attention. Cubase Pro 10's Logical Editor makes this approach possible — it can be used to select, in a clip, any MIDI data that meet the criteria you define, and then make adjustments. For example, you could use it to select only notes with a velocity under 30 and change their velocity to zero.

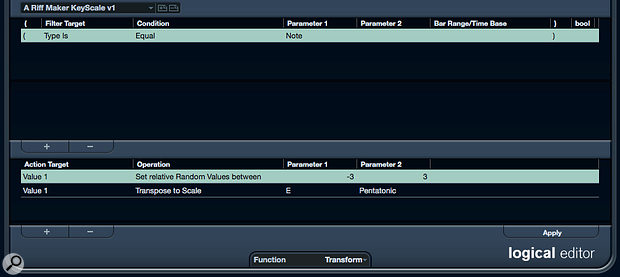
To do this, we first have to create the necessary Logical Editor presets, so let's start by tweaking the note pitches. In the first screen, the Logical Editor's upper panel is set so when you run the preset it will select all MIDI notes, and the lower panel defines the changes that will be applied. Two actions are defined. The first randomises the current Value 1 (pitch) by up to three semitones in either direction. The second (optional) line changes the resulting pitches to the nearest note on the specified key/scale. I used E Pentatonic since that was the key/scale of this project, but there are plenty more options in the drop-down menu of the parameter 2 column.

Logical Editor presets can also be used to reset your original MIDI clip, so you can start over.Logical Editor presets can also be used to reset your original MIDI clip, so you can start over.Each time this preset is applied to the selected MIDI clip all note pitches are randomised by a small increment and then nudged to work in the specified key/scale. Importantly, note that a Logical Editor preset can be applied while the MIDI clip is being played; you can hear the changes as you apply them.

The next screen shows two Logical Editor presets to adjust note velocity data. The first again selects the clip's MIDI notes. A single action then applies a small random change (+10 or -10, but you could experiment with other values) to Value 2 (velocity data). Applied iteratively, the note's velocity pattern will slowly evolve.

In the second preset, the upper panel selects only MIDI notes whose velocity is currently 30 or lower. The action then changes their velocity to zero, effectively muting them. This can be fun to apply occasionally, as it removes low velocity notes from playback and can thus help add some rhythmic interest to our (initially) 16th-note-pattern starting point.

It's not hard to imagine creating other similar Logical Editor presets — for example, you might set a zero velocity for specific note pitches if you wanted to exclude some notes from one of the preset scales.

The Key To Success?

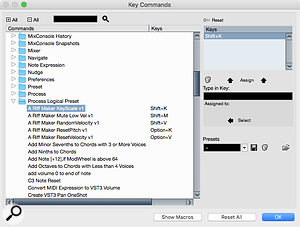
By executing the Logical Editor presets via Key Commands, you can generate new ideas more efficiently.By executing the Logical Editor presets via Key Commands, you can generate new ideas more efficiently.Applying randomisation processes in the hope of something good can feel a little crude and won't always bear the tastiest fruit, and in that case you might want to start afresh. The next screen shows the lower (action) panel for two further Logical Editor presets. In both cases, the upper panel is configured to select all MIDI notes. The two actions then reset all notes pitches to C3 (or whatever note you prefer) and reset the note velocity data to 80 respectively. You could combine both actions into a single preset, but I prefer the flexibility of being able to reset this data independently. If I have a melody I like, I can reset just the velocity data, and vice-versa. And don't forget the undo Key Command (by default, Ctrl/Cmd Z), which can be used to undo your iterative changes if you just want to go back a step or two in the randomisation process.

Executing these presets via the Logical Editor window itself is a bit clumsy, as you have to switch between the presets manually via the window's preset panel. A more efficient workflow can be established via the Process Logical Preset section of the Key Commands window, where you can define convenient key commands for your DIY presets. Having selected your target MIDI clip, you can then fire off repeated presets without opening the Logical Editor. If you also have the clip open in the Lower Zone Key Editor, you can combine your 'guided randomisation' with some occasional manual MIDI editing.

For a further creative step, why not try combining your Logical Editor presets with a bit of Chord Track magic?

More Options

The basic process described here really is very simple, and the idea is that you can use manual editing to refine the results — once this tactic has sparked a fresh musical idea, it's done its job. But if you want different options, you could try giving your initial MIDI clip a more obvious direction and/or rhythmic feel, whether it's different note intervals or leaving some steps blank. There are plenty of options, but one neat example is to copy your kick/snare MIDI data to a bass synth track, reset the pitch values, and see if you can't randomly generate a cool bass pattern to play alongside your drums.

The Chord Track can add a  further creative twist to your random melody generation workflow.The Chord Track can add a further creative twist to your random melody generation workflow.

For a further creative step, why not try combining your Logical Editor presets with a bit of Chord Track magic? For the final screen, I used my Logical Editor presets to generate an initial two-bar MIDI sequence. Then I made three copies to create an eight-bar sequence, which I set to follow both the chords and scales defined in the Chord Track. So the sequences in bars 5/6 and 7/8 have been subjected to further pitch tweaking by the Chord Track engine, resulting in some nice further variation.

Finally, in the Key Command window, you could easily create a Macro that bundles some of the Logical Editor randomisation presets into a single command... but I've already encouraged you to face your Logical Editor fears, so I'll leave that for another time!


Published November 2019