Saturday, August 31, 2024
Friday, August 30, 2024
The Big Squeeze
Make your Cubase mixes pack more punch with master‑bus compression.
Whether you realise it or not, you're probably familiar with the sound of master bus compression, by virtue of having heard so many records that have been mixed in this way! The primary aim of compressing the signal running through your stereo bus is to achieve more coherent, bigger‑sounding mixes: the compressor attenuates the loudest parts of the material and, when make-up gain is applied, the track's average (RMS) level is increased. The dynamic balance of your mix as a whole can appear considerably smoother, which is why bus compression is often described as 'mix glue'. Another desirable effect of master-bus compression is that you'll often find yourself needing to compress individual track signals far less than you otherwise would. Although it sounds a little counter-intuitive, the result is that mixes can be made to sound both more 'cohesive' and more 'transparent'.
 Cubase's humble bundled Compressor plug‑in can serve perfectly well as a stereo mix‑bus compressor.
To achieve this in your DAW software, you'd typically use a dedicated bus compressor plug‑in such as SSL's Duende Native Stereo Bus Compressor, but there's no reason you can't put Cubase's own plug-ins to work in this role — so in this workshop, I'll show you how to do just that, as I explore several different master‑bus compression techniques.
Getting Started
Note that master‑bus compression yields the best outcome when you set up the compressor before making your mixing decisions — that is, the idea is to mix into the compressor. If you try to use this technique having already established all of your track levels, fader‑rides and each individual track's dynamic processing, you may be a bit disappointed by the results. With that out the way, let's explore a basic setup:
1. Insert compressor: Insert an instance of Cubase's bog‑standard Compressor plug‑in on your master stereo channel. Select a low ratio (eg. 2:1) and medium attack (50ms) and release (250ms) times.
2. Threshold: Set the threshold of the compressor so that the compressor is delivering gain reduction of about ‑2dBFS or less at the loudest parts of your track. Make sure you adjust the compressor's make‑up gain to compensate for the loss in level.
3. Attack: Now to tweak the attack and release settings to make the compressor work better with the song's groove. As a general rule, the more up‑tempo the song, the faster the attack can be. Use your ears to judge this, though, because too fast an attack will mean the signal transients get squashed and buried in the mix (especially when mixing rock and/or songs with drums, piano or prominent acoustic guitar strumming), leaving the track feeling dull and lifeless.
4. Release: If the meters of the Compressor plug‑in move in time with your song's main groove, you're probably on the right track with the release settings. But once again, make sure you use your ears and, if need be, adjust the release time to taste. If you find this difficult, try using a higher ratio while setting the release.
5. Set ratio: If you increased the ratio just now, remember to lower it again when you're done setting the release. Now's the time to tweak the ratio to taste. Aim for light compression — 2:1 or even less — because you really want bus compression to be unobtrusive.
References Required!
That basic setup was easy enough, wasn't it? But if you want to compare your mix with good‑sounding reference tracks, you don't want those to be compressed as well. The solution to this is to create a 'virtual master bus' through which you route all the tracks used in the mix. This virtual bus, complete with your bus compressor, and the track with your reference material are each routed directly to the 'real' stereo master bus. You'll treat the virtual master as the main master bus, as if it's the master channel itself. That way you can compare your bus‑compressed mix directly with your reference tracks. To set this up, follow these five simple steps:
1. Make a virtual master bus: Add a stereo Group Channel and drag it to the bottom of your track list on the Project page. In Cubase's mixer, this Group Channel should now appear just to the left of your main master bus (labelled 'Stereo Out' by default).
2. Rename group: Give your new Group Channel a meaningful name, such as 'VirtMaster', as in my example.
3. Routing: Route all of your project's tracks (whether audio, instrument, effects or Group tracks) that are currently routed to the master bus to your new virtual master. A quick way to do this is to select all those channels on the mixer, and shift‑click on the output routing at the top of one channel to select the new destination. It's important to leave the channel for your reference track(s) routed directly to the real stereo master.
 Easily compare your mix, complete with master‑bus compression, with reference tracks by setting up a virtual master bus.
4. Reference level: Commercial reference material will have been mastered and will probably be too loud to compare with a mix in progress, so adjust the reference track fader so that the loudness is around ‑13 or -16 LUFS. To set this level, you can enable the loudness metering on the master bus while soloing the reference channel.
5. Mute references: Finally, mute the track used for your references. Now, you can play your mix as normal, but by clicking Solo on the reference track, you can toggle between hearing your references and your mix in progress. Remember, though, not to add any processing to the real Stereo Out channel from now on!
Parallel Bus Compression
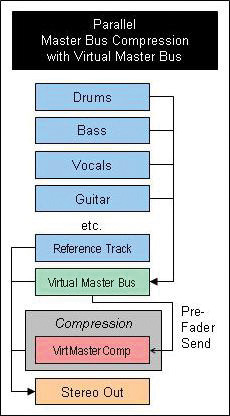
Parallel bus compression can help you craft some really smart‑sounding mixes. You can dial in compressor settings that are much more aggressive, lending solidity to your mix and intelligibility to your lyrics, without destroying the mix's transients. Some third‑party plug‑ins such as Cytomic's The Glue and the freeware TDR Feedback Compressor II include a dedicated blend control. Cubase's bundled plug-ins don't, though, so here's how to set up parallel compression with any compressor:
1. Parallel channel: Create a stereo effects channel in your project and move it next to your virtual master channel in the track list. Name the effects channel something appropriate, like VirtMasterComp.
2. Routing: Send a signal from VirtMaster to VirtMasterComp. The send control should default to a send level of 0 (no gain or attenuation in relation to the channel's signal), which is what you want. Now, activate the send's pre‑fader mode (right‑click and choose 'Move to Pre‑Fader'), so that no future fader moves on VirtMaster change the level going into VirtMasterComp.
4. Adjust levels: Lower the faders of both channels by the same amount (eg. ‑6.5dB), such that the highest peaks in the main stereo out channel do not exceed ‑0.3dBFS.
 Parallel compression of the master bus signal can often sound less obtrusive, or more natural.
5. Apply compression: Remove (or bypass) any compressor on your VirtMaster channel, and insert another in the VirtMasterComp channel. Set its parameters just the way you would for a 'normal' bus compressor, and then use the faders to balance the parallel and VirtMaster channels to taste. Now's also the time to experiment with harder-hitting compression settings if you wish, all the while balancing the VirtMaster and VirtMasterComp levels.
If you're working with reference tracks, you'll need to create another virtual master bus, and route both the first one and the VirtMasterComp channel to it. Also, summing the compressed and uncompressed signals results in hotter levels: make sure the signal doesn't exceed ‑0.3dBFS (you can always bring down the input gain of your new virtual master channel).
Dual Mono Compression
Some compressors treat stereo signals as true stereo, with a summed left and right (L+R) 'side-chain' signal for both channels. Others treat them as separate mono signals, each of which is its own side-chain source. In my experience a 'livelier' stereo signal can be achieved by compressing each channel independently. It's important not to over‑exaggerate this technique when working with very wide mixes, or mixes with substantial stereo separation (eg. classical recordings): if you do, the stereo image can fall apart or become really 'bouncy'.
If you'd like to try this technique with Cubase's compressor (which uses an L+R summed side-chain signal) you must somehow split the signal of your VirtMaster channel out to two mono channels and recombine them after the compressor(s). I'll explain how to do this in the following steps:
1. Dual effects channels: Create two stereo effects channels, and name them VirtBusL and VirtBusR. Place these channels right after your VirtMaster channel on the Project page, so that they appear at the right of the mixer window.
 Used carefully, dual‑mono bus‑compression can help you achieve a livelier stereo picture — but push it too far using this technique and the stereo image can become unstable.
2. Routing: Send two identical signals from your VirtMaster channel, one to VirtBusL, another to VirtBusR. Activate the pre‑fader option for both sends.
3. Level and pan: Drag your VirtMaster fader down to ‑∞dB (minus infinity) and adjust the stereo pan setting of VirtBusL and VirtBusR to 100 percent left and 100 percent right, respectively.
4. Compress: Now you can insert a compressor on both VirtBusL and VirtBusR, and set their parameters as described previously.
You can still use the solo and mute facilities on the VirtMaster stereo track when comparing with references. These four charts provide a clear indication of the routing you need to set up in Cubase using Group and/or effects channels for the different types of compression and mix‑referencing described in the article.
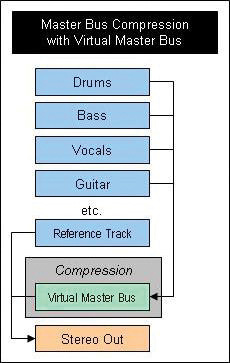
More Possibilities
Some people like to use serial compression (with the signal passing through two or more compressors in series) on the bus. Feel free to try this, but listen out for pumping effects and interaction between the signal processing of the compressors. I don't recommend this approach unless you're very experienced with dynamics processing.
Sometimes you'll find that you really want the effect of bus compression, but certain sections of the song are problematic with full‑band compression. For example, where there's only a kick and a hi‑hat in a song intro or breakdown, but the rest of the arrangement is rather 'bigger' the usual effect may be undesirable. Multi-band compression is an option here, and this can also be used in a parallel compression setup, with more aggressive gain reduction. But, again, it's very easy to screw things up with multi-band compression, so unless you know from the outset that a multi-band is likely to be beneficial, there's little to be gained 'mixing into' such a processor. This goes for techniques that compress portions of M/S signals (eg. the lower frequencies of the mid signal could be used to consolidate the stereo centre).
Published August 2014
Thursday, August 29, 2024
Wednesday, August 28, 2024
Get Pitch Quick!
I often use Celemony's Melodyne pitch-processing software because it boasts some useful functionality that Cubase's built-in VariAudio doesn't (not least polyphonic detection/correction), but with VariAudio being built into Cubase's editor, I find that the latter is often much more convenient to use. So, after watching an inspiring tutorial video demonstrating how Celemony's Melodyne software can be used on a lead guitar part, for both corrective and creative applications, I decided that I'd find out just how good VariAudio is for the same tasks. And it turned out that VariAudio is actually rather good for this!
Detective Inspector
Before I launch into the processing side of things, I need quickly to touch on the pitch‑detection side of things. As with most pitch‑detection systems, VariAudio is more accurate when dealing with clean, well‑recorded audio. For this reason, when working with guitars, I found that it was better where possible to start with a DI'd guitar part rather than an amplified and miked one (or, for that matter, one smothered in fuzz, chorus, reverb and delay!). Don't worry — amp modelling can be applied downstream, to shape your tone to taste, and if you're particularly fussy about your tone, you could always monitor through your amp while taking a DI feed, and re-amp the result later on.
 My first guitar part — and probably the worst guitar solo ever!To keep everything 'in house' I set up a mono audio track with Steinberg's VST Amp Rack installed as an insert effect. While tracking the original part, I simply toggled the track's Monitor button on so I could hear the processed sound (with all the fuzz, chorus, reverb and delay!) while recording a 'dry' DI signal. You really need to be working with a low latency for this sort of monitoring, so be sure to set your audio card's buffer to a low number for this stage.
Stand Corrected
Let's start with the corrective side of things. The first screenshot shows a short, three‑part phrase that contains three typical issues that require correction (they're for illustration only, I promise — my playing is not usually this bad!): in the first phrase, the bend into the first note is too slow; in the second, the vibrato is a bit over the top in the sustained note; and, finally, in the third element, the bent note didn't quite hit the target pitch correctly. The second screenshot shows the same set of phrases after applying VariAudio tweaks in the Sample Editor.
To deal with issues in the first phrase, I did two things. First, with VariAudio's Pitch & Warp mode selected, I hovered the cursor at the lower half of the left edge of the longest segment in the phrase. Doing this turns the cursor into a double‑headed left/right arrow with which you can then drag the start of the segment to change it's timing. Moving it to the left lengthens that segment at the expense of the previous one and, as a result, the bend to the sustained note is shortened. Second, with just that (now even longer) segment selected, I adjusted the Straighten Pitch setting (in the VariAudio tab) to about a third of its range. This flattens the pitch of the note's sustain somewhat. In combination, these adjustments serve to shorten the bend of the note, so that it reaches the target pitch more quickly but without changing the length of the phrase.
For the second phrase, there were two problems with the vibrato: as well as vibrato, there's an odd underlying pitch bend (up and then down again; and the degree of vibrato is excessive. To solve both issues, I split the segment into three shorter segments (as shown in the second screenshot). To split a segment, select the Segments option from the VariAudio tab and hover the cursor along the lower edge of the segment, where it will change to a pair of scissors. Then just click where you want the split.
 After all three phrases have been corrected, the guitar part is almost respectable.I left the first of the resulting three segments unchanged, but to cure the underlying pitch bend in the second and third segments (upwards in the second and downwards in the third), I used the tilting tool. If you select Pitch & Warp mode again, holding the cursor either top‑left or top‑right of the segment to be edited turns the cursor into an up/down double-headed arrow. Use this to click and drag, and the small‑scale pitch variation in the curve will be preserved, but the underlying trend in the pitch can be tilted. I just made these two segments a little bit straighter before applying a little bit of the Straighten Pitch control to both, to reduce the amount of vibrato. I then finished with just a touch of the Quantize Pitch control.
In the third phrase, where the bend never quite made its target pitch, I started by selecting the segment and applying a healthy dose of Quantize Pitch — but that didn't solve the problem to my satisfaction. As an alternative approach, in Segments mode, I split the segment into two (where the short pitch bend into the sustained part of the note ends). I extended the longer segment, so that it covered more of the sustain of the note. Be aware that, when in Segments mode, this actually extends the length of the whole segment, rather than time‑stretch the audio within a segment (as in Pitch & Warp mode).
Finally, I switched to Pitch & Warp mode, held down the Shift key (which overrides any pitch snapping) and manually pitch‑shifted the two segments so that my bend sounded good to the ear (the main part of the note ended up at A3). It may not be the most inspiring guitar solo I've ever played, but it's much improved, and it illustrates the principles involved in patching up the odd duff note pretty well.
Creative License
The third screenshot shows a second short lead‑guitar phrase. This time, there's very little wrong with the performance so, instead of correcting the part, I'm going to use it to demonstrate how VariAudio can be used more creatively. I'm going to replicate two things from the aforementioned Melodyne tutorial: adding in some artificial pinch harmonics to certain notes and transforming the long sustained note at the end of the phrase into a multi‑note hammer on/off phrase.
 This second short solo phrase is fine but needs a little ear candy.The pinch harmonics trick requires two notes to be overlaid. Unlike Melodyne, VariAudio can only process monophonic audio, and this means that you'll need to duplicate the DI guitar track (complete with the VST Amp Rack plug‑in). When you've done that, convert the duplicated clip into a 'real' copy, which can be edited independently of the original version, by using the Edit / Functions / Convert To Real Copy command.
Next, the copy must be edited so that only those notes that you want for overlaying a pinch harmonic effect remain. For a short phrase, the easiest way to do this is to select each bit of audio you don't want in the Sample Editor and apply Audio / Process / Silence, so that the audio clip eventually contains just the notes that are to be converted into the pinch harmonics.
All that remains is to select the Pitch & Warp option in VariAudio, and drag the segments up by either one or two octaves, depending on where the original notes were played on the fretboard. In my short example I had to shift the notes from D3/E3 up to D5/E5. Finally, you just blend the volume of this 'pinch harmonics' track with the original and the effect is complete.
 and the short 'tapping' section at the end, the lick is much more interesting. Just make sure you convert your duplicate audio clip into a 'real copy' before isolating the notes to create the pinch harmonics!") With pinch harmonics added to some notes (in a separate track) and the short 'tapping' section at the end, the lick is much more interesting. Just make sure you convert your duplicate audio clip into a 'real copy' before isolating the notes to create the pinch harmonics!For the simulated hammer on/off lick, you can return to working with the original single DI guitar part in the Sample Editor. Zooming in on the final sustained note in the original phrase, use the scissor tool in Segment mode to divide the original segment into a number of smaller ones. I chose to do this at 16th‑note intervals for three beats, leaving the final portion of the note to fade out.
With pinch harmonics added to some notes (in a separate track) and the short 'tapping' section at the end, the lick is much more interesting. Just make sure you convert your duplicate audio clip into a 'real copy' before isolating the notes to create the pinch harmonics!For the simulated hammer on/off lick, you can return to working with the original single DI guitar part in the Sample Editor. Zooming in on the final sustained note in the original phrase, use the scissor tool in Segment mode to divide the original segment into a number of smaller ones. I chose to do this at 16th‑note intervals for three beats, leaving the final portion of the note to fade out.
Switching to Pitch & Warp mode, change the pitch of these smaller segments as required. You can do pretty much anything you like here, including creating harmonically correct arpeggios. Once the segments are pitched as required, select them all and apply a good dollop of Straighten Pitch. This makes the pitch transitions between each note almost instantaneous, just as they would be when a guitar player hammers on or off. If you have the patience to do it, then you could easily use this approach to create a whole Eddie Van Halen‑style performance, starting with nothing more than a few long sustained notes. Some might call it cheating; I call it good fun!
Flat Out

While VariAudio doesn't offer all the options found in Melodyne — in particular, the potential to tweak the pitch of an individual string in a polyphonic guitar part — when used to correct and embellish lead guitar parts, it can actually do a pretty good job. There are, of course, plenty of other creative possibilities including creating harmony lines or experimenting with note bends to simulate the long slides of bottleneck playing. Whatever you're doing, just remember that after spending any length of time using VariAudio to correct or create in this way, you should visit the Process tab in the Sample Editor and execute the Flatten option, to avoid any accidental unpicking of your work.
Tuesday, August 27, 2024
Monday, August 26, 2024
VCA OK
Outside Assistance
Help is at hand, though, in the form of a freeware plug–in by Blue Cat called BC Gain. The plug–in comes in three versions, bundled together in their Gain Suite (www.bluecataudio.com/Products/Product_GainSuite), and it enables you, with a little lateral thinking, to add VCA groups and master faders to pretty much any DAW that lacks them. Unlike most ‘gainer’ plug–ins, different instances of BC Gain can be assigned to one (or none) of nine groups, and each instance can be controlled via MIDI. When you change the gain on one instance of the plug–in in a group, all other instances move accordingly. It doesn’t take a great leap of the imagination to realise that you could place instances in any insert slot you wish, assign them to a group, and then create a dedicated MIDI track whose fader may be used to control the group level.
Basic Setup
Although simple in concept, my experiments suggested that there are good ways and less good ways to implement this system in Cubase. Let me take you, step by step, through the way I find works best.
1. Open a new Cubase project and create a handful of audio tracks. In the example, I’ve made four stereo and four mono tracks. Use a ‘spare’ audio, FX or Group channel to host your ‘VCA Master’ instances of BC Gain — but be sure to choose the stereo version of the plug‑in.
2. Create one more track. It can be an audio, Group or FX channel. It doesn’t really matter which, but you may find that it’s more easily identifiable in the mixer if you make it a Group or FX Channel, as these will appear to the right of your mixer by default. Call this channel ‘VCA Master’.
3. Now, create a MIDI channel and label it ‘VCA Group A’. This channel’s fader will become your VCA Group A master fader.
We now have all the channels we need to test this out, so let’s put some sound through that first group of audio channels. You could import or record some audio, of course, but you can alternatively use Cubase’s Test Generator plug–in, just to get the level meters showing something. Now to wire all this mess together so it works as a VCA system...
1. Insert an instance of the BC Gain plug–in in the first insert slot of your VCA Master channel. Whether the channel you created is mono or stereo doesn’t matter, but be sure to choose the stereo version of BC Gain (there are also mono and dual–mono versions), as I was unable to link mono and stereo plug–ins in a single group successfully.
2. Click both the cog (settings) and chain (link) icons at the top left of the plug–in to reveal some hidden features. Click the pointer that just appeared under the gain knob and select ‘settings’ to bring up the MIDI control dialogue. Make sure MIDI Enabled is ticked, and click the MIDI Learn button. In the Group section of the plug–in select ‘A’.
3. On your MIDI channel, VCA Group A, set the output destination to the gain plug–in on your VCA Master channel. It should be easy to identify in the drop–down list. Waggle the fader on your VCA Group A MIDI channel and the plug–in’s gain control should respond. If the Learn function isn’t working properly, you might need to set the plug–in to receive on the correct MIDI channel, which is listed on the MIDI channel in the Routing section of the Cubase Mixer.
4. Insert another BC Gain stereo plug–in instance on your next audio channel. Click the link button and assign the plug–in to Group A. There’s no need to do any MIDI assigning this time. Just waggle your MIDI fader again, and you should see the control of both instances reacting to your fader movements.
Congratulations: you just used a VCA Master channel to control the level of two separate channels in Cubase! But we can take things a little further...
 1. In the MixConsole, Alt–drag and drop the second plug–in instance to copy it to any other channels you want to be part of the same VCA group. All of the plug-in’s settings will be copied, including the Group assignment. In this way you can quickly assign several channels to a single VCA group.
2. Now create a second VCA Master fader in exactly the same way —ie. create a new MIDI channel and call it VCA Group B.
3. Put another instance of BC Gain in the VCA Master channel’s second insert slot, set it up to respond to your second MIDI channel fader, and assign the plug–in to Group B.
4. Then insert yet another instance of one of your audio channels — it can even be in another slot on the same channel as before. Change the routing to group B and Alt–drag to create new instances on other channels. All these instances will now respond to your second MIDI Fader.
It’s much less hassle the second time around! Note that by placing multiple instances on a channel, that channel’s level can be influenced by more than one VCA Master Fader at a time. So far, so good, then — it works. But there are a few issues we need to overcome.
Overcoming Obstacles
First, although a single channel can be assigned to multiple VCA groups (as just described), you’re limited by the number of insert slots on each channel, which is fixed at six pre–fader and two post–fader. There’s no elegant way around this: if you need more slots, you’ll either have to route the channel in question to another channel and use the inserts on that one (you can always hide the second channel if you want), or use a third–party plug–in chainer such as DDMF Metaplugin.
 Link the VCA Master instances of BC Gain to a MIDI channel’s fader, either using MIDI Learn, or programming the values by hand. Setting the plug–in’s Control Max value to +20.2dB results in a more useful gain range and near–unity position.Second, you might have noticed that the MIDI protocol’s 0–127 settings are causing a couple of issues: by default, the ‘zero’ point (ie. no gain, no attenuation) lies somewhere in between values 63 and 64 — your plug–in’s gain control can be set to +0.47 or –0.47 dB, but not unity. There’s no getting around the resolution of the MIDI fader itself, but you can tweak how the BC Gain plug–in responds. I found that restricting the maximum gain to 20.2dB (leaving the minimum at –60) gave a more useful control range that placed an almost no boost/attenuation position (–0.01dB) of the MIDI channel fader at about the same place (MIDI value 95) as unity gain on the regular audio channel faders, leaving you with around 20dB of gain and 60dB of attenuation available. What’s more, if you make sure you create and set up all of your VCA Master instances of the BC Gain plug–in first, and only add new instances as you need them for each channel, the grouping will be relative — so as it loads at unity by default, you’ll always be able to return to that value by placing your MIDI fader at 95. Neat!
 offset on the Master instance, the knob on the channel instance can be set precisely to 0.00dB gain/attenuation. Assigning the channel instance on the same group as the master means it, and any other instances in the group, will be controlled by your MIDI Fader.") Despite the slight (–0.01dB) offset on the Master instance, the knob on the channel instance can be set precisely to 0.00dB gain/attenuation. Assigning the channel instance on the same group as the master means it, and any other instances in the group, will be controlled by your MIDI Fader.
Despite the slight (–0.01dB) offset on the Master instance, the knob on the channel instance can be set precisely to 0.00dB gain/attenuation. Assigning the channel instance on the same group as the master means it, and any other instances in the group, will be controlled by your MIDI Fader. Mixer to create a dedicated VCA mixer, which you can assign its own shortcut key (‘V’ for VCA, perhaps?).") You can use the Visibility controls of Cubase’s second (or third) Mixer to create a dedicated VCA mixer, which you can assign its own shortcut key (‘V’ for VCA, perhaps?).With all these extra channels and instances, your project can soon start to feel very cluttered. You could, if you wished, abandon the MIDI faders and use your VCA Master channel’s Quick Controls to govern the VCA group master levels. Personally, I prefer to have the option of having the VCA faders in the MixConsole. You can take advantage of Cubase’s multiple mixers, though. Go to Devices/MixConsole 2 (you can assign a keyboard shortcut to this). Use the mixer’s Visibility function (on the mixer’s left, or revealed using the mixer’s Setup Window Layout icon, top left, if hidden) to hide all channels except those you wish to see. This doesn’t affect what you see on the main MixConsole, but on MixConsole 2 you can see only your dedicated VCA controls. In the Project page, you can hide all these MIDI channels inside a collapsed Folder track if you wish.
You can use the Visibility controls of Cubase’s second (or third) Mixer to create a dedicated VCA mixer, which you can assign its own shortcut key (‘V’ for VCA, perhaps?).With all these extra channels and instances, your project can soon start to feel very cluttered. You could, if you wished, abandon the MIDI faders and use your VCA Master channel’s Quick Controls to govern the VCA group master levels. Personally, I prefer to have the option of having the VCA faders in the MixConsole. You can take advantage of Cubase’s multiple mixers, though. Go to Devices/MixConsole 2 (you can assign a keyboard shortcut to this). Use the mixer’s Visibility function (on the mixer’s left, or revealed using the mixer’s Setup Window Layout icon, top left, if hidden) to hide all channels except those you wish to see. This doesn’t affect what you see on the main MixConsole, but on MixConsole 2 you can see only your dedicated VCA controls. In the Project page, you can hide all these MIDI channels inside a collapsed Folder track if you wish.
And there we have it. While it may not be the most elegant VCA system ever implemented — you can’t merge the VCA automation with the track automation, as in Pro Tools, for example — it’s free, it solves a genuine problem many users have with Cubase and Nuendo, it’s both easy to configure and reliable in use, and you can save the setup as a project template, in which assigning a channel to a VCA group is as easy as inserting a plug–in and clicking a letter. I’ve created a template project with all the VCA Master side of things set up, so I just have to insert an instance on a channel when required. As luck would have it the ‘V’ key isn’t assigned to a shortcut by default, so I was able to assign that to MixConsole 2, which I’d set up to show only the VCA faders — you can find it along with a short demonstration video on the SOS web site at http://sosm.ag/oct14-cubase-media, though you may need to set up your own keyboard shortcut for the mixer, as these are stored in your own Cubase preferences.
Saturday, August 24, 2024
Friday, August 23, 2024
Get Glitched
Listen to almost any contemporary pop music, particularly electronic dance music, and you’ll notice just how often vocal sampling techniques are used. The samples can serve all sorts of useful purposes, but they’re most often used as ‘ear candy’ — effects to keep the listener engaged, and to create rhythmic interest. This idea has been around for as long as sampling itself, of course, and you can do a lot of it with nothing more than judicious audio editing in Cubase’s Project window. But Cubase offers all sorts of other useful tools which can get you where you want to be rather more quickly.
The Special Agent
I find that the fastest method is to use Cubase’s bundled drum machine, Groove Agent (SE4 or ONE). This may have been designed for working with drum sounds, but it allows you to load any samples you wish and associate them with individual drum pads — so there’s nothing to stop you using it to trigger vocal phrases.
 The Sample Editor’s Hitpoint system can be used to divide vocal loops, not just drum loops.Groove Agent also allows you to import audio slices that you’ve created from a single audio event using the hitpoint system in Cubase’s Sample Editor, and to map those slices onto a continuous series of drum pads. Again, this feature is primarily intended for slicing an audio drum loop into individual hits, but although the slicing process can require a little more hands-on attention for vocals, the same approach can be used to map individual words or syllables from a vocal part onto Groove Agent’s pads pretty quickly. Once you’ve done that, you have control of the vocal elements at your fingertips — quite literally, if they’re sitting on your MIDI keyboard or drum pad!
There are two stages to this process: first, the mapping of your vocal part to Groove Agent’s pads; and second, the creative exploitation of your samples in a musical context.
Master Your Vocal Chops
Pick a suitable phrase for this ‘chop shop’ treatment. You don’t have to tackle the whole vocal recording, so just start with a key phrase or hook that has a bit of character. If you’ve not done so already, perform any routine editing that you might usually do in terms of tightening the timing or pitching, so that you have a ‘finished’ phrase, ready to be given the chop.
Once happy with your selection, open the phrase in the Sample Editor, select the Hitpoints tab, and then adjust the Threshold setting so that each obvious transient (typically the start of each word) has its own hitpoint. This will require more tweaks than when working with a drum loop, as drum transients tend to be quite obvious, and thus easy for the detection algorithm to identify. With vocals more than any other source, that tends not to be the case.
The odds are that you’ll need to audition each possible slice between the hitpoints to verify that it’s correctly positioned, so start by activating the Edit Hitpoint option (the small arrowhead icon). Now, when you hover your mouse over an audio slice, the cursor will become a speaker icon — and you can click and hold to audition the slice.
 Having created slices from your hitpoints, you can select them in the Audio Part Editor and then drag and drop to Groove Agent.Your aim is to ensure there’s a hitpoint exactly at the start of each word in the phrase. The automatic detection should work well for any obviously separate words, but manual editing will be required where words run into one another, or where hitpoints are placed at each syllable within a word. In the latter case, it’s easier when you come to play with the phrase if you remove the additional hitpoints within the word, but slicing to syllables can also create some useful creative options. You could always repeat this process later if you decide you want to include some individual syllables.
The hitpoints are easy to move, add and disable, so your tweaks needn’t take too long, but do make sure that you spend enough time on this because the more precisely the hitpoints are placed, the easier it will be for you to play the slices via Groove Agent. As you move across a hitpoint at the top of the Sample Editor window, the cursor will change to a double-headed arrow, allowing you to move a hitpoint by clicking and dragging. Holding the Alt (Windows) or Option (Mac) key will bring up the Add Hitpoint tool, and to disable a hitpoint just hover over the hitpoint line and press Shift. With your hitpoints placed correctly, select the Create Slices option in the Sample Editor’s Hitpoints tab. An audio Part will replace the original Audio Event on your audio track. Inside this Part is an Audio Event for each slice that’s defined in the Sample Editor.
Luxury Pad
You’re now ready to get these slices into Groove Agent (SE4 or ONE), so open an instance of this instrument via the VST Instruments rack, link a MIDI track with it, and double-click on your Audio Part to open it in the Audio Part Editor. Select one slice with the mouse and hit Command+A/Ctrl+A (Mac/Windows) to select all slices automatically. All you now need to do is drag the selected slices to an empty pad in Groove Agent and, as you release the mouse, each slice will be placed on a separate empty pad. The slices should be assigned in order to adjacent pads, each with its own MIDI note.
Get Creative
That’s the technical stage completed, so now it’s time for the fun part. If all you want to do is use MIDI to trigger your new vocal samples, just select the MIDI track that’s linked to Groove Agent and start playing. Even at this level, there’s plenty of fun to be had. You can create all the usual stutter effects, and experiment with different combinations of words. Indeed, picking a few key words and repeating them in a rhythmic fashion is a good basic option if you just want to get a feel for things. But you’d be missing out on some of the more ear-catching options that Groove Agent SE4 or Groove Agent ONE offer you, and can start to sound a bit tired quite quickly. So here are a few suggestions to help you start making more interesting effects...
 Once placed into Groove Agent, each slice appears on an individual drum pad and can be edited as a separate sample.Both Groove Agent SE4 and ONE can generate a MIDI sequence that you can copy to the Project window. You can use that to play back the pads in sequence, thus reassembling your original vocal part. Why? Well, you can edit this MIDI sequence to do all sorts of interesting things with the timing and sequence of the vocal part. One important point to note, though, is that you must set Groove Agent’s tempo to match the Cubase project tempo before you generate the MIDI sequence. This ensures you get perfect sync when the MIDI is played, and if you fail to do so it can cause a lot of head-scratching!
If you also have MIDI data for your track’s drum part — as you almost always will for pop or EDM tracks — try taking some key sounds from your vocal line and use the MIDI timing of the drum part to trigger them. The effect is rather like creating a vocal-sample beatbox. It takes a little experimentation to identify the vocal samples that will work best for snare, kick and hi-hat replacements — you only need to trigger them for a short time for a rhythmic effect like this, so not all sounds are suitable — but a very effective trick is to drop out the main drum parts for a bar, substitute in your ‘vocal drums’, and trigger them using the same MIDI rhythm.
. Grove Agent ONE has a similar function.") In Groove Agent SE4, the Slice window includes a tiny ‘Drag MIDI Phrase To Host Sequencer’ button (bottom right). Grove Agent ONE has a similar function.If you have some spare pads on Groove Agent, you can copy some of the samples to empty pads, but this time play around with their settings, such as tuning, pan and reverse. Drop these into your rhythmic vocals phrases for additional variation.
In Groove Agent SE4, the Slice window includes a tiny ‘Drag MIDI Phrase To Host Sequencer’ button (bottom right). Grove Agent ONE has a similar function.If you have some spare pads on Groove Agent, you can copy some of the samples to empty pads, but this time play around with their settings, such as tuning, pan and reverse. Drop these into your rhythmic vocals phrases for additional variation.
 Groove Agent has lots of automation options so you can apply real-time control to parameters such as pan and pitch in your new vocal sequences.Groove Agent allows you to automate a number of playback controls on a per-pad basis so, next, try building a MIDI phrase from just two or three key words, and then add automation data for things such as pan or pitch to add some additional effects. It’s really easy to find interesting effects this way if you have a suitable hardware controller to generate the automation data.
Finally, having created your chopped and glitchy alternative vocal lines, using any of the approaches suggested above, solo the MIDI track and use the Export option to render this new vocal as an audio event. Then, open the audio and experiment with VariAudio to create some pitch-based effects. These can be subtle (essentially a shift in ‘melody’) or more extreme (obvious ear-candy). The difference with this approach is that any pitch shifting doesn’t also slow down/speed up sample playback and VariAudio attempts to preserve the formants, resulting in a more natural sound.
These are, of course, just suggestions; once you have your vocals sitting in Groove Agent (SE4 or ONE) you can let your experimental side lead you on. Rhythmic, stutter, chopped or glitchy; vocal effect clichés are all within your reach.
Audio Demo
I’ve placed an audio example on the SOS web site. It’s a short track based around an eight-bar vocal phrase. You hear it in its original form first, with a simple backing track to provide a little musical context. There are five further eight-bar sections, each separated from the previous one by a one-bar drum loop, in which I’ve applied the various creative options described in the main text. You can, of course, take things much further than I have here, but the examples should provide ample illustration of what can be achieved.