Welcome to No Limit Sound Productions

Company Founded
2005
Overview

Our services include Sound Engineering, Audio Post-Production, System Upgrades and Equipment Consulting.
Mission
Our mission is to provide excellent quality and service to our customers. We do customized service.

Friday, June 30, 2023

Automation Tips

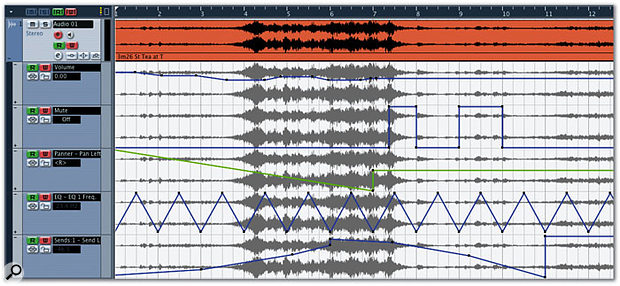
All the parameters that can be automated on a track are displayed and edited in independent Automation Sub-tracks which, rather neatly, are displayed with the data from the parent track in the background.All the parameters that can be automated on a track are displayed and edited in independent Automation Sub-tracks which, rather neatly, are displayed with the data from the parent track in the background.

When Cubase VST became Cubase SX, one of the big improvements was a better automation system for audio-based tracks and channels. This month, we show you how to make the most of this newer system.

When you're working with a mixer, such as the one built into Cubase, there will probably come a time when you find yourself moving the mixer controls and thinking 'Wouldn't it be great to record these movements as part of the performance?' Indeed it would. And that's one of the great advantages of computer-based mixing systems (no matter whether implemented with a hardware surface or purely in software): the ability to record and play back the movements of various mixer parameters, which we refer to as automation.

Automation 101

The basic operation of working with automation in Cubase is fairly straightforward. For example, say you have an audio track and you want to automate the volume fader. To do this, simply click the track's [W] Write Enable button, press play, move the fader to taste, and then press stop. In a nutshell, once a track's Write Enable button is active, any parameters that can be automated on that track will be 'armed' for automation so that when the transport is active (which is to say you either pressed play or record), any adjustments made to armed parameters will be stored at the appropriate time location.

Cubase represents mixer channels that don't play back Audio Events as Automation tracks on the Project window's Track List, and automatically organises them into folders by channel type.Cubase represents mixer channels that don't play back Audio Events as Automation tracks on the Project window's Track List, and automatically organises them into folders by channel type.Once you've written automation data to a track, it's a good idea to deactivate the Write Enable button to avoid any accidents, and then, for the automation data to play back, you need to make sure the track's [R] Read Enable button is activated. You can toggle the Read and Write Enable buttons for all tracks simultaneously by clicking the 'All Automation to Write/Read Status' buttons at the very top of the track List (labelled [|W|] and [|R|]).

So once a track is armed for automation, what parameters are actually recorded? In the case of audio-based tracks, you can automate Volume, Pan and Mute, the built-in channel EQ parameters, and Level and Enable parameters for each send. Any parameters for insert plug-ins you're using on the track that's being enabled to write automation are also included. You'll notice that plug-in windows also include Read and Write Enable automation buttons, and these can be used independently of the track or channel on which the plug-in is used. For example, if you have an insert plug-in on an audio track and enable the track's Write Enable button, the plug-in's Write Enable button will also become active. However, the reverse isn't true, so enabling a plug-in's Write Enable button doesn't activate automation for all the parameters on the appropriate track.

As an aside, it's important to stress that in the current version of Cubase, when a track's Write Enable button is active, the movements of all automatable parameters are recorded — it isn't possible to arm only certain parameters for automation (with the exception of plug-ins, as we've just discussed).

Getting On The Right Track

In the same way that MIDI Events are used to record MIDI data in Cubase, Automation Events are created to store automation actions, such as dragging a fader. And since MIDI Events are recorded onto MIDI tracks, it therefore makes sense that Automation Events are recorded onto Automation tracks — or, to be more precise, Automation Sub-tracks. When you automate a parameter on a track, the Automation Events created get stored on Automation Sub-tracks within the actual track whose parameter is being automated. And, to make life simpler when you're trying to edit Automation Events, each parameter that can be automated on an audio track (including plug-ins) has its own independent Automation Sub-track for Automation Events.

Automation TipsAutomation TipsAutomation TipsHere are three Automation Events. If the last two were deleted with the Object Selection Tool,  the events depicted in the top screen would be the result. However, if you selected a Region containing the last two Events with the Range Selection tool, third screen down, and pressed Backspace, the results would be as shown in the bottom screen.Here are three Automation Events. If the last two were deleted with the Object Selection Tool, the events depicted in the top screen would be the result. However, if you selected a Region containing the last two Events with the Range Selection tool, third screen down, and pressed Backspace, the results would be as shown in the bottom screen.To see an Automation Sub-track in the Track List on the Project window, simply click the relevant track's 'Show/Hide Automation' button in the track List (which is the little '+' symbol in the bottom-left corner of the track). By default, the first Automation Sub-track revealed is for Volume, although you can change this, as we'll see in just a minute. You can see more Automation Sub-tracks by clicking the Append Automation track button (the '+' symbol at the bottom of an Automation Sub-track). You'll notice that the '+' symbol changes to a '-' symbol on the main track once Sub-tracks are being displayed.

Clicking the '-' symbol on the main track hides all Automation Sub-tracks currently being viewed for that track, but the good news is that when you click '+' again on that track, all of the previously visible Automation Sub-tracks are displayed again — you don't have to add them one at a time. To hide individual Automation Sub-tracks once they've been appended, simply click the '-' Hide Automation track symbol on the Automation Sub-track you want to hide. It's important to note that hiding and showing Automation tracks only affects what you see: it isn't the case that only Automation tracks that are visible are played back.

Before we go any further, I want to mention some important exceptions to the operation of Automation Sub-tracks for audio-based channels that don't contain any Audio Events, such as Input/Output channels, Group, FX, Rewire and VST Instrument channels. With these channels, the track you'll see on the Project window is actually an Automation track representing the appropriate channel on the mixer, and Cubase will automatically organise these Automation tracks into different folders based on channel types. So if you want to find the Automation track for a Group channel, you'll find it in the Group Channels folder in the Track List.

For VST Instruments, there are always at least two Automation tracks created: one for the actual Instrument (useful for controlling the plug-in's parameters), and additional tracks for each output of the Instrument, for adjusting levels and output settings. You'll notice that Cubase organises the VST Instrument Automation tracks into Sub-folders so that Automation tracks for different VST Instruments remain separate.

With the exception of Input and Output channels, Automation tracks for all channels appear in the Track List as they're created. Although at least one pair of Input and Output channels always exists on the mixer, the appropriate Automation tracks are not added to the Track List until an Input or Output channel's Write Automation button is activated for the first time. For example, you'll see Automation tracks for the Input and Output channels appear on the Project window if you click the 'All Automation to Write Status' button.

Running Cubase On Intel Macs With Rosetta

Although Universal Binary versions of many popular music and audio applications are now shipping or being tested, at the time of writing Steinberg have yet to announce a schedule for the availability of a native Mac-Intel version of Cubase. However, if you find yourself using an Intel-based iMac, Macbook Pro or Mac Mini, the good news is that Cubase will run on these systems thanks to Apple's dynamic binary translation technology, Rosetta, which basically lets you run Power PC applications on Intel Macs. (See April 2006's SOS for more about Universal Binaries and Rosetta).

Cubase SX 3.1 running under Rosetta on an Intel iMac.Cubase SX 3.1 running under Rosetta on an Intel iMac.The fact that Cubase will run on an Intel Mac is partly due to the fact that Syncrosoft, the company who provide the copy-protection drivers and dongle for Cubase, have already released a Mac Intel-compatible version of the License Control Center (LCC) software, which includes the drivers required to make the USB dongle work on Intel-based Macs. So if you want to run Cubase under Rosetta, make sure you download and install the latest version of LCC from Syncrosoft's web site (www.syncrosoft.com).

I tested Cubase SX 3.1.1 (build 944) on a 17-inch iMac with a 1.83GHz Core Duo processor, and the user interface felt surprisingly snappy (or rather, no less snappy than usual!). The only area where you feel the performance hit of the Power PC code being translated for the Intel processor by Rosetta is, of course, audio performance, such as when you're running instrument and effects plug-ins. However, the good news is that Cubase running under Rosetta is still able to make use of both the Core Duo's processor cores when running plug-ins. Using a single A1 instrument as a sound source, I was able to run 12 Reverb A instances simultaneously, by running six active instances of each of two FX channels, which were sent the A1's signal from the VST Instrument channel.

Although Cubase under Rosetta can make use of any attached hardware running via native Intel drivers, such as the USB dongle, MIDI interfaces, or an audio device like RME's Fireface 800, you won't be able to use Intel-native plug-ins or Rewire applications. In order for Cubase to see plug-ins and Rewire applications under Rosetta, they also have to be running under Rosetta, which means that previous Power PC VST plug-ins can be used, in addition to the Power PC versions of Rewire applications such as Reason and Live.

Given the performance limitations of Rosetta, running the current Power PC version of Cubase on an Intel-based Mac isn't something to be recommended right now. However, the fact that it does at least work might help you out if you get stuck in a situation where you need to be able to open a Project, check something, or export a MIDI file or track to another system.

Working With Automation Tracks

Automation tracks (or Sub-tracks) generally show Volume Automation Events by default, but you can change this by clicking on the name of the current parameter (such as Volume) and selecting More from the pop-up menu. You'll notice the pop-up menu itself offers a choice of parameters, but when you click More, the Add Parameter window will be displayed, allowing you to see (and choose) any of the parameters for that track that can be automated. If you want to quickly see Automation tracks for every parameter within a track for which Automation Events have been recorded, you can simply right-click (or Control-click on Mac) on the track in question and choose 'Show Used Automation'.

You'll notice that each Automation Sub-track has its own set of Read and Write Enable buttons, but unfortunately, as mentioned earlier, these don't work independently in the current version of Cubase. Although you can't enable automation to be written only for certain parameters, however, it is possible to prevent automation from being played back on certain parameters. Automation tracks offer a handy Mute Automation control, and when this button is enabled, as you might expect, Automation Events on that Sub-track will not be played back.

Automation tracks offer a graphical representation of Automation Events that have been recorded, and you can edit these Events (or create new ones if you have no pre-recorded automation and want to create some from scratch) just like any other Events in Cubase. Each Event is represented as a black point, and you'll notice that Cubase automatically interpolates between Automation Events, so that a fade-in requires just two points — a start point and an end point — leaving Cubase to smoothly fill in the transition. Note that Read Enable must be active on a track for Automation Events to be edited — otherwise, the automation data appears as a grey line.
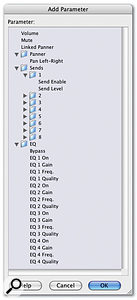
The parameter windows for audio tracks show which parameters can be automated. If any insert plug-ins were used on a given track, the parameters for these plug-ins would show up in this window when you were adding parameters to be automated for that track.The parameter windows for audio tracks show which parameters can be automated. If any insert plug-ins were used on a given track, the parameters for these plug-ins would show up in this window when you were adding parameters to be automated for that track.With the Object Selection (arrow) Tool, Automation Events can be edited by simply dragging them around: once selected, they turn red, and can be deleted by pressing Backspace. More than one Automation Event can be selected and edited (and deleted) simultaneously, and you can create new Automation Events by clicking on the blue line that joins the Events. You can also draw in multiple Automation Events with the Draw Tool, or use the various shapes accessible from the Line Tool.

One Tool that comes in extremely handy when you're editing Automation Events is the Range Selection Tool, which we've discussed in Cubase technique articles in the past. Unlike some Events in Cubase, Automation Events can't be Alt/Option-dragged to copy them (even when many are selected), so the Range Selection Tool is especially handy as a way of copying a range of Automation Events. Once you've dragged out a range, you can either move the entire block, or copy it by dragging with Alt/Option held down.

You can also delete the block by pressing Backspace, and the result achieved will differ slightly from deleting a selection of Events made with the Object Selection Tool. Imagine you have three Automation Events and you select the latter two with the Object Selection Tool, then press Backspace. The Events are deleted as if they never existed, and the value of the first Automation Event is carried forward, even during the timeline where the other Events previously existed. However, if you selected the same latter two Automation Events with the Range Selection Tool and pressed Backspace, Cubase would automatically add Automation Events at the start and end of the Range Selection points, to preserve the value of the automation data that previously existed at these two points before the Events within the Range were deleted (see the illustrations on the previous page for a pictorial explanation).

One final issue to be aware of when you're working with Automation Events is that Cubase has an option called Automation follows Events, in the Edit menu, which is enabled by default. This means that if there's an Event on the main track, such as an Audio Event on an Audio track, any Automation Events that fall under that Audio Event will also be moved when you move the Audio Event. This behaviour applies to both copying and moving. Therefore, if you want to ensure that Automation Events are dealt with independently of any Events on the parent track, you'll have to disable the 'Automation Follows Events' option.

That's all we've got space for this month, but next month we'll continue our exploration of automation and look at the different modes for writing automation in Cubase SX, using hardware control surfaces, and looking at the issues you'll face if you use both MIDI Controller and automation data on MIDI tracks simultaneously.  


Published June 2006
Wednesday, June 28, 2023

Using Automation

This month we continue exploring Cubase 's automation features with a look at the different modes available to SX users, and the issues you'll face when using automation and MIDI Controller data on MIDI Tracks.

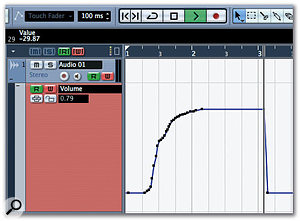
In last month's Cubase workshop we looked at how to write automation data on a track. By default, Cubase writes automation data in a mode that's known as 'Touch Fader' in Cubase speak. This basically means that Cubase will write automation data (when in write mode) at any time you're touching the fader, even if you aren't actually moving the fader, overwriting any pre-existing automation data for the parameter being 'touched'. Obviously it's not actually possible to 'touch' an onscreen control, so if you're using a mouse, 'touch' means to click and hold an onscreen control without releasing the mouse button. However, if you're using a hardware control surface with Cubase that offers touch-sensitive controls, 'touch' literally means touch.

Using Automation

The ARTful Dodger

In Cubase SX and SL, Touch Fader automation is used in conjunction with the Automation Return Time setting, which is part of the Automation Mode toolbar on the Project window. If you can't see this setting, right-click on the Project window's toolbar and make sure Automation Mode is checked. The Automation Return Time (ART) is the time it takes from when you stop overwriting automation data for the value of the parameter to return to the value of the next Automation Event of that same parameter, and can be between one and 2000ms.

In these two screens you can see a second pass of automation data being recorded on top of a previous pass where the level is higher during the second pass than the first. In the first screen the Automation Return Time (ART) parameter is set to 100ms, while in the second screen ART is set to 1000ms: notice the how this affects how Cubase joins the point between the two automation passes.In these two screens you can see a second pass of automation data being recorded on top of a previous pass where the level is higher during the second pass than the first. In the first screen the Automation Return Time (ART) parameter is set to 100ms, while in the second screen ART is set to 1000ms: notice the how this affects how Cubase joins the point between the two automation passes.

For example, say you have automation data written for volume that keeps the level roughly at 0dB and you overwrite this with a fade-out in one part of the track. If the ART setting is 1000ms and you release the fader at around -64dB, Cubase will automatically write automation data so that the channel smoothly returns to the level of the pre-existing automation data (from -64 to 0dB) over a period of a second. This prevents the volume suddenly jumping from -64dB to 0dB, which would happen if there was no ART feature, or if the ART was very short.

In Cubase SL (and SE), Touch Fader is the only way in which automation can be written, but Cubase SX users have four other modes available to them: Autolatch, X-Over, Overwrite, and Trim.

  • In Autolatch mode, as with Touch Fader, Automation Events are recorded (overwriting existing data) from the minute you 'touch' a parameter. However, in this mode Automation Events will continue to be recorded once you have released the parameter and until you stop the transport.
  • X-Over is similar to Autolatch mode, except that once the parameter you're automating is released, Cubase will stop recording Automation Events as soon as existing Events are encountered on the track.

The Automation Mode pop-up menu in Cubase SX enables you to select different modes to use when writing automation data.The Automation Mode pop-up menu in Cubase SX enables you to select different modes to use when writing automation data.

  • Overwrite mode is again similar to Autolatch mode, with two exceptions: firstly, Overwrite mode only works with Volume Automation Events, and, secondly, Automation Events are recorded (overwriting existing data) the instant the transport is running, until you stop the transport.
  • Finally, Trim mode, like Overwrite, also only works with Volume Events; but rather than writing completely new Automation Events it allows you to proportionally adjust existing volume automation data. When you start the transport running in Trim mode, the volume fader moves to a central position where moving the fader up increases the level of all Volume Events relative to each other before the Project Cursor, and moving the fader down decreases the level of all Volume Events ahead of the Cursor.

Usefully, you can also use the Trim mode offline as well. With Write Automation enabled on a given track, selecting Trim mode and moving the volume fader for that track will trim all the Volume Automation Events on that track between the Left and Right Locators. The last part of that sentence is the most crucial, as it's easy to forget to set the Locators appropriately, although it is really neat to be able to trim certain sections of a track by setting the Locators to specific locations. To ensure you're trimming all the Automation Events on the track, right/Control-click in the Volume Automation track and choose 'Select All Events', followed by 'Transport / Locators to Selection', which will set the Locators to encompass all of the Volume Automation Events on the track.

Editing Automation Events In The Project Browser

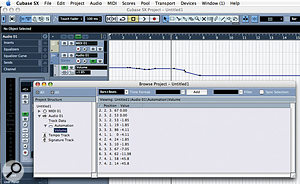
The Project Browser provides a numerical way to edit Automation Events. Here you can see Volume Automation Events for an audio track represented on both an Automation Sub-track in the Project window and in the Project Browser.The Project Browser provides a numerical way to edit Automation Events. Here you can see Volume Automation Events for an audio track represented on both an Automation Sub-track in the Project window and in the Project Browser.In addition to using Automation tracks (and sub-tracks) to edit Automation Events graphically, it's also possible to edit this information numerically in Cubase 's Project Browser window, which you can open by choosing Project / Browser or pressing Control/Command-B. In the Project Structure list, select the track containing automation data you want to edit and click the triangle beside it to reveal an Automation sub-folder, which has an entry for each of the Automation tracks (or sub-tracks) used for that track. Selecting the appropriate Automation track in the Project Structure list will display all the Automation Events for that track in the main Event Display area, where you can edit the Position or Value of Automation Events.

MIDI Automation

In the examples discussed in last month's Cubase workshop, we were looking at automating parameters on audio-based tracks; but it's also possible to read, write and edit automation data for parameters on MIDI-based tracks in exactly the same way, via a track's [R] Read and [W] Write buttons, along with the Automation sub-tracks. The parameters that can be automated for MIDI-based tracks include Volume, Pan, Mute, the Send and Insert Enables (along with the controls for any MIDI Insert plug-ins you might be using), and most of the controls from the Track Parameters Section (including a global on/off toggle), such as Transpose, Velocity Shift, and the Random and Range settings.

The Add Parameter window for a MIDI track shows which parameters can be automated. Parameters for MIDI Insert plug-ins will also appear here for any Insert plug-ins you're using on a MIDI track.The Add Parameter window for a MIDI track shows which parameters can be automated. Parameters for MIDI Insert plug-ins will also appear here for any Insert plug-ins you're using on a MIDI track.Being able to automate some of these parameters might not seem especially useful at a first glance, but being able to automate pitch- and velocity-modulating parameters such as Transpose and Velocity Shift can lead to some interesting creative ideas. Back in the Cubase VST days, for example, I was once asked to hack together a makeshift transpose fader to add variation to some taiko samples. Because the taiko samples were laid out on the keyboard with a different (but similar drum) sound assigned to each pitch, you could take some very basic rhythmic patterns and move the transpose fader to create more complex, varying patterns. This would work especially well with fast, straight patterns, and is effective when there are random notes on the keyboard that have no sample assigned, so as to create gaps. Creating these types of effects is now much easier in Cubase SX with the ability to automate a track's Transpose parameter.

Standard MIDI Controllers can also be added as Automation Parameters, but this where things can get a little complicated because working with Controller data as Automation Events is completely separate to working with Controller data as MIDI Events in one of the editor windows, such as the Controller Lanes in the Key editor. This is a problem because both types of data can co-exist and produce conflicting results that are confusing for the user and for Cubase.

If you're not completely sure what I'm talking about, let's consider the Volume parameter as an example: when you move the volume fader on a MIDI track in Cubase, the program will send MIDI Controller 7 (Volume) data to the appropriate MIDI device. To save the conflict of two automation parameters producing the same data, you'll notice that Controller 7 isn't available from the Add Parameters window, since it's effectively the same as the track's Volume parameter. But what if you have Controller 7 data programmed in your MIDI Parts and you have recorded volume automation data on the MIDI Track as well?

Multiple Track Trickery

When you have multiple adjacent tracks in the Track List that you need to rename (such as after adding several MIDI tracks via the 'Add Multiple Tracks' command), renaming each one individually can be a real pain. Fortunately, there's a quicker way of carrying out this task: double-click the name of the first track you want to change and type in the new name as normal, but instead of pressing Return (or clicking outside the text field) to exit, you can simply press Tab to jump to the next track's name in the List, or press Shift-Tab to move to the previous track's name.

When you have finished renaming tracks, press Return or click outside the text field to exit as normal. The track that was selected when you started renaming tracks will still be the track that's selected in the Track List.

MIDI Controllers Vs. Automation

To take a worst-case scenario, imagine you have MIDI Controller 7 data recorded that represents a fade-out over two-bars. What would happen if you had Track Volume Automation Events in the same two-bar period that were performing a fade-in? On playback, the MIDI output of the track would contain both the MIDI Controller 7 fade-out data, and the Automation Events, which Cubase would also translate into MIDI Controller 7 data. Because we can have two sets of volume data represented in two completely different ways, that end up sending the same type of message to our MIDI device (be it an external or VST-based instrument), the result is completely garbled.

One easy solution is to only use one area of Cubase to work with MIDI Controller data: either work with this data as Automation Events or MIDI Events. However, the problem here is that if you choose Automation Events, you can only work with the data on the Project window, and if you choose MIDI Events you can work in one of the MIDI editor windows. Since both sets of tools have advantages and disadvantages, it's no wonder that users naturally gravitate towards mixing and matching to get the best of both worlds, which leads to the type of conflicts described earlier.

Here you can see MIDI Controller 7 (Volume) data represented by the vertical lines in the MIDI Part, with Volume Automation Events recorded over the same period of time. When played back, both sets of data send MIDI Controller 7 to the MIDI device, which produces a rather unintelligible result.Here you can see MIDI Controller 7 (Volume) data represented by the vertical lines in the MIDI Part, with Volume Automation Events recorded over the same period of time. When played back, both sets of data send MIDI Controller 7 to the MIDI device, which produces a rather unintelligible result.In terms of volume, one good approach is to think about how, in a musical sense, track-based automation is used compared to how MIDI Controllers are used. Track-based automation is intended, at the most basic level, to record the movements of Cubase 's internal mixer. While MIDI Controllers can and have been used to remotely control mixers, they also have a second purpose, which is to provide articulation data for a MIDI instrument. By articulation data, I mean parameters such as modulation, or even volume in the dynamic sense, such as when you record MIDI Controllers to mimic the way someone would produce louder and softer tones while playing an instrument. In this case, we're talking about a performance and not a mix parameter.

The good news is that when the list of MIDI Controllers was drawn up, somebody was obviously thinking about this problem. One Controller often forgotten is Expression (despite the fact that most instruments, hard and soft, support it), which is basically a volume fader that sits before the regular MIDI Controller 7 volume fader. This means you can record your dynamic volume as Expression MIDI Controller data and leave Cubase 's track-based volume control as a trim for the output of that channel. You can have two different types of volume data playing back at the same time without interfering with each other.

The above workaround is obviously only suitable for avoiding volume conflicts, and right now there isn't a really good workaround for other types of MIDI Controller data. On the plus side, though, a command called 'Extract MIDI Automation' was added in SX 3 that allows you to convert Controller data represented as MIDI Events in MIDI Parts into track-based Automation Events. To use this command, simply select the MIDI Part (or Parts) in question, choose MIDI / Functions / Extract MIDI Automation, and MIDI controller data will be converted into automation data.

Last But Not Least

A final Preference that's handy if you use a hardware MIDI controller for recording Controller data is 'MIDI Controller Input to Automation Tracks', which is found on the MIDI page in the Preferences window. When this is disabled, MIDI Controller data is recorded as normal (if you're in record mode), as MIDI Events in MIDI Parts; but when it's enabled, incoming Controller data remotely controls automation parameters on the selected MIDI track instead. In this mode, you can record Controller data and some track parameters (volume and pan) as Automation Events in the same way you would normally write automation data, but using your regular MIDI hardware controller. However, note that this only works with MIDI tracks (you can't write volume data for a selected audio channel in this way, unfortunately), as the purpose of the feature is to prevent you from recording Controller data as both MIDI and Automation Events.

Understanding automation can greatly improve the quality of mixes produced entirely in Cubase, and, once you've got the hang of it, you'll start to see why hardware control surfaces are so useful. Although they don't actually add anything sonically to your work, one area where they really are useful is writing automation data — especially if they have touch-sensitive controls. Stay tuned for more about this in a forthcoming Cubase workshop article.  


Published July 2006

Monday, June 26, 2023

All About Quantise

Figure 1: Here you can see a badly played MIDI part that's not quite in time, before being quantised.Figure 1: Here you can see a badly played MIDI part that's not quite in time, before being quantised.

When sequencers first allowed you to record musical notes in real time, one of the features that became ubiquitous in all systems was quantisation. This month we take a look at how quantise has evolved and is used in Cubase SX.

In its broadest scientific sense, quantisation means taking a continuous value and making it fit against a scale of pre-determined values. In MIDI sequencers like Cubase, the timing of notes is quantised against the internal resolution of the sequencer, which is measured in 'Parts Per Quarter Note' (or PPQN), as you perform them. The higher the PPQN, the more accurately the timing of your performance is rendered. However, while the issue of PPQN was really important maybe 15 years ago, modern sequencers offer such a high internal resolution that nobody really talks about the resolution of their sequencer any more.

Although modern sequencers do a pretty good job of accurately representing the timing of your playing, even the best player will deviate from the metronome click when recording. So it can be useful to further quantise your playing against a much larger or smaller resolution (depending how you look at it), such as a quaver (or eighth note), enabling you to effectively take an out-of-time recording and make it completely accurate against the sequencer's precise musical time grid. There are both functional and creative uses to Cubase 's Quantise features, which is what we'll be looking at in this month's technique article.

Quantising In Cubase

Let's start with the basics. Say you've played a MIDI part into Cubase (badly, as shown in Figure 1) and you want to simply tighten up the timing by quantising the start positions of the notes. In the Project window, you would choose the quantise resolution from the Quantise pop-up menu on the toolbar, select the MIDI part (or parts) you want to quantise, and select 'MIDI / Over Quantise', or press 'Q'.

Figure 2: After quantising the notes using a 16th-note resolution, everything is precisely in time.Figure 2: After quantising the notes using a 16th-note resolution, everything is precisely in time.You can also do this from the Key Editor, which features a Quantise pop-up menu on the toolbar that's linked to the one on the Project window (choosing a resolution in one window automatically updates the other with the same selection, for example). However, if there aren't any notes selected in the Key Editor, all the notes displayed in the editor will be quantised, unless the 'e!' Edit Active Part Only button is active, in which case only the notes in the currently active part will be quantised. You'll notice the resolution specified in the Quantise pop-up menu also determines how the grid is drawn in the Key Editor, which can be quite useful when you get into more complex rhythmic quantise patterns.

Once you've quantised your part, all the notes will move to the nearest beat specified by the resolution you chose from the Quantise pop-up menu. If you look at Figure 2, you'll notice that I quantised my original recording with a resolution of 1/16 (a semiquaver) — in order to preserve the correct timing of the music, it's important to make sure that you choose the shortest note used for the rhythms in your performance as the quantise resolution. The shortest notes used rhythmically in my performance were semiquavers, which is why I chose 1/16 as my resolution — if I had chosen 1/8 (as in Figure 3), you will notice that the basic rhythm of my original performance would have been destroyed.

Selecting the 'wrong' resolution isn't always a bad thing, though, as you could end up with a creative variation on your performance by over-quantising. Alternatively, if the shortest note is a semiquaver, you might want to tighten the timing a little by quantising with a shorter resolution, such as a 64th note, although there are better ways of achieving a more human feel with quantisation, as we shall see shortly. As a footnote, it isn't just straight note values that are available: if your rhythms are based on dotted notes (such as two dotted crotchets, or quarter notes, per bar of 6/8, for example) or triplets, there are suitable options also available in the Quantise pop-up menu.

Figure 3: By over-quantising the original performance with quavers (eighth notes), the piece becomes substantially different.Figure 3: By over-quantising the original performance with quavers (eighth notes), the piece becomes substantially different.On the subject of changing resolutions, remember there's nothing to prevent you from making selections of different notes in the Key editor and quantising them with different resolutions. This can be handy if you play a piano part with a slow-moving bass line underneath a fast arpeggiation for example.

Once you've quantised notes, you might want to change your mind and return to an unquantised version and try something else. Cubase 's multiple undo feature can come in handy here, but what if quantising wasn't the last thing you did, or what if you quantised the notes in question last week and many different versions of the Project ago? Fortunately, Cubase offers a dedicated Undo Quantise command (which you can find in the MIDI / Advanced Quantise menu, although I would usually assign it to the 'U' keyboard shortcut, as it was in 'classic' Cubase) to return notes to their original positions, which are always stored in the Project.

This is pretty handy, but it's important to note that Undo Quantise always returns notes to the positions they occupied when they were first input into Cubase. This matters when you use Quantise multiple times, because if you play in some notes, quantise them, and then further quantise them again, Undo Quantise will undo to the original positions, not the intermediary quantised positions. If you want to reset the currently quantised notes as the original positions for a set of notes, you can do this with the Freeze Quantise command.

It's Not Just About The Start

By selecting the upper notes, setting Quantise to 1/32 and using the Fixed Length command I was able to get an instant Glenn Gould-like feel for my performance.By selecting the upper notes, setting Quantise to 1/32 and using the Fixed Length command I was able to get an instant Glenn Gould-like feel for my performance.With the exception of Groove Quantise, where the Velocity and Length of a source recording are included in the Quantise preset, the quantise commands mentioned in the main text (Quantise and Iterative Quantise) usually only operate on the start positions of notes. However, there are two further Quantise commands that let you process either the end position of the note or the length of the note — the appropriately named Quantise Ends and Quantise Lengths commands — which are available from the MIDI / Advanced Quantise sub-menu.

Quantise Ends does exactly what you would expect, and moves the end of the note (leaving the start position where it was) to the nearest grid position specified by the current Quantise Preset. Quantise Lengths quantises the length of the note to the nearest value specified by a separate Length Quantise pop-up menu on the Key Editor's toolbar. By default, Length Quantise is set to Quantise Link so that the value is taken from whatever the Quantise menu is set to, although you can set this to an independent value if you wish.

It's important to remember that Quantise Lengths doesn't make all the notes the length set by the Length Quantise menu. This is possible with a command called Fixed Lengths, which uses the resolution specified in the Quantise pop-up menu and makes the specified notes the length set by that resolution. For example, if you want to make a set of notes precisely demisemiquavers in length, select 1/32 in the Quantise pop-up menu, select the appropriate notes if you're in the Key Editor (or none at all to process all the notes in the Key Editor) or the appropriate part in the Project window and choose MIDI / Functions / Fixed Lengths.

Advanced Quantise

So far we've looked at a fairly functional use of quantisation — moving notes to rigid metronomic positions — but it's also possible to use other rhythmic templates and a variety of other options in Cubase 's Quantise Setup window. To open this window, select either 'MIDI / Quantise Setup' or choose Setup from the bottom of the Quantise pop-up menu. The Quantise Setup window is where you set up the quantise templates we've already been using from the Quantise pop-up menu, and once this window is open, any settings you make automatically become the currently selected quantise template.

The Grid and Type menus at the top of the window allow you to define the type of quantise templates we've looked at already: Grid allows you to pick a note length (for example: 1/4, 1/8, and so on) to use for the resolution, while Type sets a modifier for the note length: Straight, Triplet or Dotted. Speaking of triplets, there are times when you might need to quantise against other divisions of a beat other than three (ie. triplets), and Cubase allows you to set up such patterns with the Tuplet setting, which is set to 'Off' by default.

Take the third Opus-90 Impromptu by Schubert, for example, where you have crotchet sextuplets (six notes divided into the space of a quarter note). To set up a suitable quantise template in Cubase you would set Grid to 1/4, Type to Straight and Tuplet to six.

There's also a Swing slider where you can specify how much of a swing feel (as a percentage) to apply to the quantise pattern. For example, say you have a straight-16th performance (much as in the example figures) and you want to inject a swing feel: set Grid to 1/16, Type to Straight, and add as much swing as you can handle. To carry out the quantise operation you can either use the normal commands or click 'Apply Quantise' in the Quantise Setup window — see Figure 4 on the next page.

As you were dragging the Swing slider, you might have noticed that the grid in the Key editor is automatically redrawn to show where the beats fall in the new quantise template. You can also make Cubase automatically apply the actual quantising to the notes while you experiment with settings in the Quantise Setup window by enabling the Auto checkbox just below the Apply Quantise button.

Figure 4: Here you can see a 16th-note swing pattern setup in the Quantise Setup window and applied to the notes in the Key Editor. The grid in the Key Editor also reflects the grid described by the Quantise Preset — Bach would be proud.Figure 4: Here you can see a 16th-note swing pattern setup in the Quantise Setup window and applied to the notes in the Key Editor. The grid in the Key Editor also reflects the grid described by the Quantise Preset — Bach would be proud.In addition to the Key Editor showing the quantise pattern in its grid, the Quantise Setup window also offers a graphical display of where the beats will be in the current quantise pattern, represented by dark blue lines. This is particularly useful for another Quantise Setup feature called Magnetic Area. Normally when you use Quantise, notes are moved to the nearest beats as specified by the quantise template; however, the Magnetic Area allows you to specify a distance from the beats in the quantise template (as a percentage) and only if a note is within the specified distance from a target beat will it be moved. The Magnetic Area is indicated on the Quantise Setup window's grid by a light blue region drawn around the darker blue 'quantise beat' lines.

The opposite to Magnetic Area is the Non-Quantise setting, which enables you to specify a distance in ticks (where there are 120 ticks in a semiquaver) from the target beat where notes within this distance will not be quantised. This is pretty useful for rendering a more natural-sounding performance, as you quantise only the notes that are badly out of time, leaving the ones that are almost on the beat alone. The Non Quantise distance is indicated on the Quantise Setup window's grid by light red regions that are drawn around the beats.

Another feature that can be useful to make your performances sound more in time without being completely mechanical is Random Quantise. Here you specify a value in ticks so that when a note is quantised to the nearest beat specified by the other parameters in the quantise template, it is offset by a random amount from zero to the value specified by the Random Quantise setting. This is similar to the final Quantise parameter, Iterative Strength, which is used in conjunction with a separate Iterative Quantise command in the MIDI menu. Iterative Quantise works similarly to normal Quantise except notes are moved closer to the quantise grid by the percentage specified by Iterative Strength. Repeated use of Iterative Quantise will keep moving the notes closer to the grid, so you can experiment with how relaxed you want to the timing to sound, and eventually Iterative Quantise will end up completely quantising the notes as if you'd used the standard Quantise command.

There are two other features in the Quantise Setup window that can come in useful. Firstly, the Move Controller option specifies whether controller data within a note being quantised should be moved along with the quantised note, and secondly, the 5.x Import button allows you to import a quantise pattern from an earlier version of Cubase that was saved as an old Cubase VST 5.x Part (.prt) file.

Once you have a quantise template you want to use again, you can store it as a Quantise Preset so that it appears in the Quantise pop-up menu by clicking the Store button in the Quantise Setup window. The Preset is automatically created (and selected) and is given a name by Cubase based on the current settings in the Quantise Setup window. If you want to change the name, with the Preset selected, double click the Presets pop-up menu in the Quantise Setup window, enter a new name in the aptly-titled 'Type In A Preset Name' window and press Return or click 'OK'. The currently selected Preset in the Quantise Setup menu can be deleted by clicking the Remove button.

That's all for this month's Cubase Technique column but keep your eyes open for a future edition where we'll be taking an in-depth look at Groove Quantise.  


Published August 2006