Welcome to No Limit Sound Productions

Company Founded
2005
Overview

Our services include Sound Engineering, Audio Post-Production, System Upgrades and Equipment Consulting.
Mission
Our mission is to provide excellent quality and service to our customers. We do customized service.

Friday, March 31, 2017

Q. How should I treat my project studio?


A good starting point when tackling an untreated room is to hang traps behind each speaker and to the sides of the listening position. If there's enough space, additional treatment can be added on the ceiling above the listening position, as well as in the corners, as shown here.  
A good starting point when tackling an untreated room is to hang traps behind each speaker and to the sides of the listening position. If there's enough space, additional treatment can be added on the ceiling above the listening position, as well as in the corners, as shown here.

I'm just about to get started on quite a big project in my new home studio. I'm a bit concerned about the acoustics of the room, so I've been re-reading Studio SOS from July 2006 where Paul and Hugh sorted Hilgrove Kenrick out with some great acoustic trapping, and I'm thinking of making some myself. I just wanted to ask if you thought it would help in my situation.

My room is 4.6m x 4.1m, with a height of 2.4m. The walls taper in at a 45-degree angle about 30cm below the ceiling. The floor is covered in thin carpet, and there is one single-glazed window about 2m x 1m in the front wall. I can record instruments and vocals in the adjoining room if necessary, to reduce noise from my workstation (an Apple Macbook running Logic Pro).

But I'm more concerned about playback and EQ. I'm unsure about the best place to put the workstation, and I'm a bit worried about the listening environment; I'm not sure whether I'll be able to hear all frequencies correctly and therefore provide good-quality mixes. Do you think the traps and foam will help, if positioned in a similar manner to the article?

Simon Greenwood

Editor In Chief Paul White replies: The traps we made for Hilgrove would certainly work in your room, and if you're willing to get your hands dirty with the manufacturing process, I'd start by making one for each side of the listening position and another pair to situate behind the speakers. As a starting point, try setting your speakers up around 18 inches from the wall and make sure they're angled towards your head, with the minimum of reflecting surfaces between you and them.

Your room's dimensions are a bit closer to a square than I'd like, but at least it is large enough that you won't need to sit too close to the centre, which is where the bass becomes most unpredictable. If you have space, add further traps in the corners of the room, again as we did in Hilgrove's studio. Alternatively you could put them between the wall and ceiling on the walls that don't have angled sections. Q. How should I treat my project studio?Q. How should I treat my project studio?
Logic's Test Oscillator (above) can be assigned as a source on an instrument track, then sequenced to play sine tones at semitone intervals, using the Matrix Editor, as shown below.

I wouldn't recommend using EQ to try to fix the monitoring, as it is rarely very successful. Instead, use your ears (and some test tones) to analyse the best placement for your speakers. This is a fairly laborious task, but one that's certainly worth the effort. Here's what to do.

Set up ascending sine-wave tones in semitone steps, starting from around 30Hz. As you have Logic Pro, you could use Test Oscillator, which is listed as a source on an instrument track, to generate these steps. Alternatively, you could open an instance of EXS24, which has a sine-wave tone as its default sound. You could, of course, use ES2 on an instrument track, and set up a sine wave on one of the oscillators (making sure the other two oscillators are switched off), but you must be careful to check that all modulations, LFOs, envelopes and, most importantly, velocity sensitivity controls are having no affect on the output.

All three of these options give you the flexibility to trigger the tones using a MIDI controller keyboard, enabling you to find out where the troublesome frequencies are at the point in the room where you play the keyboard. But sequencing a stepped sweep (as shown in the screenshot, bottom left) is a better option, as it allows you to listen to other parts of your room. When programming the steps, it's important to check that MIDI velocities are the same, and that notes don't overlap (if using ES2, set your sine-wave generator to 'mono' mode).

Once you've set up the sequence and ensured that there are no programmed jumps in volume, listen for excessively loud or quiet notes around the room. Moving your speakers further from or closer to the walls will change this, so look for the spot that gives the smoothest response. A further piece of acoustic foam on the ceiling directly above your knees in your normal monitoring position will help kill reflections from that source.


Published July 2007

Tuesday, March 28, 2017

Q. Should I use my spare PC as a remote workstation?

My friend has just built a control room at the rear of his house, and he would like to set up a networked remote workstation in a room at the front of his house, which he is using as a recording space. We want the computer in the front room (which will be connected to a multi-channel audio interface) to transmit live audio inputs via LAN into the host computer, which is running Cubase in the control room. I realise that we could route the inputs along analogue cables to the host PC, but in this case we would like to be able to run just one Cat 5 network cable. I'm envisaging a system where a VST plug-in, running on the host PC, shows the audio signals being transmitted by the remote PC, in a similar fashion to FX Teleport. Is this possible?
Q. Should I use my spare PC as a remote workstation?

Sean Hughes

PC music specialist Martin Walker replies: If you've already got a spare PC and soundcard available, I can see why this idea occurred to you. One possible solution that would fit the bill is the Digital Musician Net software (www.digitalmusician.net), a free VST 2.0 plug-in that enables musicians in different locations around the world to collaborate 'live', all running their own computers and audio interfaces. Usually you would do this via an ADSL Internet connection, but I dare say you could also adapt it to a local network.

However, I can't help thinking that this approach is using a sledgehammer to crack a nut. While my August 2005 PC Musician feature on Spreading Your Music Across Networked Computers (available on-line at www.soundonsound.com/sos/
aug05/articles/pcmusician.htm
) covered using a second PC as a simple stand-alone synth, or running software such as MIDIoverLAN, Steinberg's VST System Link and FX Teleport, none of these alternatives supports the running of live inputs on a remote PC. And there's a very simple reason for this: the last thing most musicians would want in a 'live room' is a noisy computer, and many already go to great lengths to get their computer out of the control room too!
There are a number of ways to transfer audio from one room to another. One is to use a computer in each room and a networked audio transfer application, as illustrated on the left. However, this process will involve significant latency issues that can prove particularly tricky to resolve. The most effective alternative is to remove the second computer and use an audio multicore to connect the two rooms, as shown on the right. With this option, there are no latency issues encountered in the transfer of audio between the recording space and the control room. 
There are a number of ways to transfer audio from one room to another. One is to use a computer in each room and a networked audio transfer application, as illustrated on the left. However, this process will involve significant latency issues that can prove particularly tricky to resolve. The most effective alternative is to remove the second computer and use an audio multicore to connect the two rooms, as shown on the right. With this option, there are no latency issues encountered in the transfer of audio between the recording space and the control room.

Another problem when connecting live inputs via a remote PC would be additional latency. When you use a utility like FX Teleport to add the processing power of a second PC to the pool, the latency of its remote plug-ins is automatically compensated for while mixing, just like those on the master PC. However, your proposed live inputs would be delayed by the latency of the network, as well as the audio interface input buffers, and would all end up behind those on the master PC. If the musicians wanted to monitor existing tracks being played back on the master PC, these would also be delayed on their trip back to the live room via the network. While you could, no doubt, line up the tracks afterwards, I suspect you'd find it a very frustrating experience.

One alternative approach that also uses a single digital cable would be to install a Firewire or USB 2.0 audio interface in the recording space, connected to the host PC via a single long Firewire or USB cable. Many manufacturers offer software drivers that support three or four of their interfaces simultaneously, so with a suitably compatible audio interface in each room you could end up with a greater amount of inputs and outputs. These would, of course, be locked to sample-accuracy, there would be a complete absence of computer noise in your live room, and you'd be able to route headphone mixes to the extra interface's outputs for monitoring. One thing to consider with this option is the length of the cable you use. The official limits for both USB and Firewire cable lengths is around five metres, but you might get away with longer than this (there are plenty of companies advertising Firewire cables up to 120 feet if you look on-line); with a repeater box, to clean up and boost the signal, you could run much longer cables.

However, there's an even easier alternative, which you actually mentioned in your query: connecting the live room sources to unused inputs on the control room PC's audio interface via analogue cables. You dismissed this because you didn't want to run multiple cables, but you don't have to; the vast majority of recording studios use a single multi-core 'snake' cable containing multiple, balanced audio cores, terminated in a robust breakout box at the live end, and a set of XLR plugs at the other.

You can buy these in many formats ranging from two-way to 32-way and beyond, and despite their increased diameter over a single Cat 5 cable I can't help thinking this would be the best solution, especially as a 30-metre, 12-way snake would only cost around £100, and you could use a few cores to send monitor outputs to the live room.


Published July 2007


Saturday, March 25, 2017

PC Spring Cleaning

By Martin Walker
Your PC may well be the nerve-centre of your studio, so keeping it in top condition is worth a bit of effort. Read on for the SOS guide to inner and outer PC cleanliness.

PC Spring Cleaning
There's no need to periodically reformat your PC and reinstall everything from scratch to regain peak audio performance. Giving it a good spring-clean will keep your hard drive error-free and your personal data secure, relieve your drive of unwanted junk data and eradicate hundreds and sometimes thousands of redundant entries in your Windows Registry, which can slow Windows performance and sometimes cause crashes.

Even physical cleanliness can make more of a difference to performance than many musicians realise. Keeping your PC clean on the inside will help it run cooler and reduce acoustic noise, by giving the cooling fans less work to do, and may even prevent long-term crashes. Just follow these tips to optimise your computer so that it never grinds to a halt and runs cooler and more reliably than ever before.

Wash and Brush Up

Some musicians seem to take a perverse delight in never cleaning their computers, but keeping your PC physically clean can have more significant health benefits than many people realise. Studies have found that a PC keyboard can end up contaminated with 400 times more germs than the average toilet seat. A primary cause of this shocking health risk is that so many of us eat near our computers, with the result that germs and bacteria grow between and underneath the keys, as they do on any other surface that's regularly handled, including your mouse, telephone, and so on. This can result in ear, nose and eye infections, and I've seen it estimated that up to 60 percent of time off work may be caused by contracting germs from dirty office equipment. The most germ-ridden item in many offices is the printer button, so it's fair to assume that studio germs will also gather on the various sliders and rotary knobs of our mixers and synths. If you run a commercial studio the health issues resulting from lots of clients handling your computer and audio gear may be even worse (especially since some people don't seem to wash their hands after visiting the bathroom!).

For general cleaning of PC casework, a simple rub-down with a cloth dampened with washing-up liquid and water, followed by a quick polish with a dry cloth, is often sufficient and won't leave smears like some general-purpose cleaning products. For more details, have a look at our feature on 'Refurbishing Your Old Equipment' in SOS December 2006 (www.soundonsound.com/sos/dec06/articles/cosmeticsurgery.htm).
Don't underestimate the health benefits of keeping your PC clean. With a range of dedicated products like these you can not only sharpen your monitor images and give your gear a new sparkle, but also deal with potentially hazardous bacteria.Don't underestimate the health benefits of keeping your PC clean. With a range of dedicated products like these you can not only sharpen your monitor images and give your gear a new sparkle, but also deal with potentially hazardous bacteria.

Other PC-related items that will probably benefit from a routine clean include floppy drives (with a dedicated cleaner disk) and CD/DVD optical drives, especially if you're experiencing unreadable disks or audio stutter. In the case of the latter, cleaning the laser lens assembly may help. You can do this using a dedicated lens-cleaner CD, but sometimes a better long-term solution is to open up the drive and clean the lens manually, using a cotton bud and isopropyl alcohol (SOS reader and studio owner Tim Rainey has a helpful guide to the latter on his web site at www.kymatasound.com/Optical_drive_fix.htm).

Your computer and other often-handled items in your studio will generally benefit from dedicated cleaning products that not only avoid smearing but also have anti-static and anti-bacterial properties. Most PC component retailers stock some, but one range that particularly caught my eye is from Durable (www.durable-cleaning.co.uk), especially as they promote awareness of health issues with their 'Computer Cleaning Week' (17th to 22nd September), which also has its own dedicated web site (www.computercleaningweek.com).

The Durable product range includes Superclean sachets and anti-bacterial wipes that are suitable for PC and music keyboards, mice, telephones, faders and knobs, plus Screenclean, for streak-free cleaning of all types of monitor screen and other glass surfaces on scanners and photocopiers. Meanwhile, to eject crumbs and other detritus from inside your PC keyboard, try a Powerclean Airduster canister. The dedicated Durable PC Clean Kit 5718 contains both Superclean and Screenclean fluid, cleaning cloths, and keyboard swabs and cleaners that reach between the keys to remove grime.

I was impressed when I tried out samples from the range. When I up-ended my PC keyboard and tapped it, all manner of food crumbs and dead skin particles dropped out, but the Powerclean Airduster dislodged plenty more (it may help to use the soft brush of a vacuum cleaner attachment to help remove any further debris). To clean the keys themselves, I used neat Superclean with both swabs and the supplied lint-free cloths, and it was surprising just how much grime ended up on them, even though the keys looked superficially clean.

I found Superclean moist wipes perfect for cleaning and sanitising mice (don't forget to wipe off the ingrained dirt found on the 'skids' underneath), while anyone still using a ball mouse should open it up and clean the ball itself, along with the rollers, which will keep your mouse action smooth and sure. The moist wipes also worked very well on telephones, rotary knobs, fader caps and music keyboards. I was particularly shocked at how much dirt came off the last!

Desktop and laptop monitor screens may already have anti-reflective or anti-static coatings, so don't be tempted to use domestic glass-cleaning products that may strip these away. You can try a damp clean cloth, but I found Durable's Screenclean not only easily removed stubborn marks and left my screens clean and shiny with no smear marks, but its anti-static properties really did seem to prevent further muck accumulating. Overall I can highly recommend the range, which is widely available at reasonable prices.

On-line Health Checks

You may have noticed web sites offering free automated Internet PC checkups, which, once they have potentially discovered hundreds of problems on your machine, then offer to sell you software to resolve them. Unfortunately, the only ways to thoroughly scan your PC for problems are to download and run a free utility or run Active X controls and Javascript tests, both of which have the potential to do serious damage to your computer. My advice is, therefore, to be extremely careful and not to be tempted to run any such tests unless you're absolutely sure the web site belongs to a bona fide developer that's been in business for some time. One I've had recommended to me by an SOS Forum user is PC Pitstop (http://pcpitstop.com), but in general I find it hard to recommend such regimes.

Internal Cleanliness

Once the outside of your PC and peripherals are clean, the next stage for the desktop PC user is to remove one of the case side panels, to inspect the inside for any build-up of dust and dirt. You'd be amazed at how much muck can build up on heatsinks and cooling fans, and the problem may be particularly bad if you smoke or burn joss sticks in the studio (so don't do it!).

Unfortunately the build-up of dirt generally occurs so gradually that you may be surprised when you eventually suffer a major calamity. Even a thin layer of dust on heatsinks and cooling fans reduces their effectiveness, so the operating temperatures of your CPU and other components in your PC will gradually creep up, which in turn may increase acoustic noise as fan speeds increase to counteract the higher temperature.
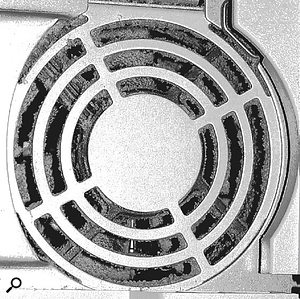
If you can see this much caked-on dust inside your power supply, your PC is probably running hotter than it should, and you should immediately remove its side panel to give it a good vacuum. 
If you can see this much caked-on dust inside your power supply, your PC is probably running hotter than it should, and you should immediately remove its side panel to give it a good vacuum.

Without a good clean, more severe symptoms are eventually likely to appear, including songs suddenly glitching due to high processor overheads (because the CPU has automatically throttled its clock speed down in an attempt to cool it), or unexpected shutdowns. In the worst case a PC will boot up fine, run for just a few minutes, and then shut down and refuse to boot up again until it has cooled down. The latter is often what happens when the gaps between the heatsink 'fins' become completely solid with dirt, or when the cooling fan is so clogged up that it can no longer rotate.

The diligent can monitor their CPU, motherboard and hard-drive temperatures, along with fan speeds, using suitable software utilities (for more details, read 'The SOS Guide To Keeping Your PC Cool, Quiet, and Stable'; see the 'Further Reading' box). However, a routine internal inspection a couple of times a year makes more sense.

Unplug the PC from the mains and use a soft brush and a vacuum-cleaner brush attachment to remove as much muck as you can find from all the obvious places. These include the CPU fan and heatsink, any case fans and any air filters (often placed before the intake fans at the front of a PC). Don't forget to clean any other heatsinks you find on the motherboard, or on expansion cards (modern graphics cards require large heatsinks, as do some soundcards). For inaccessible fans, such as those inside PC power supplies, moisten a cotton bud and use it to wipe the fan blades, or blow an Airduster (described in the previous section) into the PSU from the back of the PC to loosen the internal dust, which should then get blown out by the fan.

Finally, for DIY desktop PCs, while you're inside the case, see if it's possible to use cable wraps and ties to neaten up the wiring loom connecting the PSU, motherboard, floppy, hard and optical drives. If you can streamline the airflow by carefully forming the cables into neat bundles, you may shave several degrees Centigrade off your CPU temperature, and therefore be able to tun your cooling fans at slightly lower speeds, for less noise in the studio. I heard of one PC user who, after cleaning his machine and tidying up the wiring, measured reductions of five degrees Centigrade for his CPU temperature, eight degrees for his motherboard and a couple of degrees for his hard drives!

Laptops are often more difficult to open up for access to the air vents and internal cooling fans. The procedure also varies considerably from model to model, and may involve the removal of dozens of tiny screws or struggling with lots of confusing clips. If you suspect overheating due to an internal build-up of dust and dirt clogging your laptop fans, and can safely get inside, clean the fans as above, then use a blast of Airduster through the intake vents to dislodge any other dust. It's best to do this outdoors, since you may get a sizeable cloud of dust flying out.

If it's not obvious how to open up your laptop, one useful web site linking to DIY instructions for many different models can be found at http://repair4laptop.org/notebook_fan.html. Failing that, it may be safer to return the laptop to the manufacturer or a local repair company for cleaning. If you're considering an upgrade, such as having more RAM installed, asking the company to give your laptop a good clean while it's already opened up may be significantly cheaper.

Smart Monitoring

HD Tune's Health page warns of impending hard drive doom by checking the drive's SMART monitoring data.HD Tune's Health page warns of impending hard drive doom by checking the drive's SMART monitoring data.

For quite some years now, the vast majority of hard drives have featured SMART (Self-Monitoring, Analysis and Reporting Technology), which provides feedback about performance parameters including error rates, spin-up time and temperature. Although in older computers the extra overhead slowed performance slightly and resulted in many people disabling SMART monitoring in the BIOS, with modern PCs this overhead is almost undetectable.

When any of the parameters mentioned above changes significantly, it may indicate impending failure, so you might as well take advantage of the information to find out how your drives are performing and whether or not they are likely to fail in the near future. I've previously mentioned HDD Health (www.panterasoft.com) in PC Notes as a useful utility that sits in your system tray and predicts impending failure of your drives, but another I've recently discovered is HD Tune (www.hdtune.com). This utility not only provides SMART health status on demand, but also offers drive benchmark tests and a useful error-scan function that will find defects (bad blocks) on your drives.

Hard Drive Health

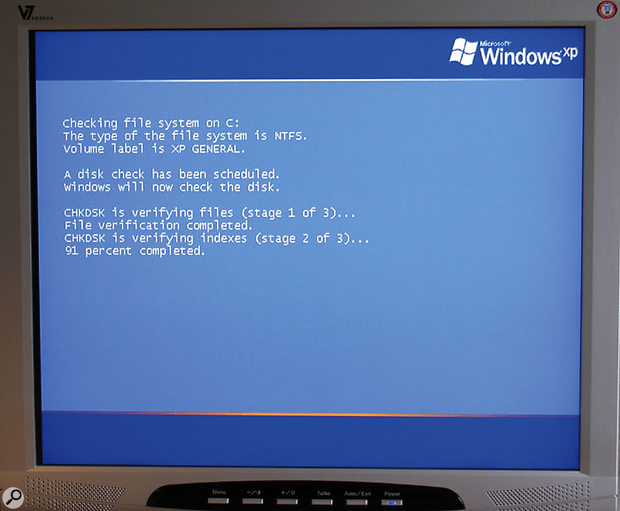
Hard drives are sealed to prevent dust getting inside, so physical cleaning isn't necessary. However, the data they hold can be subject to errors, so it's well worth doing some routine health checks using Microsoft's CHKDSK utility (supplied with Windows NT, 2000, and XP). This utility runs automatically when you boot up your computer after it's had any problems shutting down, has crashed requiring a reboot, or after a power cut. However, it's sensible to run CHKDSK at other times to check for errors, and sort them out if any are found. I suggest you do this routinely two or three times a year, as well as immediately before defragmenting your drives (most defragmenters will abort if drive errors are discovered).
Running CHKDSK a couple of times a year to scan and fix any hard drive errors is a wise precaution that will help keep your PC running smoothly.Running CHKDSK a couple of times a year to scan and fix any hard drive errors is a wise precaution that will help keep your PC running smoothly.

The easiest way to access CHKDSK is to right-click on a drive partition in Windows Explorer and select the Properties option. The dialogue that appears has a Tools page that includes an error-checking option. You can use this to scan for possible errors, but you can't, unfortunately, use the 'Automatically fix file system errors' option while within Windows, since many system files will already be open and therefore 'active'. An error message will pop up and offer to instead run CHKDSK the next time you boot up before Windows starts, just as it does after a crash.

If, for some reason, you can't run CHKDSK on automatic reboot, try running it from the Windows XP Recovery Console. First, boot your PC from the Windows XP CD-ROM, and once the 'Welcome to Setup' screen appears, press 'R' to launch the Recovery Console. If you have multiple XP or 2000 installations, you'll next have to choose one to log into.

With either of these alternatives you then need to type in the appropriate text command. To scan for and fix hard drive errors you'll need to type in 'chkdsk c: /f' and press return (change the 'C:' parameter if you want to fix other partitions). There are also various other CHKDSK options. For detailed descriptions, pay a visit to www.microsoft.com/resources/documentation/windows/xp/all/proddocs/en-us/chkdsk.mspx.

Once you've run CHKDSK and it's discovered no errors, it's the ideal time to defragment your Windows drives. Defragmentation is essentially the art of rearranging files on your hard drives to enhance performance, and the pros and cons of doing this on audio drives is a complex subject that I discussed in great depth back in SOS June 2005 (see the 'Further Reading' box). However, there are nearly always benefits to defragmenting Windows drives, such as both Windows and its applications loading more quickly, and smoother general file access.

Wipe Sensitive Data

When you delete files on your hard drive, all that happens is that the entry pointing to the data is removed, leaving the data itself intact. Although Windows will now happily save new data over the top of the old, some of your deleted data may still be intact months or even years after its deletion. Even reformatting your hard drive simply removes its 'table of contents', and using suitable software tools you could still recover much of it.

This can be a life-saver if you ever accidentally delete some data you later want reinstated, but is extremely worrying if you have personal information on your PC that you need to permanently erase, such as client data, tax records, credit card numbers and web-surfing history. A study by the University of Glamorgan on 105 hard drives bought on Internet auction sites showed that data could be retrieved from 92 of them, including passwords, National Insurance numbers, and financial information such as sales receipts and profit and loss reports.

Security experts say the only really successful way to ensure that no-one can ever retrieve personal data from a discarded hard drive is to drive a six-inch nail through it, crush it or incinerate it, but utilities designed to securely wipe complete partitions and drives of all their data by overwriting them a number of times with random patterns of data do make the hacker's life a lot more difficult. So if you want to permanently erase personal data from a hard drive, either for routine personal security, before you sell it, or before you donate your old PC to a local charity, it's well worth taking a little more trouble to make sure your deletions are permanent. After all, identity theft can be a costly business!
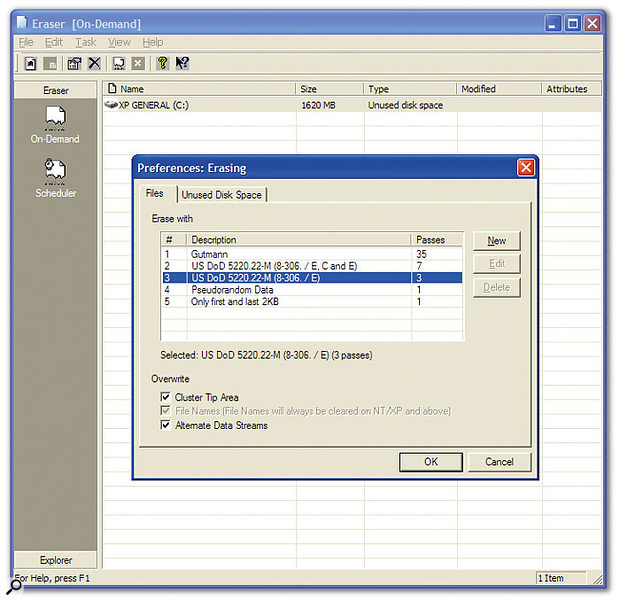
If you want to securely erase personal data on your PC, Eraser can deal with both individual files and wiping supposedly 'unused' disk space on your hard drives. 
If you want to securely erase personal data on your PC, Eraser can deal with both individual files and wiping supposedly 'unused' disk space on your hard drives.

If you want to permanently delete the contents of an entire hard drive, there are plenty of commercial products available, including the $50 Acronis Drive Cleanser (www.acronis.com), the $30 Paragon Disk Wiper (www.disk-wiper.com), or the $40 VCom Secur Erase (www.v-com.com). One freeware alternative is DBAN (Darik's Boot And Nuke), a self-contained boot floppy disk that you use to boot up the PC in question. It will completely delete the entire contents of any hard drive it can detect, making it ideal for use prior to disposal of a PC but highly dangerous in the wrong hands.

Since a number of passes are normally required for secure deletion, it may take some hours to completely wipe an entire hard drive using such utilities, but they should prove extremely useful if you or your company periodically disposes of old computers. If, on the other hand, you need to securely delete specific files, or want to 'clean up' the supposedly empty areas of your hard drives on a more routine basis, I can thoroughly recommend the Eraser tool (www.heidi.ie/eraser). It's free (although you can send a donation of a suggested 15 Euros to support further development) and can be be run on demand to delete specific files, folders or the empty areas of your drive, or be used inside Windows Explorer as a right-click option instead of the Recycle Bin or normal delete options. It also deals with 'cluster tips' (unused areas at the end of the final cluster used for each saved file, which may still contain data belonging to a file that previously occupied that cluster).

Clearing Junk

Even if your hard drive is healthy, it may be storing a considerable amount of junk data that you no longer need. Temporary Internet files, those left behind during software installs or by applications with multi-step Undo functions, old backup files and unwanted log files can soon amount to many megabytes unless you take steps to eradicate them. You may also prefer to remove evidence of your Internet surfing activities, including cookies and URL history files of sites you've visited.
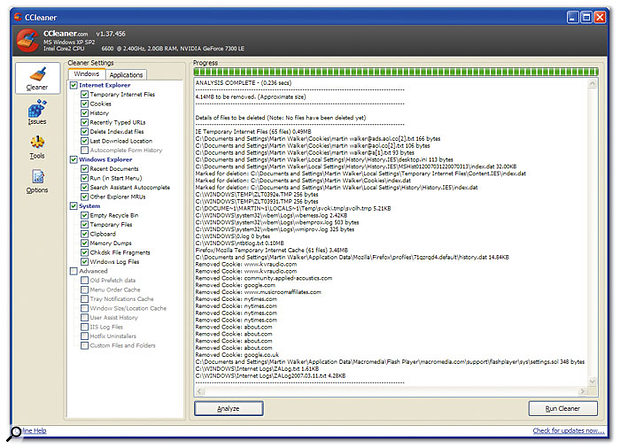
For routine clearing out of Windows 'junk' data, CCleaner is thorough and free! 
For routine clearing out of Windows 'junk' data, CCleaner is thorough and free!

Windows XP includes its own Disk Cleanup utility, but it's not very thorough. There are also plenty of commercial utilities that do better, but the one I regularly use and recommend is CCleaner (www.ccleaner.com), which runs with Windows 95, 98, ME, NT4, 2000, 2003, XP and Vista. It cleans the Windows Recycle Bin, Recent Documents, temporary files and log files, plus the temporary files, URL history and cookies from Internet Explorer, Firefox and Opera browsers.
CCleaner also deletes temporary files belonging to many third-party applications and offers optional secure deletion, with one, three or seven passes, so you're certain of removing sensitive data for good (although it doesn't eradicate the file names — Eraser is still more thorough in this respect). It also has a basic Registry cleaner (more on this shortly) and, best of all, it's totally free! The only area that CCleaner doesn't cover is comprehensive scanning for non-Windows junk files across all your drive partitions. If you want a good clearout of these, Iomatic's $30 System Medic is certainly versatile, offering a user-configurable list of junk-file types, plus separately configurable lists of Inclusions and Exclusions for specific folders, as well as a choice of which drives to include in your searches. Such a utility can deal with many unwanted files extremely quickly, but you have to be extremely careful what files you include in its scans. It's very easy to accidentally delete all your song backups, for instance!

Registry Cleaning

Your Registry is another area where a good spring clean may reap dividends, since it could potentially contain thousands of redundant entries. Some Registry entries may point to non-existent files, and may be deleted, or alternatively amended to point to the correct file, to avoid crashes.
Although I'm against disabling Windows Services, since the measured benefits are tiny but the risks of causing instability are great, my experience with Registry-cleaning utilities is rather different. I use several on a regular basis on my own PCs, removing rogue Registry entries, followed by Registry compaction, either using a tool built into some registry cleaners or the freeware NTREGOPT (www.larshederer.homepage.t-online.de/erunt), typically reducing the size of my Registry by around 10 percent. This can only improve Windows performance, but all the utilities I use provide backup options, so if necessary you can reverse any Registry changes you make.
In my experience, every Registry cleaner finds a slightly different collection of issues, so I tend to run each in turn. First up is Microsoft's own RegClean (no longer supported by Microsoft, but still available as a free download at www.soft32.com/download_239.html). It's by no means as thorough as most other tools, but can remove a significant swathe of redundant data on its first run and a smaller amount on subsequent runs.
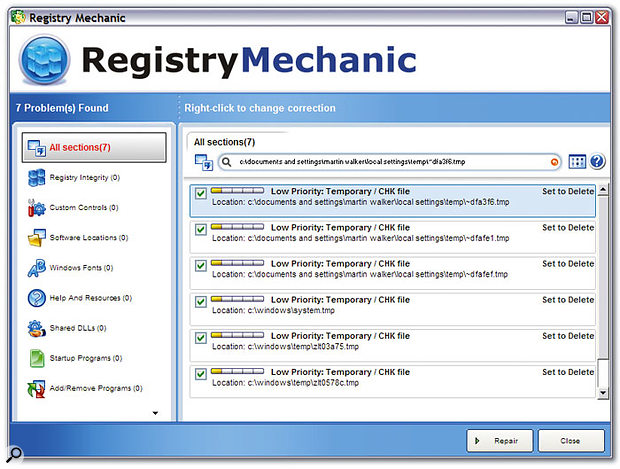
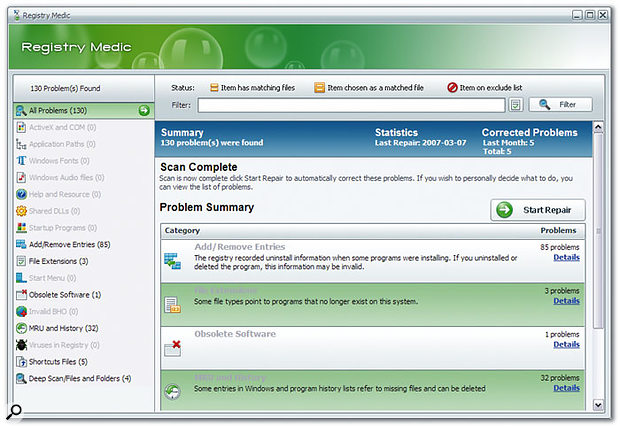
Utilities such as Registry Medic and Registry Mechanic will keep your Windows Registry free of redundant entries and references to non-existent files.Utilities such as Registry Medic and Registry Mechanic will keep your Windows Registry free of redundant entries and references to non-existent files.

Next up is RegSeeker (www.hoverdesk.net/freeware.htm), which, among its many other features, has a Clean function that always finds lots of unused extensions and 'open with' references, as well as references to non-existent files. Its excellent 'Find in Registry' function is handy or stripping out all old soundcard references that won't be removed by the standard uninstall routines.

The other two utilities I use and recommend are Iomatic's Registry Medic (www.iomatic.com) and PC Tools' Registry Mechanic (www.pctools.com). Registry Mechanic offers a Smart Update function to ensure you're using the latest version, a background monitor that you can use to spot unintended changes to your Registry (although for optimum performance it's wiser to disable this while running audio applications), an Optimise function for applying various registry tweaks and a Registry 'compacting' feature. Registry Medic has similar features.
Registry Medic.Registry Medic.


Published May 2007

Thursday, March 23, 2017

Q. How do I record an acoustic duo with my setup?

I have a small home setup based around a Yamaha AW4416 multitracker and a Focusrite Penta compressor. Usually, I just record myself, but I've agreed to record a demo for a female vocalist and her guitarist. The problem is that the guitarist has requested that he plugs his guitar (an electro-acoustic model) directly into my system. He wants it to sound like an 'amplified acoustic guitar', not an 'acoustic guitar through a mic'. Have you any idea what this might mean in practical terms? I don't have a separate DI box, only an instrument input on the Penta, with which I was planning to track the vocals. The artists have also said they don't like reverb on the voice, and they don't like compression. It seems that they're after a raw stripped-down sound, which I am tempted to believe is only possible with higher-end gear and a really good recording space. I have asked them to mention specific artists they want to sound like, but I'm not familiar with any of their suggestions.
James Pyot

Editor In Chief Paul White replies: There are a few points to cover here, so let's start with the acoustic guitar. If this has active pickups — that run on batteries — you can record it directly into a line input on your multitracker. If it has a passive pickup of some kind, then you'll need a high-impedance DI box, but these can cost as little as £20, although the more expensive ones tend to handle the low end with greater accuracy. The output of the pickups creates a harder sound than that produced when miking and acoustic guitar, so you shouldn't need to do much to the signal other than adding some compression and reverb. And this is the point where you will have to don your diplomat's hat.
Hanging duvets behind the vocalist will help to reduce the amount of unwanted room ambience being recorded, enabling you to add some sympathetic reverb at a later stage. 
Hanging duvets behind the vocalist will help to reduce the amount of unwanted room ambience being recorded, enabling you to add some sympathetic reverb at a later stage.

You said that your clients "don't like compression", but if you explain to them that you only need a hint of compression to even up the levels, they should be reassured. Using the same level of diplomacy, tell them that, rather than adding reverb, you're going to introduce a little simulated room ambience to make up for the fact that the guitar has been DI'd. An early reflections preset or ambience setting should create the right sense of space without adding overpowering reverb.

Now let's deal with the problem you have with tracking guitar and vocals simultaneously. As your Penta is a preset-based stereo compressor, with no option to split the stereo into two mono channels, you won't be able to record the guitar and the vocal simultaneously, even though it has separate inputs for instrument and microphone, as you rightly point out. However, using a couple of channels on your AW4416, you could record both tracks 'dry', then use the Penta to process them separately at a later date. Doing this will give you more flexibility, as you will be able to audition a number of different compression settings while playing your comped tracks back. (Remember to keep a backup copy of the original vocal!) Use automation to get the level as even as possible, then insert a compressor that trims off only four or five dBs from the peak levels, to take care of the final levelling. You can tell them that this is a normal approach for non-rock music and it will sound very natural. None of the people that they listen to will be recorded with no compression or reverb, even if it sounds that way to the untrained ear.

Finally, you mentioned your recording space posing possible problems. If you find that it's not dry enough, just hang up duvets in a 'U' shape around the back of the singer. Doing this should mop up most of the room reflections. Again, when adding the reverb back to the sound using software, pick a short, ambient type, to give the vocal some sense of space, as recording in a dry room will rob it of any spatial character. With any luck, these things should give you the raw sound you're after. As long as you let your clients vet the effect you add, they should be happy. Just try not to pick anything too obvious!


Published June 2007


Wednesday, March 22, 2017

Q. What's the best way to manage long digital cable runs?

By Chris Mayes-Wright
Merging Technologies' Onouris Long Distance Converter does exactly what it says on the tin, allowing ADAT optical signals to be carried up to 1km!Merging Technologies' Onouris Long Distance Converter does exactly what it says on the tin, allowing ADAT optical signals to be carried up to 1km!

I'm putting together a list of equipment for a venue. We already have a PA (the amps are behind the stage), and the mixing position is about 30 metres from the performance area, although the cable run is more like 40m, as it goes around corners and over doorways. Initially I wanted to use a digital desk, such as a second-hand Yamaha 01V96, and trail ADAT cables to the stage, where they would connect to a bank of Behringer ADA8000s for A-D and D-A conversion. However, I understand that ADAT's maximum cable length is 10 metres. What do you suggest as an alternative? I would still like to keep the desk digital and locate all the converters on the stage with the amps.

Simon Thomson

News Editor Chris Mayes-Wright replies: Well, there are a few options available at a range of budgets. You're correct to dismiss standard ADAT over those lengths, as you will lose timing accuracy, resulting in audible clicks and pops. However, there are products that allow you to 'bump up' the ADAT signal, using a converter and a different type of cable. The standard ADAT protocol uses Plastic Optical Fibre (POF) cables, which have a relatively high attenuation rate (up to 1dB per metre in the case of poor-quality cables), whereas glass optical fibre cables are much more efficient. Merging Technologies' Onouris Long-distance Converter, pictured right, enables cable runs up to 600 metres, although you may struggle to find a cable that long! A set of two costs £495 (you need one at each end of the glass-fibre cable), and a 50-metre cable will cost £180, but you'll need two. So for a full system to carry your signal to the front of the venue and back again, you're looking at just shy of £1000. And that's only for eight channels...

For those on a more strict budget, it is possible to carry digital signals over regular network hardware. Hear Technologies' Extreme Extender system converts the optical signal to a network connection, and back to optical again, with the 'ADAT In' and 'ADAT Out' models at each end of a regular Cat-5e network cable with RJ45 connectors. They cost $79 each (around £41 when we went to press) and will work with cable lengths of over 150m. www.heartechnologies.com/extender/extreme_extender.htm has full details.

Of course, there are other format-conversion options that you could consider. The one that springs to mind immediately is Multi-channel Audio Digital Interface (MADI), which uses a single 75Ω coaxial cable to carry multiple channels of audio up to 100 metres. The number of channels transmittable down the MADI cable depends on the equipment and sample rate, but the Audio Engineering Society's specification for MADI (AES10) states that it can accommodate 56 channels of 24-bit, 48kHz audio as standard. However, many manufacturers use spare bandwidth to squeeze in an extra eight channels, making 64-channel transfer possible at this rate (channel counts halve at double the sample rate). For the Yamaha 01V96, you can purchase Audio Service's MY16 MADI64 expansion card (www.audio-service.com), which will give the mixer MADI capabilities. Of course, you'll need an analogue-to-MADI converter to get your on-stage signals into and out of the desk. These are available from the likes of RME, Euphonix and Otari, but because they're designed for critical-listening applications, they can be quite pricey, and you may not be able to justify spending the money!

An alternative — which is probably the best, but definitely not the cheapest — is to purchase one of a new breed of desks that feature a control surface and 'mix engine' combination. Examples include Digico's D1 and D5 (www.digico.org), Soundcraft's VI6 (www.soundcraftdigital.com), and Allen & Heath's iLive (www.ilive-digital.com). These allow the mixer — usually a flashy affair with motorised faders and touchscreen displays — to be located in the usual mix position, while connections and conversion are handled by an on-stage unit. The two modules are connected by a data cable, and the only audio connection that's required is for the engineer's monitor mix.

This suggestion may very well be out of the question in terms of budget, but it should give you an idea of what's available. If I was in your situation, however, I would buy a multicore and an analogue desk!


Published January 2007

Monday, March 20, 2017

Q. Can you help me with my drum recording?

By Matt Houghton

I'm taking the leap into recording drums. I already have a basic drum mic kit, but I want to get some professional mics to make my recordings sound better. I also need more mic preamps, and I'd like some advice on how to process the recorded tracks to get the best sound. I currently use a PC with Cubase, and I have a handful of plug-ins already, but could afford to buy some more.

Mike O'Reilly

Reviews Editor Matt Houghton replies: You've raised a few different issues here, and it's a big enough subject to write a book about (and there have been many!) so I'll try to pull out the salient points.
A jazz kit miked up with three mics: although it can't be seen, the kick is miked with Audio Technica's dual-capsule AT2500, while a Neumann KM185 handles the snare drum. In this case, unusually, a Soundfield mic acts as a 'virtual' stereo pair, located directly above the drum kit. An alternative to the Soundfield in this case could have been a crossed pair of hypercardioids, but it was chosen partly to free up two channels on the multicore during this session, which was documented in SOS July 2003 and on-line at www.soundonsound.com/sos/ Jul03/articles/recordingjazz.asp. 
A jazz kit miked up with three mics: although it can't be seen, the kick is miked with Audio Technica's dual-capsule AT2500, while a Neumann KM185 handles the snare drum. In this case, unusually, a Soundfield mic acts as a 'virtual' stereo pair, located directly above the drum kit. An alternative to the Soundfield in this case could have been a crossed pair of hypercardioids, but it was chosen partly to free up two channels on the multicore during this session, which was documented in SOS July 2003 and on-line at www.soundonsound.com/sos/ Jul03/articles/recordingjazz.asp.

Let's start with the mics. You mention you have a drum-mic kit; you don't state the make or model but it should be broadly capable of doing the job. However, as you implied, it might be worth thinking about augmenting your collection as you progress, with mics such as the AKG D112 or Audix D6 for the kick, an SM57 or Beyer M201 for the snare, and a decent set of overheads such as, for example, AKG 451s or maybe the recently released Rode NT55s (cheaper than the AKGs but still pretty nice for the money, and handy as they've got a pad and a high-pass filter). I'm not urging you to spend on these mics now, but you should bear it in mind if you start to reach the limitations of your present setup.

On to mic technique. Take the number of recording engineers in the world, multiply it by the number of mic models, and you have an indication of the many different ways to mike up a drum kit. Few people agree on the best way to do it, but many agree that experimentations with mic placement, types and angles is the key.

If you are after a classic jazz drum sound, you can easily get away with three or four mics: one on the kick, one on the snare and a pair of overheads. In the 'old days', where solid low-end wasn't as essential as it is today, engineers would use a single room mic for a drum kit, and that's if it had a designated mic at all.

On the other hand, a classic rock drum setup can use many mics, possibly well into double figures: at least one on each piece of the kit (probably two on the kick and on the snare), a pair of overheads, perhaps a handful of room mics, and maybe something pointing down over the drummer's head too, for example. With this approach you create lots of options, and you can choose to leave tracks out if you have the capacity to do so.

It is perfectly possible to mic things up and EQ and compress the signal via the desk or insert plug-ins before things go into the computer. This approach will save you a lot of time during the mix, as you already know the different sounds will gel together, and you can play back the recording to the drummer to check (s)he is happy with it. You need to try different positions for the mics to get the right sound, but be sure to check for phase issues when using multiple mics (for example, on the top and bottom of the snare you'll probably need to flip the polarity of one of them).

Even with a good sound, it is worth ensuring you achieve good separation between the different elements of the kit: capture as much of the direct sound as you can from each piece, and try to reject as much of the other kit sounds as possible. Think about the polar patterns of the mics you're using: the lobe at the back of cardioid and hypercardioid mic patterns, for example, means that you need to be as careful about where you point the back of the mic as you do the front (the same reason why you see shotgun mics pointing down at the subject on a film set rather than horizontally at them, where they would pick up other sounds from the set).

Now let's consider the mic preamps. There are plenty of alternatives, including some cheaper options. It's worth asking yourself if you need great mic preamps on every channel. If you have a good signal on the pair of overheads, the snare, hi-hat and kick, you might get away with cheaper preamps elsewhere and free up money to invest in your four or five 'good' pres or in your plug-ins. My own preferred setup is an RME Fireface 800 with a Focusrite Octopre connected via ADAT. This works well but may be over your budget (though it also gives you eight outboard compressor/limiters!) and I've had decent enough results using a Behringer ADA8000 ADAT interface in place of the Octopre, or using a small Mackie VLZ Pro mixer as a rack of mic pres for the line inputs of my Fireface. For more information on ADAT expansion, check out SOS July 2006's Q&A section, where we explored the possibilities in depth.

So what do you do when you've recorded everything? Again, opinions are many and varied, but you'll need basic tools: a good EQ, a good compressor and a nice reverb or two. I don't have the space to go into detail, but as a rule, when processing it's important to check the sound in the context of the whole kit and the wider mix: boosting, cutting and otherwise mangling the kick might give you a great sound for the kick alone, but it needs to work well with the other sounds, and with the cross-bleeding original kick sound on the other channels.
Session drummer Gavin Harrison has to be prepared for all occasions. His setup consists of up to a nine-piece kit, for which he uses a pair of Shure SM57s on each snare (one on top, one below), Electrovoice ND408s on each of his five toms, a Beyer M88 on the kick drum, and Schoeps CMC5s as overheads. Check out his Readerzone feature in SOS October 1999, and online at www.soundonsound.com/sos/ oct99/articles/readerzone.htm. 
Session drummer Gavin Harrison has to be prepared for all occasions. His setup consists of up to a nine-piece kit, for which he uses a pair of Shure SM57s on each snare (one on top, one below), Electrovoice ND408s on each of his five toms, a Beyer M88 on the kick drum, and Schoeps CMC5s as overheads. Check out his Readerzone feature in SOS October 1999, and online at www.soundonsound.com/sos/ oct99/articles/readerzone.htm.

You'll also need to think about panning the tracks. Traditionally, the kick, hi-hat and snare are pretty much central, with the rest spread out either as the drummer or the audience sees the kit. Bear in mind that very wide panning often sounds unrealistic.

I tend not to compress things too much, athough setting up a drum buss compressor and feeding bits of the whole kit to it can help glue things together. The reverb is important, and unless you have a nice sounding room to record in, you'll want to try to record things quite dry, with little of the room sound in, and add ambience back in later with a reverb. Convolution reverb is great for the whole kit, but you might also want to consider sending the snare signal to a different reverb (perhaps a plate), with a decay setting timed so that the tail of the reverb dies off just before the next snare hit. Don't be scared to apply an unnatural amount of reverb on the snare: as long as it sounds good in the mix it's fine.

Next, what plug-ins should you buy? My favourites for this are those for the UAD1 platform, particularly the Pultec and Neve EQs and the Plate 140 reverb, but they may be a little expensive for you if you don't already have the UAD1 card. Personally, in your position, I'd be happy to make a start in Cubase using the built-in plug-ins and freeware such as Digital Fishphones' excellent Fish Fillets bundle and SIR's quite frankly amazing SIR convolution reverb. If you're on Cubase SX3 it may be worth paying for the upgrade — Cubase 4 's plug-ins are a significant step up from previous versions of Cubase. The new Channel EQ, Gate and Vintage Compressor are nice enough to give you decent results and I'd certainly recommend practising with these until you have a good feel for EQ'ing, gating and compression. An excellent addition to Cubase 4 is the Envelope Follower, which allows you to shape the envelope of different sounds — increasing the snap from the attack portion of the kick drum, while lengthening its 'boom', for example. But if you're still keen on splashing out, you should have a look at the plug-in feature in our February issue!


Published March 2007

Friday, March 17, 2017

Q. How do I adjust Velocity values of drum sounds in Cubase?

By Mike Senior
Cubase's Drum Editor allows you to edit velocity values for any individual instrument within a drum kit MIDI part, without affecting the velocities of the other instruments.  
Cubase's Drum Editor allows you to edit velocity values for any individual instrument within a drum kit MIDI part, without affecting the velocities of the other instruments.

I'm using Cubase and have I just bought the BFD plug in. I've programmed in all the MIDI notes for the drum part, but I now want to draw in the velocity for each note by hand (hi-hats, kick, snare, and so forth). When I go to draw, my actions affect the velocity for every MIDI note on that beat, even if I have only selected one note. I have been told that it possible to hold the Shift key in Pro Tools to draw in velocity values just for selected notes. Is there anything like that for Cubase?

SOS Forum post

SOS contributor Mike Senior replies: It sounds like you're trying to edit your drum parts using Cubase 's Key Editor, and this does indeed respond in the way you describe, when you 'draw' in the Velocity Controller Lane with the pencil tool. However, if you open up your drum part in the Drum Editor instead (right-click the MIDI region and select Drum Editor from the shortcut menu's MIDI submenu), the Velocity Controller Lane will only show velocities for notes of one MIDI pitch at a time.
Assuming that you're wanting to tweak just the hi-hat dynamics, all you have to do is select any hi-hat note in the main window using the pointer tool. This brings up only hi-hat values in the Drum Editor's Velocity Controller Lane, and you can then edit these with the drumstick tool. I tried this in Cubase SX2 and it worked fine.


Published February 2007

Tuesday, March 14, 2017

Q. What setup should I adopt?

I have just purchased a Macbook Pro and will be buying Ableton Live 6 soon. I have also bought a Korg Electribe MX1, with the intention of making house and techno music.
Next on my list is an audio interface, a pair of monitors and, if there's any change from £550, a controller. I've been looking at the M-Audio Firewire 410 and Focusrite Saffire interfaces, and either Tapco S5 or Fostex PM1 monitors. If I do have enough money for a controller, it'll have to be quite small, as I have a bedroom setup with limited space.

Ben Miller

News Editor Chris Mayes-Wright replies: I think you're on the right lines with the products you've mentioned in your question, but there are a few things to consider. Let's start with the audio interface. As you're using a laptop, it would be handy for you to get an audio interface that can be buss-powered, meaning that you don't need a dedicated power supply to operate it and you can use your system in a completely 'mobile' manner. Also, your Korg Electribe MX1 has four mono audio outputs — a main stereo output and a pair of assignable 'individual' outputs — so another consideration would be to ensure that you get an interface with at least four analogue inputs, so you can make the most of your MX1's output capabilities.
A rare case of less is more: Focusrite's Saffire LE has two more audio inputs than the higher-end model. 
A rare case of less is more: Focusrite's Saffire LE has two more audio inputs than the higher-end model.

And here lies the first problem: despite both the M-Audio Firewire 410 and Focusrite Saffire having four inputs and 10 outputs, two of each of those are used by the digital S/PDIF buss, and you'll need an analogue-to-digital converter to get all four of your Electribe's outputs into your computer. However, if you're not too bothered about the on-board DSP that the Saffire boasts, the cheaper Saffire LE (which has an RRP of £229, compared to £299 for the standard model) features the extra pair of balanced line inputs you need, plus the stereo S/PDIF and combination analogue inputs that its older brother has. The closest thing M-Audio have is the Firewire 1814, which is good, but a little over-specified for your purposes; besides, it would gobble up most of your budget, so I'd recommend checking out products from other manufacturers, such as Edirol and Emu, before committing yourself.

On to monitors then, and your initial thoughts about the Tapco S5s and Fostex PM1s. It's almost impossible to recommend a pair of speakers just from looking at the spec sheet, so the best advice I can give is to visit your local retailer and try some out with reference material that you're familiar with. Often, the retailer will have a listening room, but if you can twist their arm enough to get some speakers on loan, you're on to a winner. It may be the case that they'll only do this if you're spending top-dollar on some speakers so, within your budget, I think this option may be unrealistic, but it's always worth a try.

Considering that you'll probably have to spend around £250 on the audio interface (don't forget some decent cables), there should still be around £300 in your pocket. Monitors in this price bracket include the two that you've mentioned, plus models from Tannoy — the Reveal Active 5A, costing under £230 per pair including VAT; Alesis, with their M1 Active 620 (£300 in the shops); KRK (the RP6, at £299); Tapco, whose S8s cost £150 each; and Yamaha, whose MSP5s are discontinued but are still available at the larger retailers and are a bargain at £240 per pair.

At this stage, if you've kept within the budgets, I'm afraid to say that you'll be broke, with only a few pence left for some milk and bread and maybe a trip to the launderette; certainly not a control surface. But if you're in the market for one in the next few months, can I make you aware of the Presonus Faderport, which should have landed in the UK at the end of September. We haven't seen it in the flesh yet, but it promises to be a useful little gadget. It's a neat desktop unit with one motorised fader, transport control and a host of general workflow-enhancing buttons. The best thing is that it will cost just £159!

For house and techno, however, you'll probably want a swarming expanse of knobs so you can tweak those filters like there's no tomorrow. With this in mind, look out for Novation's Remote Zero SL, costing £229 (it's reviewed in this November 2006 issue). It has 16 knobs, eight faders and loads of assignable buttons, plus transport control and an impressive LCD. Usefully for you, as an Ableton user, its Automap software has a template for Live, so you can just plug it in to your Mac (it's class-compliant, too, so no drivers are required) and start making tracks. On the lower end of the scale, there are plenty of different models — from pad controllers to more knobby units — available from the likes of Akai, Kenton, Korg, M-Audio and Novation; visit their web sites for more information.

It's worth mentioning that, when buying your items you may be able to get a bit of discount if you buy them simultaneously. Purchasing like this often gives you a bit more leverage to haggle; think along the lines of "I'll buy this as well, if you throw in some cables".


Published November 2006

Saturday, March 11, 2017

Q. Why is my Dual Tube Channel so noisy? Is it a faulty unit?

By Hugh Robjohns
Mindprint's Dual Tube Channel (DTC) remains the top choice of many professional users. 
Mindprint's Dual Tube Channel (DTC) remains the top choice of many professional users.

I recently purchased a Mindprint DTC and I've noticed that it produces quite a lot of hiss. It is not so obvious to the ear at first but after individually compressing instruments and playing them together, it becomes quite nasty. Also, if you are monitoring the signal from the DTC, you notice quite a large amount of noise on the analyser. I purchased the 24-bit S/PDIF module to find the same happens there. Whilst I was sold this as a mastering tool I am wondering if this is a design flaw. I have read some good reviews (including yours from SOS June 2002), but on a few web sites, similar problems are mentioned. I have done all the regular troubleshooting, such as changing cables and checking the power distribution of my system, and it all looks fine. I am wondering why my DTC is so noisy and if it is supposed to be.

Chris Frost

Technical Editor Hugh Robjohns replies: This is tricky to answer without actually hearing the problem you are complaining about and knowing how you are using the product. However, the DTC remains a favourite processor of mine, and I've not had any serious noise problems when I've used it, so I would suspect either an operational problem or a faulty unit.

As it uses valves, it is possible that you have a faulty one, which could lead to excessive noise. Changing the valves is not difficult and replacements aren't expensive — but it might be worth getting the product properly checked-over by a qualified technician, in case anything more serious is wrong. Unlikely, but it's always best to get it checked.

Perhaps the more likely problem is an operational one. Setting an appropriate gain structure is important to optimise the signal levels through the unit. The other thing that intrigues me is that you say: "It is not so obvious to the ear at first but after individually compressing instruments and playing them together, it becomes quite nasty". Noise will always add and build in level, so processing individual instruments with the DTC will always produce a noisier result than simply processing the final mix. But I wonder if, in fact, you are over-compressing the instruments.

Ideally, you could send a short extract of some affected material, but it may be easier and quicker to get the unit checked-out or compared with another unit to make sure all is working as it should.
I've always found Mindprint to be helpful in resolving issues like this, so giving them a call might be a worthwhile step to take as well. Mindprint +49 6851 9050.


Published October 2006

Thursday, March 9, 2017

Can You Still Make Music With An Elderly PC?

By Martin Walker
Back in September 2000, this Pentium III 700MHz PC from Millennium Music was capable of running Windows 98SE, Cubase VST 3.7, quite a few plug-ins and a soft synth or two... and a similar vintage PC can still do so today. 
Back in September 2000, this Pentium III 700MHz PC from Millennium Music was capable of running Windows 98SE, Cubase VST 3.7, quite a few plug-ins and a soft synth or two... and a similar vintage PC can still do so today.
Many of us feel compelled to regularly change our PCs in line with the demands of the latest software. But, depending on our requirements, an older PC may still be more than capable of doing a great job, as PC Musician discovers this month.

As the demands of software on the computers that run it become heavier and heavier, musicians can feel obliged to change their hardware every couple of years or so, which means that we often have slightly elderly PCs lying idle, despite the fact that they could well still be suitable for music making, perhaps for a friend or relative. For other musicians who haven't yet taken the plunge into running a computer studio, an old PC that can still run certain music software might be just the thing to get them into the swing. But what minimum hardware specification do you really need to run audio and MIDI software? And can you still track down older software that was written for more modest hardware in the first place? Let's find out.

Modern Audio Software Requirements

Reading the packaging for a selection of recent software releases turned up typical minimum requirements of a Pentium/Athlon XP with a clock speed of 1.4GHz and 512MB RAM. However, the recommended specs were considerably higher — typically a Pentium or Athlon XP with a 3GHz clock speed and 1GB of RAM.

This huge difference is partly because developers don't want to dissuade owners of slower PCs from buying their products, but mainly because minimum specs are generally regarded as applying to the product used in isolation — ie. what an individual soft synth might realistically need. In practice, very few people are likely to run just one piece of software like this; most will need to run some sort of sequencer, plus whatever soft synths, samplers and effect plug-ins they need to complete their songs. I'm reasonably sure that the latter is what determines the recommended specification.

Delving deeper into my chronological software pile, I soon discovered soft synths released a couple of years ago whose packaging suggested a minimum of Pentium III/Athlon 600MHz processors and 256MB of RAM, with recommended specs of an 800MHz processor and 512MB of RAM. Looking back even further, through the SOS review archives, I found that Steinberg's Wavelab 1.6 audio-editing package only needed a Pentium 133MHz processor in 1997. Of course, back in 1997 we were still excited at the prospect of being able to run a single plug-in effect, and a reverb plug-in could consume all your processing power in one gulp. Nowadays, many musicians are creating entire songs in the virtual domain and may expect to run dozens of everything. As I've said before many times in SOS, plug-ins and soft synths eat CPU for breakfast.

Second-hand PCs

Until a few years ago, PCs that were about to be thrown out were probably not fit for further active duty, but nowadays most are still perfectly usable for many general-purpose applications and even music making. If you're strapped for cash and could make good use of an elderly PC, letting friends and family know will often result in something suitable turning up. Alternatively, most towns and cities have at least one computer shop that offers low-cost 'second user' PCs with some sort of guarantee. Such shops are also a good way to find out if there are any computer clubs in your area (another good source of older computers).

If, rather than looking for an older PC, you have one that you're about to dispose of, don't just throw it into a skip. A far better solution is to donate it to a good cause. You can contact an organisation that recycles PCs (a good list in the UK can be found at www.itforcharities.co.uk/pcs.htm) or offer your hardware directly on the Donate A PC website (www.donateapc.org.uk).

Real-Time Audio and Treatment

Having said that, if you're recording acoustic/electric instruments onto audio tracks, perhaps tweaking them with a few plug-ins, with maybe some MIDI tracks outputting to a clutch of hardware MIDI synths and keyboards, your PC specification needn't be very ambitious. Many musicians build up multitrack songs primarily using audio tracks, and a typical 7200rpm hard drive can manage to record and play back 60 or 70 24-bit/96kHz tracks before running out of steam, yet still require comparatively little processing power. So those who need few plug-ins (perhaps an EQ and compressor on each of a couple of dozen tracks) could get away with an entry-level PC. It's difficult to provide an exact specification, because this depends on what combination of plug-ins you want to run, but a sensible baseline spec would be a 2001-vintage Pentium III 1GHz or equivalent machine with perhaps 512MB of RAM. I would team this with Windows XP and a couple of hard drives (one for system duties and the other dedicated to audio storage).
If you're happy to run Windows 98SE instead of Windows XP (see the 'Which Operating System' box for advice on operating systems) you could probably get away with an even older PC — I'd recommend a Pentium III 700MHz model with 256MB of RAM. You'd still be able to run a few soft synths from the same period on such a machine, but modern ones would probably struggle. However, if you wanted to add synths to your songs using a modest PC like this, sequencing external hardware MIDI synths is the way we all used to do it until a few years ago (before soft synths became so capable), and MIDI consumes very little in the way of resources, as we shall see later on.

Which Operating System?

Windows XP has proved to be by far the best Microsoft operating system to date for musicians — after all, it was the first to take multimedia performance really seriously. By comparison, Windows 98SE required far more tweaking to run audio applications successfully, although there are still plenty of musicians running this operating system, simply because once they'd finally got it tweaked to work well with audio recording/playback they were loath to abandon a smoothly-running system.
Although tweaks such as finding the most suitable Virtual Memory settings were far more critical to smooth audio recording and playback than the equivalent Paging File settings in Windows XP, Windows 98SE nevertheless remains the most suitable operating system for PCs that are slower than a Pentium II 450MHz and have less than 256MB of RAM. 
Although tweaks such as finding the most suitable Virtual Memory settings were far more critical to smooth audio recording and playback than the equivalent Paging File settings in Windows XP, Windows 98SE nevertheless remains the most suitable operating system for PCs that are slower than a Pentium II 450MHz and have less than 256MB of RAM.

 If you've got an older PC, it may well already be running Windows 98, and you may wonder whether it's worth upgrading to the more recent XP. I think this depends on several factors. If the PC seems to be running smoothly and the music software you propose to use is also compatible with Windows 98, perhaps it's best to leave well alone, unless you run into problems. However, do make sure you have the SE (Second Edition) version, which has better USB and Firewire implementation and multimedia performance.

I also don't think it's particularly wise to install Windows XP on anything less than a Pentium II 450MHz machine or equivalent with 256MB of RAM, but if you only require a PC to record and play back audio tracks and don't need any soft synths, and either a very few or no plug-ins, you may be able to get away with a much more modest PC than this — in which case Windows 98SE is a more sensible proposition.
Another reason for sticking with Windows 98SE is if the PC in question already has a perfectly good soundcard installed, which you wish to carry on using but which doesn't have Windows XP drivers. Conversely, if you're about to buy a modern interface to partner with your old PC you may have to install Windows XP, as many manufacturers have abandoned writing Windows 98 drivers for modern audio interfaces.

A completely different approach is to use the Linux operating system, but although this is freely available (and we host a dedicated Linux Music area among the SOS Forums), not everybody has the time or the inclination to learn a completely new operating system. Nevertheless, Linux has plenty of enthusiastic followers, so I've provided several links elsewhere to SOS articles that can help get you up to speed.
Finally, the earliest MIDI sequencers for the PC were DOS (Disk Operating System) only, pre-dating the graphic interface of Microsoft's Windows altogether. Because each DOS application took over the PC rather than running alongside others, their timing could prove better than Windows sequencers, where multiple threads jockey for position. However, apart from abandoning the graphic interfaces that we're now so used to, using DOS would require a suitable pre-Windows MIDI interface and some knowledge of arcana such as I/O addresses, so DOS sequencing probably remains the domain of the enthusiast or the determined.

Audio Recording & Playback Only

Some musicians don't need to run any plug-ins or soft synths at all. For instance, there are plenty of engineers recording live performances who get the sounds right at source with careful mic positioning and therefore don't even need to use EQ plug-ins. Many classical engineers also avoid compression if at all possible. If you're only interested in recording, playing back and mixing audio tracks (using your PC like a glorified tape-recorder), a modern PC is an unnecessary luxury, and even the slower hard drives of yesteryear should manage a few dozen simultaneous tracks at 24-bit/96kHz, given a suitable audio interface.

Using Windows 98SE, I suggest a sensible baseline spec of a 1997-vintage Pentium 200MHz processor or equivalent, plus 64MB of RAM, although a 300MHz CPU would probably be a more sensible option that would enable you to run the odd few plug-ins when you needed to. If you want to install Windows XP, a 1999-vintage Pentium II 450MHz machine or equivalent with 256MB of RAM is more suitable, as XP can struggle on a lesser PC.

We're now starting to consider computers that are up to nine years old, so it's an ideal point in the proceedings to discuss another dilemma: whether to reformat their hard drives and reinstall both Windows and software from scratch, or just to leave well alone and install whatever new music software we need.
Can You Still Make Music With An Elderly PC?Some audio interface manufacturers, including Lynx and Echo, still offer Windows 98 drivers on their web site for older products such as the Lynx One and Mia shown here, but others don't, so always check driver availability before choosing an audio interface for an older PC. 
Some audio interface manufacturers, including Lynx and Echo, still offer Windows 98 drivers on their web site for older products such as the Lynx One and Mia shown here, but others don't, so always check driver availability before choosing an audio interface for an older PC. 

Given that PCs generally accumulate lots of software junk over the years, with an older PC it's probably sensible to at least clear this out and uninstall the applications that are no longer required. However, the uninstall routines on Windows 98-vintage PCs were notoriously bad: some left lots of detritus behind, while others were too enthusiastic and deleted shared files that were still required by other applications, so be careful. The most sensible approach is to first use an image-file utility such as Drive Image, Norton Ghost or Acronis Backup to capture an image of the current Windows partition before you start deleting stuff. Then if you later find you've disposed of something you needed after all, you won't have to panic.

If you're intending to use an older PC as an audio recorder, you may be lucky enough to have one with a suitable audio interface already installed. Although today's converters do generally sound better, you could buy PCI soundcards with very decent audio quality from about 1997 onwards (my first was Echo's 20-bit Gina), and by about 2001 there were quite a few budget models capable of high-quality 24-bit/96kHz audio recording and playback. PCI soundcards predominated until about 2002, when USB 1.1 devices began to appear, and then M-Audio's Firewire 410 was one of the first budget Firewire audio interfaces to appear, in late 2003.

If, on the other hand, this is a PC donated by a non-musical friend or colleague, you may need to buy a suitable audio interface for it, and if it's running Windows 98 you'll need to get one with compatible drivers. A few older audio interfaces still being sold today have Windows 98 drivers, although it's hardly surprising that nearly all models introduced since about 2004 only support Windows XP, so bear this in mind when choosing. However, you don't need to compromise on audio quality — the excellent Lynx One soundcard (that I reviewed in SOS November 2000) still provides superb audio quality, yet has drivers available for Windows 95, 98, ME, 2000 and XP.

It will probably prove a lot easier to stick with PCI soundcard models, as there were a lot of issues with some early motherboard USB ports. Firewire support is even patchier than USB on older PCs: the first PC I bought with motherboard Firewire support was in 2003, and even today Firewire support isn't automatically included on motherboards. However, you can buy Firewire-to-PCI adaptor cards (see this month's PC Notes for a more detailed discussion on this topic) to add Firewire support, and if the adaptor card in question has Windows 98 drivers you can, of course, use it on an older PC running this operating system.

If you have an old soundcard without its Windows 98 drivers (a common situation with vintage eBay purchases), don't assume you can rely on the generic driver-download web sites (such as www.driverguide.com, www.windrivers.com, and www.driverzone.com): you'll find very few drivers there for quality soundcards and interfaces. Some audio interface manufacturers maintain archives, but not all.

All of which brings us neatly back to the reformat/leave alone debate. If you're considering reformatting the hard drive and reinstalling Windows 98SE from scratch, you should first make sure that you've either got a copy of the interface drivers, or that they are still available from the manufacturer's web site, otherwise you might find yourself in a pickle.

The Absolute Minimum-spec Music PC

When is it still worth upgrading an old PC, and when should you call it a day?
Back in 1996 I recommended a minimum of a 66MHz 486DX2 processor and 16MB of RAM to successfully run Windows 95, but soundcards at that time only supported 16-bit audio formats, while audio quality was nowhere near that of the 16-bit DAT recorders of the same period. Moreover, although the final version of Windows 95 added support for USB peripherals, there were few devices around at the time to take advantage of it.

So unless you're putting together a machine purely for the sake of nostalgia, I strongly recommend you work with Microsoft's Windows 98SE operating system, which had far more robust USB support, or the more recent Windows XP. This determines the cut-off point beyond which it simply isn't worth trying to resurrect an old PC.

In 1998, when Windows 98 was first released, Microsoft quoted a minimum spec of a 486DX 66MHz processor and 16MB of RAM, but this was extremely optimistic. A far more realistic spec, in my opinion, is any Pentium 200MHz processor or equivalent, plus 32MB of RAM. This, for me, is the minimum spec a PC needs to be at all useful to the musician.

MIDI Recording and Playback Only

If you've got a collection of hardware MIDI synths and keyboards and want to run a MIDI-only sequencer with no audio recording facilities, you can get away with a very low-spec PC. After all, a few musicians are still running Atari ST computers with an 8MHz clock speed at the heart of some complex hardware MIDI setups!

However, you have to be careful. Back in 1996, I upgraded from one version of Cubase Score, which had run happily on my the 486DX33 (33MHz) PC I was using, to one that added basic stereo audio support, and found that my PC almost ground to a halt, even when I was only using the Cubase MIDI facilities. This was because the software was optimised in a very different way to achieve smooth audio recording and playback. Later on, when Steinberg released Cubase VST 3.55, they added a 'Disable Audio Engine' feature for this reason, to suit those musicians who still relied totally on MIDI but who wanted to upgrade to the latest version of their favourite application.

So although MIDI itself takes few resources, and MIDI-only software likewise, don't assume you can use a modern MIDI + Audio sequencer on an old PC and just ignore the audio parts. The perfect solution might be to track down someone who still has an early version of your favourite sequencer with minimal audio support, or (possibly even better) an elderly MIDI-only version. It's a shame developers don't keep a few of these as freebies on their own web sites, but of course they much prefer that we buy the latest and greatest versions!

Using An Old PC Alongside A New One

If you have an elderly PC that you're about to press into service, you don't, of course, have to use it in isolation — it can instead be run alongside a newer and faster model, although you will have to keep an eye on overall acoustic noise levels in your studio. Here are some suggestions on how you could use a second computer, starting with scenarios that require a fairly powerful model and ending up with those that will suit more modest machines:
  • Use it as a stand-alone soft synth PC, supporting the main music PC, connected either by MIDI, audio, or network. As discussed in the main text, the quoted minimum requirements for a soft synth tend to be what's required for the synth alone, so you can use these as a guideline to how powerful your slave PC needs to be to run a particular model. If the synths you want to run are only available as VST Instruments you'll also need a simple application to host them, such as Xlutop's Chainer (www.xlutop.com), Brainspawn's Forte (www.brainspawn.com), or Steinberg's V-Stack (www.steinberg.de). If both PCs already have a MIDI and Audio interface, the easiest way to connect the two is via a MIDI cable, or you could network them. For more information on networking music PCs, look no further than our feature in SOS August 2005 (www.soundonsound.com/sos/aug05/articles/pcmusician.htm).
  • Use it as a stand-alone software sampler running an application such as Tascam's Gigastudio, Steinberg's HALion or NI's Kontakt. In this role, the emphasis tends to be more on hard drive streaming of audio rather than the performance of the CPU, so older and slower PCs will still cut the mustard as long as they have a reasonably large and fast hard drive and a reasonable amount of RAM. This is especially true if you ferry the audio back to the main PC via a network or ADAT connection to add plug-in effects, rather than doing it in situ. This approach also neatly bypasses the inevitable conflicts of attempting to run both sequencer and stand-alone software sampler on the same machine.
  • Use it to safely connect to the Internet, and for word processing, accounts, downloads, and so on, connected to your main music PC via a network cable. If you don't have the main music PC powered up when you're on-line with the Internet one, there's no way any virus or other nasty can infect it, and when you're no longer on-line you can power up and transfer music updates.
  • Use it as a way of storing backup files from your main PC. This approach is always safer than keeping backups on a different hard drive on the same computer, and is also an ideal scenario if you want to try Wireless (WiFi) networking, since you can then store the backup machine in another room, the garage, or even the loft, where its noise contribution won't matter. It doesn't need to be a powerful machine, either, just as long as it has enough hard drive space for your needs. The only thing to bear in mind is that, like all mechanical devices, hard drives can eventually wear out. However, fitting a new 200GB drive will cost under £50.

Software With Modest Requirements

If you're about to equip an elderly PC with music software, the obvious first port of call is musical friends who may still have old versions of their existing sequencer that they can pass on, along with any dongles and update files. I can't see that developers can grumble about this if the products in question have been long out of commercial production. There are also plenty of entry-level sequencers bundled with audio interfaces that might do the job for you.

Another approach is to look at entry-level versions of flagship sequencers such as Cubase, Sonar and so on — although, as I often remind people in the pages of SOS, even these are surprisingly powerful for the price, and therefore benefit from a reasonably fast PC. For instance, a 1.4GHz Pentium/Athlon processor and 512MB is recommended for Cakewalk's Sonar Home Studio, but you ought to be able to get away with a Pentium III 1GHz and 256MB of RAM if you don't require a lot of audio plug-ins. For Cubase SE, Steinberg recommend a Pentium/Athlon 2.8GHz machine with 512MB of RAM, but the software will run on 800MHz processors and 384MB of RAM at a push.
You can still buy MIDI-only software for the PC, such as Voyetra's Record Producer MIDI (shown here) which only requires a Pentium II 233MHz processor and 64MB of RAM when running under Windows 98SE. 

Digidesign's Pro Tools Free for Windows 98/ME runs on Pentium III-vintage machines, while some musicians have also reported success with Pentium II 300MHz machines — and, unlike the rest of the Pro Tools range, this software runs with any audio hardware. Sadly, it's no longer available at the Digidesign web site as a free download, but if you can find someone who downloaded it, it's worth getting a copy from them, since the software supports eight audio channels and 48 MIDI channels, includes EQ, compression and limiter plug-ins, and of course provides a version of the famous Pro Tools interface.

Mackie's Tracktion 2 specifies a Pentium III, 256MB of RAM and Windows 2000/XP, and has proved very popular for its ease of use and clear, single-screen interface, while Audacity (http://audacity.sourceforge.net) is a free audio editor/recorder that I reviewed in SOS July 2004. As well as being freeware, it can also run on Windows 98, ME and 2000, as well as XP. Even better, for our purposes, the minimum spec is an extremely modest 300MHz processor and 64MB of RAM. However, it doesn't support the ASIO driver format, so isn't suitable if you need low latency. Nevertheless, for those only requiring audio recording and playback, it could be just the job.

Other modest audio applications include the $45 Goldwave and $55 Multisequence (www.goldwave.com) and Tracker loop-sequencing software (which I covered in my PC Music Freeware feature — see the 'Further Reading' box). In his SOS July 2003 review of Making Waves Studio (www.makingwavesaudio.com), Mike Bryant reported that a Pentium I with 16MB RAM would suffice, yet MW Studio provides a lot of features for its £80 download price, and the MW Audio version, with simpler stereo audio but 1000 MIDI track support, costs only £20.

I also highlighted plenty of other more modest applications in my SOS April 2005 feature, 'Easier Alternatives To Flagship Music Apps' (see the 'Further Reading' box). MIDI-only software can still be bought if you search for it: For example, Voyetra's Record Producer MIDI (www.voyetra.com) supports up to 1000 MIDI tracks, SMPTE for syncing to other gear and lots of MIDI-based effects, for just $24.95. It only requires a 233MHz Pentium II processor and 64MB of RAM, or a 400MHz Pentium and 128MB RAM if running under Windows XP. So please don't take your old computer to the skip when it's been replaced by a shinier, faster model — one way or another, there's definitely life in the old dog yet!

Further Reading


Published December 2006