No Limit Sound Productions
Welcome to No Limit Sound Productions. Where there are no limits! Enjoy your visit!
Welcome to No Limit Sound Productions
| Company Founded | 2005 |
|---|
| Overview | Our services include Sound Engineering, Audio Post-Production, System Upgrades and Equipment Consulting. |
|---|---|
| Mission | Our mission is to provide excellent quality and service to our customers. We do customized service. |
Thursday, October 23, 2025
Wednesday, October 22, 2025
Steinberg Cubase Pro 12
Cubase gains new features and dispenses with the dongle.
Cubase’s substantial and diverse user base might have had to wait a few months beyond Steinberg’s regular end‑of‑year update cycle, but version 12 is now with us. Of course, in its Pro form, Cubase has been a sophisticated, feature‑rich music production platform for many years. So what have Steinberg added to v12 to improve upon their already‑impressive flagship product and to tempt existing users, and potentially new ones, to invest?
Licence To Roam
I’ll get to Cubase Pro 12’s list of additions in a minute but perhaps the item that caused the most chatter online prior to launch was actually something Steinberg was taking away; licensing via a dongle. USB dongles are something that engender very mixed feelings. If you primarily work in a fixed studio space (as I do), it’s perhaps not so much of an issue but, for those who are more mobile, looking after a dongle (or three) when you move between locations can be problematic.
Of course, all developers have to protect their software from piracy, but Steinberg obviously feel that that can now be done effectively without the eLicenser key. With v12, activation is linked to your host computer and you can activate on up to three different machines under a single license. This worked very smoothly for me when installing Cubase Pro 12 (although some users did report issues immediately after the launch, presumably caused by Steinberg’s servers being inundated with update requests) and I was able to install and activate on both my main studio machine (under Mac OS) and on a Windows‑based laptop I occasionally use for mobile work, without any problems. For understandable pragmatic reasons, Steinberg are planning to transition their other major software titles to the new licensing system as each goes through its own update cycle. Users of WaveLab or SpectraLayers, for example, will therefore have to wait a little longer to be completely eLicenser‑free, but it is coming.
Silicon Tally
Dongle‑free licensing aside, what’s new in Cubase Pro 12? Sensibly, Steinberg have adopted an evolutionary approach rather than a revolutionary one (existing workflows therefore remain intact) but, as befits a whole number upgrade, there is plenty of ‘new and improved’ to discuss.
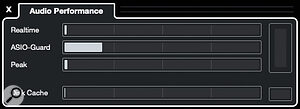 The Audio Performance meter has been improved — but Cubase 12 doesn’t seem to place any noticeable additional burden on your host system.For example, Apple‑based users will welcome the news that Cubase 12 has native support for Apple Silicon. That said, for those with a M1‑powered Mac, Rosetta is likely to remain a fact of life (albeit a fairly innocuous one) for a while yet as music software developers gradually embrace the chip format. It’s also worth noting that, amongst the brief ‘requirements’ list for Cubase 12, Steinberg’s website lists Mac OS Big Sur or Monterey. However, early user reports suggested plenty of folks running quite happily on older Mac OS iterations such as Catalina. For Windows‑based users, 64‑bit versions of either Windows 10 or Windows 11 are supported. Both Mac and Windows installs require 70GB of free storage space, and a minimum 8GB of RAM is suggested.
One further benefit of the new, dongle‑free licensing arrangements is that a trial version of Cubase is now possible. It was still listed as ‘coming soon...’ at the time of writing, but obviously will mean you can test Cubase 12 on your own hardware/OS without risk prior to making a purchase decision.
Software developments will, eventually and inevitably, leave older host systems behind. However, in use, Cubase Pro 12 felt very responsive on my now ageing 2013 iMac during the review period. Running some of my existing v11 projects under v12 created no obvious problems; if my experience is anything to go by, Cubase Pro 12 doesn’t seem to place any noticable additional demands on your computer host compared to v11.
You Hum It, I’ll Play It
Specific new additions or improvements may have differing appeal to different users but, in scanning Steinberg’s ‘what’s new?’ list prior to actually launching Cubase Pro 12, the new Audio To MIDI Chords option particularly caught my attention. The concept is simple enough; drag any audio recording to the Chord Track and Cubase will then analyse the audio, identify the underlying chord changes within it (this takes a few seconds), and place those changes as chord events within the Chord Track.
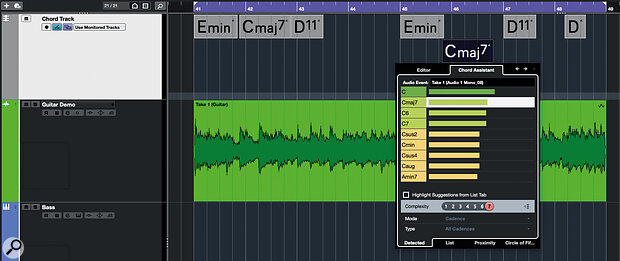 The Audio To MIDI Chords feature requires just a simple drag and drop operation, while the Chord Assistant’s new dedicated tab streamlines any subsequent finessing required after Cubase’s initial chord identification.
The applications are obvious. For example, those with limited music theory might use it to analyse a full mix or instrumental backing track to get a start on unpicking the key/chords, either for educational purposes, or to assist in any later remixing, mash‑up, or top‑line additions. You might also use it to extract the chords from a piano or synth loop so you can build other musical elements around it. Personally, however, I’d use it as a workflow enhancer to get the Chord Track populated with the chords from a new idea captured as a guitar recording (my instrument of choice), before dragging those chords off to something like Toontrack’s EZkeys or EZbass to flesh out the idea. Manually entering chords into the Chord Track is straightforward enough but can also be time consuming; having Cubase do this for me automatically is a very attractive prospect.
So, the concept is appealing, but does it actually work? Amazingly (well, I think it’s pretty amazing given what must be going on under the hood), the answer is mostly ‘yes’. Can you fool it with complex chords in a busy mix, weird chord extensions in a complex jazz piece, or bit of prog‑based strumming? Yes, you can. Might you sometimes find yourself having to go in and fine‑tune the automatic chord identification? Yes, you will.
However, even with these qualifications, the process works remarkably well. I tried it with the aforementioned guitar parts, some synth loops and some full mixes (my own and some well‑known commercial releases). As you might expect, the more straightforward the original performance, the more accurate the chord identification is likely to be but, whether perfect or not, as way of getting a first pass at the chord changes, and their entry into the Chord Track, this is a heck of a trick. In addition, even if you do find yourself needing to then finesse the results, editing chords within the Chord Track has been enhanced, with the Chord Assistant now including a new Detected tab. This gives you a prioritised list of chord alternatives that can easily be auditioned to see if they provide a better musical fit to the first choice that Cubase made on your behalf.
If your workflow doesn’t make use of the Chord Track, or your ear training is good enough to work out the chordal structure of a piece of music without any assistance from software, then this feature might not be such a big deal. For everyone else (myself included), this is a super‑useful addition and it’s available to Pro, Artist and Elements users.
Remote Control
Cubase has included support for external MIDI controllers for a very long time. Some of the previous features remain as legacy options, but the new MIDI Control Surface Editor and the associated Mapping Assistant, both accessed via a dedicated tab within the Project window’s Lower Zone, represent a considerable revamp. Preset configurations are included for a small number of popular controller devices, but a key aim of the new system is to make it easy for users to create their own preset for whatever controller device (or devices; the system support simultaneous use of multiple controllers) they have connected.
 The new MIDI Controller Editor and Mapping Assistant features — including the new Focus Quick Controls — provide a significant step forward for external MIDI controller integration.
This is a three‑step process completed via the new MIDI Remote tab within the Lower Zone. First, on opening this tab, you can click on the large ‘+’ icon to add a new controller and identify its appropriate MIDI ports. Second, you can then use the new MIDI Controller Surface Editor to graphically recreate the appropriate combination of buttons, rotary knobs and faders available on your hardware device. The editing tools let you easily position and scale individual controls to reflect the actual hardware layout. However, the key element of this second step is to establish links between each of the actual hardware controls and their respective graphical representations. A well‑implemented MIDI Learn system makes this one‑time process very straightforward.
The third step is where you link a Cubase control/command to each of the buttons, sliders and knobs. The new MIDI Remote Mapping Assistant dialogue lets you step through each of the controllers and, via the dialogue’s Functions Browser panel, link it to a Cubase command option. It’s both easy to do and flexible and, start to finish, I had the faders, buttons, transport controls and rotary knobs on my Novation Impulse controller configured in just a few minutes. This is a massive step forward from the previous Generic Remote system.
A new element introduced as part of this revamp is the appearance of what Steinberg have termed Focus Quick Controls. If your controller includes a set of eight rotary CC controllers (as my Impulse does), assigning these to the new Focus Quick Controls is particularly useful. Essentially, Focus Quick Controls automatically remap themselves to the Quick Controls of either the selected (‘in focus’) track or plug‑in window. There are options to lock the focus, or to give it either track or plug‑in priority, but the system is incredibly easy to use and seems more consistent than the previous Quick Control iteration.
For track‑level Quick Controls, you can still specify the targets via the Project window Inspector panel. However, rather brilliantly, a new QC button is located top‑right of every effect or instrument plug‑in window (whether Steinberg or third‑party) and these pop open a panel where you can define your plug‑in‑specific Quick Control targets. Once done, the rotary knobs on your hardware controller automatically ‘focus’ on the Quick Control assignments of the currently selected track or plug‑in window. It just works and, if your MIDI keyboard doesn’t currently include eight rotary knobs, this may be a good enough reason to add one that does.
Oh, and the final icing on the cake is that, for any connected controller, you can define multiple mapping pages. While you can only use one at any one time, you can easily switch between them; if you want different mappings for different types of task (for example, recording and mixing), that can easily be done.
Scale New Heights
Steinberg added the Scale Assistant functionality to the MIDI Key Editor in Cubase 11. It both speeds up routine MIDI editing (out‑of‑key notes can be avoided) and makes it easier to experiment with note combinations when creating harmonies/chords.
For the Pro and Artist editions of Cubase 12, exactly the same Scale Assistant functionality has now been added when editing audio pitches using VariAudio within the Sample Editor. This allows you to choose between the scale defined within the Chord Track or a scale selected within the VariAudio editor panel. If you go with the latter, then you can also specify the key/scale or choose from some options suggested by Cubase on the basis of the notes identified within the audio event being edited. You also get the same Scale Assistant options to change the note lane shading to emphasise the notes within the scale, enable pitch snapping when editing, and to pitch quantise selected notes.
 The Scale Assistant is now available within the VariAudio system.
Whether it’s to assist your music theory, or simply to get to the correct notes faster, Scale Assisted audio editing brings a welcome workflow enhancement. And, while pitch quantising can obviously be used as part of your pitch‑correction process, where it really shines is in the speed/freedom it brings to experiment with either changing a melody or creating a harmony to a melody. In either case, with Snap Pitch Editing engaged, you instantly know that any edits you make will stay in key. It’s very slick and, given VariAudio’s excellent pitch‑shifting algorithms, the results can be very impressive indeed.
Request A Raise
Cubase’s stock plug‑in collection includes a range of very effective dynamics processors but, for Pro users, v12 adds a further single‑band option: Raiser. Described as a versatile limiter, as shown in the screenshot, the UI includes options that are familiar from earlier plug‑ins such as Maximiser or Brickwall Limiter (for example, Detect Intersample Clipping). However, there are also some different elements and Steinberg are keen to emphasise that Raiser offers some unique release time options.
The latter include very fast release times (you can specify a Time setting of 1.0ms), and a Fast button that provides a two‑stage release (an initial very fast phase followed by a second phase controlled by the Time setting). The Release drop‑down menu provides a number of different modes including Manual, Auto and Aggressive. There’s no threshold control; you simply use the Gain control to drive the input up against Raiser’s fixed threshold to get the peak limiting to kick in. The display gives a real‑time indication of the gain change upon the waveform and, interestingly, the release behaviour. This provides very useful visual feedback as you set the Release speed.
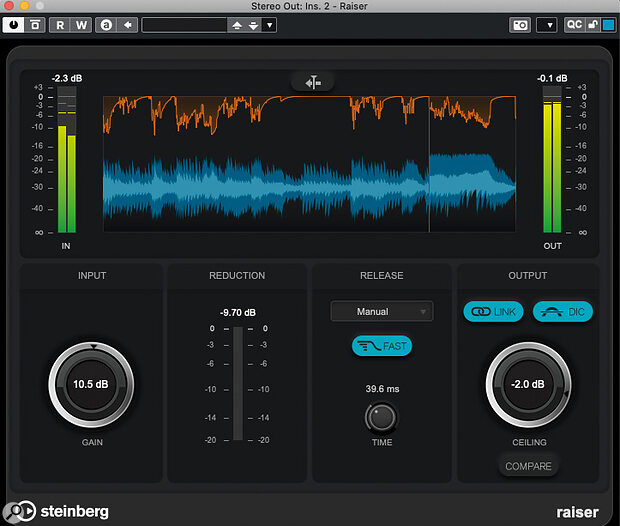 Raiser: things might get loud!
In use, Raiser makes it very easy to, er, raise the level of almost any type of signal. It works well on an individual instrument/vocal, a bus, or as a final limiter on your main stereo output. By balancing the input Gain and release Time controls, you can go from gentle, smooth dynamics control right through to very aggressive (and much louder) treatments. The Compare button lets you A/B the original and processed signals without the added loudness so you can also easily check for any undesirable consequences of the processing without being sucked in by ‘louder equals better’.
That said, things can get remarkably loud before the sonic consequences become obvious; as a means of levelling out a very dynamic source to ensure it sits consistently within a mix, Raiser does an impressive job. If supervised by SuperVision’s loudness metering, it’s also a very handy tool for fine‑tuning the overall level of a mix. And, whatever algorithm Steinberg have developed here to allow Raiser to operate with such fast release times, it’s not at the expense of latency; an instance of Raiser only added 2.6ms to the signal chain on my host system.
All Mod Cons: FX Modulator
 FX Modulator: tempo‑sync’ed multi‑effects with modulation in an easy‑to‑use format.
Raiser is not the only new plug‑in though; Pro and Artist users also get FX Modulator. This is essentially a multi‑effects unit where you can build your own six‑slot effects chain from a choice of 14 different modules. These include Filter, Volume, BitCrusher, Overdrive and Reverb amongst some modulation and frequency‑based effects. You then get to modulate key parameters within each module via parameter‑specific LFO curves, with curve presets, manual curve editing, and control over the time‑base for the curve cycling.
There is perhaps nothing drastically new about any of the individual effects modules, but the tempo‑sync’ed modulation is powerful and allows you to get very creative in terms of sound design. This is very much along the lines offered by third‑party plug‑ins such as Output’s Movement, Sugar Bytes’ Looperator or Turnado or Lunatic Audio’s Narcotic. FX Modulator is perhaps not as deep as some of these, but the straightforward UI is very accessible and encourages experimentation. While you can use it for subtle treatments, the design intention is most certainly aimed at ‘notice me!’ processing. Whether it’s to turn the most boring pad sound into a raging, pulsing, monster, spice up a dull drum loop into a glitchy, filtered, powerhouse, or create some ear‑candy vocal effects, FX Modulator is a great place to start. In short, this is a lot of fun to use if your music production involves more creative sound treatments.
Up The Warp Factor
The update also sees a number of enhancements to the AudioWarp system. First, you can now see and edit Warp Markers directly within the Project window as well as the Sample Editor. This is very useful when you want to warp one track to tighten its alignment with another. An obvious example might be to tighten up a bass guitar recording against a kick drum, and the ease with which you can see both waveforms as you make those edits certainly speeds up the process.
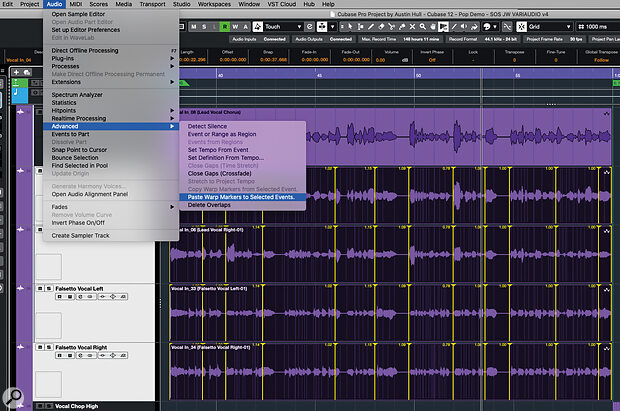 The AudioWarp system has been significantly upgraded, with operation within the Project window, phase‑coherent multitrack warping, and the ability to copy/paste Warp Markers between events.
Second, Project‑window AudioWarp editing is also possible with Group Editing enabled, and now offers Phase Coherent AudioWarp (engaged via a button found in the Group’s Folder header within the Inspector). This is ideal when editing multi‑microphone recordings such as those from an acoustic drum kit. Warp Markers added to one track automatically appear in all the other tracks within the group and, when you edit a marker in one track, the corresponding marker in the other tracks moves in sync, maintaining the phase coherence. This makes for very slick drum editing.
Third, you can now copy the Warp Markers from one audio event and apply them to another. There are a number of contexts in which this might be useful, but the obvious example is with multitrack vocals and backing vocals. For example, you might perform some VariAudio editing on a lead vocal part. You can then copy the Warp Markers from this event, select the backing vocal events, and then paste the Warp Markers into your various backing vocal events. The markers get added, and AudioWarp automatically applies the same timing adjustments to your backing vocals. Providing the BVs were in time with the original lead vocal, they will now also match the lead vocal’s revised (warped) timing.
In practice, all these new features are very easy to use and, if this kind of editing is a regular part of your workflow, you will undoubtedly see some efficiency gains.
And There’s More...
While the above may represent some highlights of the new release, it’s not an exhaustive list. Space precludes a detailed look at everything, but a number of other improvements deserve a mention. For example, amongst workflow enhancements scattered throughout v12, we get some very useful new options in handling and editing crossfades (including a significant improvement in the crossfade editor window). New key commands are added for various nudge functions, the Range Selection tool and when slip editing audio. Volume automation has also been enhanced to provide near sample‑accurate resolution. In addition, within the Sample Track, you can now use the AudioWarp option with sliced audio mode.
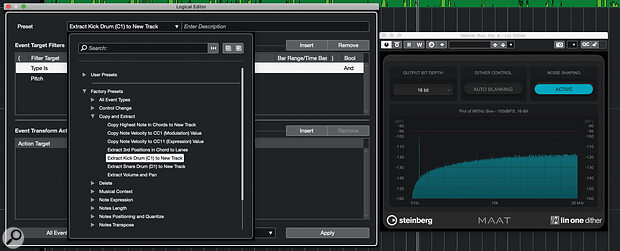 An upgrade to the Logical Editor system and a new dithering plug‑in are amongst a host of other additions and improvements in the v12 update.
There are also improvements for ARA extensions such as SpectraLayers or Melodyne. These can now be inserted at track level as well as event level, and this makes for a more efficient workflow. And while the Logical Editor system is a somewhat intimidating mystery to some Cubase users, v12 sees some considerable enhancements to its capabilities and a much‑expanded collection of presets. It might still be a little scary, but it is also more powerful and well worth exploring. Oh, and very welcome for those who have to generate multiple stems from their mix projects, for Pro users, Audio Export now includes features that take sidechain processing into account when generating stems.
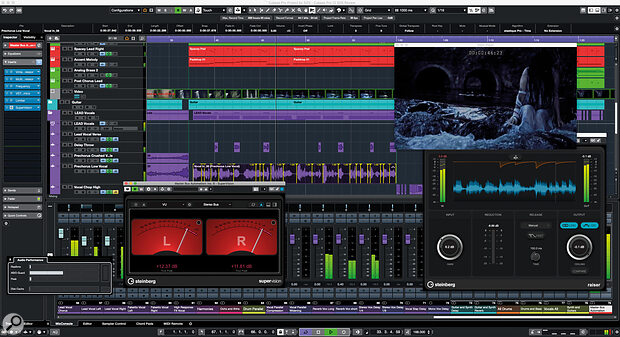
A new and more capable dither plug‑in, Lin One Dither, is also available, and support for the increasingly popular Dolby Atmos format is promised shortly in an upcoming maintenance release. Media composers now get a second video track — ideal when the director supplies you with all those last‑minute changes to the video cut! Finally, and a personal favourite amongst a few new additions to SuperVision’s module list, as shown in the opening main screenshot, we now get a VU meter with customisation of the meter’s response and a good selection of scale presets.
I’ve undoubtedly missed a number of other new additions but, before wrapping up, I ought to also mention something that, alongside the dongle, has also disappeared. Some of Steinberg’s older synths that were present within v11 — for example, Prologue, Spector or LoopMash — seem to have bitten the dust with v12, even if you are upgrading from v11, although the LoopMash FX plug‑in is still present. Thankfully, if you have older projects using these instruments, upgrading to v12 does leave v11 intact, so you can still open those projects in v11. I’ll perhaps miss LoopMash (the others are easily surpassed by Padshop and Retrologue) but I do wonder whether Steinberg might relight that particular fire at some stage.
Cubase Pro was already a powerhouse of an application. Steinberg have simply given it the bigger, better, faster, more treatment. Cubase Pro 12 is fabulous.
Conclusion
As someone who is part of the Cubase user base (Cubase Pro sits at the heart of my own project studio), I think Steinberg have done an excellent job with the v12 update. In a commercial context, the $99 upgrade price for Pro is a modest investment, yet it brings a significant number of new features that deliver obvious workflow enhancements in some very common recording and mixing tasks. Whether it’s the ability to extract the chords from an audio recording and begin populating the Chord Track, the ease with which you can edit the timing of multichannel audio recordings, the ability to edit pitch in vocal/solo instrument tracks without having to think about keeping things in the appropriate key/scale, or the tighter integration of your MIDI controller hardware with almost any aspect of Cubase, it’s all part of a more efficient workflow. And, on top of the workflow enhancements, there is also a number of new creative additions, such as new sounds from Verve and new processing options via FX Modulator and Raiser. Users working in almost any musical genre could benefit from many of these changes; it’s a lot of evolution for a pretty modest outlay.
Yes, for a brand‑new user, Pro’s asking price is a significant investment but, equally, Cubase Pro 12 is exactly what its name suggests: a music production platform capable of handling recording and mixing duties in a fully commercial, professional working environment. And, while not all the bells and whistles are included within the Artist and Elements versions (there is a comprehensive comparison of the respective feature sets on the Steinberg website), they provide a more affordable route into the Cubase family with sensible upgrade paths to Pro should that be required. And, as mentioned earlier, with Cubase 12’s new dongle‑free, licensing system, you are also soon going to be able to download a free, 30‑day trial version before committing to a purchase.
Cubase Pro was already a powerhouse of an application. Steinberg have simply given it the bigger, better, faster, more treatment. Cubase Pro 12 is fabulous.
Verve: Feel The Felt
 The new Verve instrument for Halion Sonic sounds fabulous — and note also the new panel open at the top of the UI, where you can select assignments for the plug‑in‑specific Quick Controls.
New for both Pro and Artist users is Verve. This virtual instrument combines very detailed sampling of a felt piano (a layer of felt sits between the hammers and the strings creating a softer, more intimate sound) with a second layer provided by a sustained texture from a selection of 60+ options. The instrument runs within Halion Sonic 3 (including SE) and the bespoke UI lets you adjust the balance between the two layers, tweak various parameters for each layer, and also apply delay and reverb effects.
On its own, the solo piano is both beautiful and expressive. The Distance control allows you to adjust the balance between the close and distant microphones used in the sampling process, giving you control over the natural ambience. The textures cover a fairly wide range of tones, from soft breathy sounds and various types of strings to sounds with metal ovetones, dreamy pulses and warm pad‑like options. However, they are all fairly subtle (no raging EDM here) as befits the instrument’s intention. For soft pop ballads, cinematic moods spanning dreamy love, sad reflective melancholy, or slightly sinister dark suspense, Verve can be just the thing. The combination of a soft piano and a pad texture is perhaps not a new one, but that doesn’t stop Verve sounding absolutely fantastic.
Cubase 12: FX Modulator
By John Walden
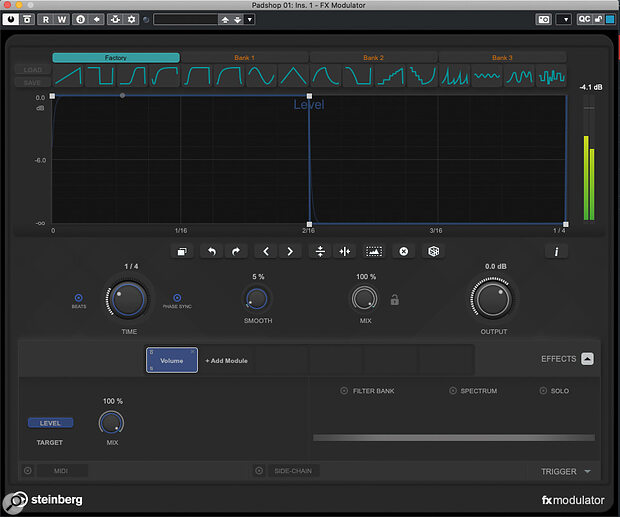 Screen 1: A simple step on/off modulation curve to control Level within FX Modulator’s Volume module, made using the second Factory curve preset in the top row.
FX Modulator brings powerful new creative processing options to Cubase 12
Included with the Pro and Artist versions of Cubase 12, Steinberg’s FX Modulator is a multi‑effects plug‑in which takes an approach that’s reminiscent of Output’s Movement and Cable Guys’ ShaperBox. It comes with plenty of cool presets and these are well worth exploring if you want to find out what it can do, but it’s also a very approachable plug‑in that makes it pretty easy to design your own effects from scratch. This article will take you through some examples, and on the SOS website (https://sosm.ag/cubase-0822) you can find some audio clips that should bring them to life.
The Rhythm Method
FX Modulator has lots of potential uses but first we’ll look at creating rhythmic effects from a sustained sound. As my starting point, I’ve used Padshop’s somewhat anonymous‑sounding Mellow preset with the in‑built delay turned off — but the same principles could be applied to any source sound.
Screen 1 shows an instance of FX Modulator inserted on my Padshop track. Any combination of FX Modulator’s 14 individual effects modules could be modulated to create rhythmic effects, but I’ve picked the simple Volume module for this example. This module offers a single parameter for modulation: Level, as shown bottom‑left of the UI. We can create a modulation curve to control this parameter in the upper panel. Some modules offer multiple parameters: for example, the Filter module allows you to modulate both Frequency and Q (resonance), and you can create independent modulation curves for each parameter.
FX Modulator ships with a bank of Factory curve presets which you can’t overwrite, as well as three banks of empty curve preset slots for your own creations. In this example, I’ve simply selected the second Factory preset curve, which steps the Level between maximum and zero once over the timebase of the envelope. This timebase can be changed with the Time control and, in this case, I’ve selected 1/4 so, when I trigger a sound in Padshop, I get a (very!) simple quarter‑note rhythm, as FX Modulator follows the modulation curve over the selected timebase. Yay: job done!
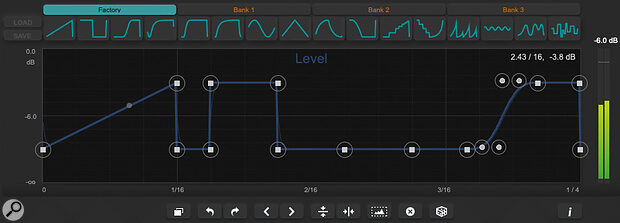 Screen 2: More complex rhythmic patterns can easily be created by combining the Factory preset curves. In this case, the curve’s vertical range has also been compressed using the editing tools.
Curve Control
That’s the basic principle covered but we can, of course, get more creative with the modulation curves — and pretty easily too! Editing the curve follows the standard approach of double‑clicking to add/delete nodes and click‑dragging to reposition them (they snap to the grid, but you can defeat this by holding Shift). You can also create curves by dragging the line between two existing nodes; a ‘shape handle’ will appear when you do this.
Depending on the nature of your source sound, sudden switches in parameter values (as for Level in the first screenshot) can produce noticeable audio artefacts such as clicks. Setting the Smooth control into the 1‑5 % range softens the transitions around the nodes (a thinner curve is superimposed on the main curve to visualise what’s happening) and will usually take care of such artefacts. Larger Smooth settings can be used to easily transform a stepped pattern into a ramped one for a pulse‑like effect.
The tool buttons beneath the curve editing window control various useful functions and, as well as undo/redo buttons, these include the ability to flip the curve horizontally or vertically and shift the curve left or right (by one grid step in the display). However, you also get buttons to reset the curve (the ‘x’ button), generate a random curve (the dice button), ‘select all curve points’ (the little mountain range), and ‘duplicate curve’ (leftmost in the row). The last two in particular warrant further comment...
You can select multiple nodes for editing by dragging with the mouse within the display, and the ‘select all curve points’ is simply a shortcut for selecting everything. However, what’s useful is what you can then do with your selection: this includes dragging left/right or up/down and, even better, the option to scale/compress the curve’s range vertically if you hold the Alt key while dragging one of the selected nodes.
The ‘duplicate curve’ button takes the existing curve and places a copy of it next to the original. Interesting to note, however, is that this is done by time‑compressing the original curve, so if you leave the Time control unchanged your curve pattern will effectively play back at double speed. You can adjust the Time control to return the pattern to the original speed, though, and then make whatever edits you might like to your modulation curve to create additional variety to your now duplicated curve.
Curve Collector
Once you’re fluent with these editing tools, it’s incredibly easy to create custom modulation curves. In our Volume module example, this results in custom rhythmic patterns but a further editing trick can speed up this process. If you don’t have any nodes selected, and then click on any one of the curve presets displayed at the top of the display, that preset curve is copied to the editing window, replacing any existing curve, and filling the timeline. However, if you first select a range of nodes on your existing curve before clicking on one of the presets, the selected preset curve replaces only the selected nodes. This makes it trivially easy to combine the preset curves in new ways, generating more complex curve starting points for further editing.
 Screen 3: Creating your own curve building blocks within the user banks makes it easy to experiment with new rhythmic patterns.
Two further things arise from this feature. First, if you design a curve you like, and might want to re‑use it in another module, a separate instance of FX Modulator, or even another project, saving it into an empty preset slot in one of the three user banks (and then saving the bank using the Load/Save button on the left) is a good move. Simply click on an empty user slot and the current modulation curve will be copied to it for later recall.
Second, and putting these ideas together, we can create some simple step on/off patterns (like that shown in the first screenshot) but each with a different number of steps. The next screenshot shows an example in which I’ve created four such presets featuring 1, 2, 3 and 4 curve cycles of on/off respectively. These can then be quickly combined in any number of ways using the option just described to replace a selected range of nodes with the current curve. This makes it super‑easy to experiment with different rhythmic patterns via our Volume module modulation and, once you have a basic rhythm you like, you can apply further manual edits to fine‑tune the end result.
To Infinity & Beyond
I’ve used a simple example here for the purposes of demonstration, but even the most complex FX Modulator presets are built from these same tools; they simply use more modules and parameters. And even if we confine ourselves to the ‘rhythmic sounds from a static pad’ aim, once you have the basics in place it’s easy to suggest a few quick ideas to try next.
For example, if you engage the Filter Bank button you can constrain the processing of the current module to just a specific frequency range (drag the two node points to adjust). So we could, for instance, apply our rhythmic volume modulation to just the low frequencies and leave the higher frequencies untouched; play with two hands and it’s almost like the sound has two layers, one rhythmic and one sustained.
Second, while you can only use a single instance of any particular effects module within FX Modulator, you can easily process your sustained pad sound through two separate FX Modulator instances, each using the Volume module to create a different rhythmic effect. If you also automate the bypass options on these two instances, you can quickly switch between different rhythms for the same sound. However, with both instances active, you can let the rhythmic effects interact and, by automating the respective Mix controls, you can change the blend between the two rhythms. The results can get really interesting if your two instances use different Time settings!
 Screen 4: The Filter Bank allows you to constrain the frequency range that each effect module is applied to.
Finally, you can try adding in other effects modules. An obvious candidate to add to your volume‑based rhythmic effects is the Filter module with both Frequency and Q set to be modulated gradually over a number of bars; your rhythm then gets some classic tonal variations added to the mix.
There’s plenty of fun to be had with the Volume and Filter modules alone, but FX Modulator is capable of way more than just rhythmic effects. These further options will, however, have to wait for a future column.
While FX Modulator might not quite reach the dizzy sound‑design heights of something like Output’s Movement, it is much easier to master — so dig in, and you’ll soon by enjoying the fruits of your sound‑designing adventures.
Tuesday, October 21, 2025
Monday, October 20, 2025
Prepping Vocals In Cubase
 To reap the full benefits of VariAudio, make sure you enable Show All Smart Controls.
The latest iteration of VariAudio includes all the tools you need to get vocals in shape for mixing.
Cubase may not be able to guarantee a world‑class vocal performance, but it does provide all the tools you need to present recorded vocals in their best possible light. Once you’ve laid down or comped your best take and dealt with any unwanted noises, if you then bounce everything into a new audio clip, Cubase’s VariAudio is a powerful one‑stop editing shop that can be used for all the obvious level, timing and pitch adjustments that might benefit the part. We looked at this topic back in the May and June 2019 Cubase workshops, but Cubase has evolved since then and, for Pro and Artist users at least, Cubase 12 includes some further options — so let’s explore the possibilities.
One For All
We’ll start with a VariAudio refresher. When you first open VariAudio from the Sample Editor’s Inspector panel, Cubase will analyse your audio clip — it might take a few seconds for a longer clip — and then superimpose pitch Segments (rectangular ‘blobs’) over the waveform. Each Segment represents a portion of the audio that Cubase has identified as containing pitch variations that lie (mostly) within a single note (semitone) range. A continuous pitch curve indicates the pitch variation within each Segment, as well as any pitch transitions that occur as the vocal flows legato‑style between them. Segments are only created for those parts of the performance that contain definable pitch components: adjacent Segments never overlap, but there will be gaps in the display between Segments where there are non‑tonal sounds, such as breaths, consonant‑only sounds or rests. (Despite the visual gaps, the underlying audio is still there and being played back!)
Before starting work, a few settings are worth checking. First, ensure the Edit VariAudio button is active, so you can actually start editing. Second, enable the All option in the Smart Controls drop‑down menu, so you see the full set of controls. Third, note that the VariAudio tab header includes a ‘bypass’ button, so you can easily A/B compare your VariAudio edits with the unedited original.
The second screenshot (below) provides a reminder of the functions provided by each of the Smart Controls available on a Segment and, while many of these are focussed on various ways to manipulate pitch, you also have options for adjusting both volume and timing — the addition of these make VariAudio a much more efficient environment, since you can now perform most core vocal editing tasks in one place. By the way, note that while Smart Controls can be used to edit individual Segments, if you select multiple Segments for editing, adjusting a Smart Control on any of the selected Segments will apply edits to all of them.
 A useful summary of the Smart Control functions.
Split Sliding Away
A good first step is to inspect the Segments Cubase has created and consider whether manual adjustments might be useful. There are a couple of things to look out for. First, if the pitch curve within a Segment seems to contain an obvious step change (as distinct from pitch vibrato), consider splitting the Segment into two for greater control when editing. Simply hover the mouse cursor towards the bottom of the Segment where you wish to make a split, and a horizontal line will appear at the base of the Segment and the cursor changes to a pair of scissors; one click, and you’re done. Segments can also be glued together, if that’s required.
Second, if the length of a Segment doesn’t encompass all of the waveform that it should, hold the Alt/Opt key, and then drag the Warp Start (mid‑left) and Warp End (mid‑right) Smart Controls. Holding down the Alt/Opt key changes these Smart Controls to adjust the Segment length rather than warping the audio, but note that you can’t extend a Segment so that it overlaps with, or re‑sizes, an adjacent one when using this modifier key.
While you’re performing these edits, you can also consider the levels. Most vocals will benefit from at least some compression or volume automation when you get to the mixing stage, but you can often make that later stage easier with a first pass using the Volume Smart Control (located bottom‑right of the Segment). Simply looping playback through short sections of your vocal while you make any adjustments on individual Segments will soon let you even out any of the more obvious inconsistencies in volume.
VariAudio is an impressively flexible one‑stop shop for both corrective and creative editing.
Manipulation Of Time
If your vocals also need some timing tweaks, you could flip to the Sample Editor’s AudioWarp panel. But in VariAudio, without the Alt/Opt key modifier, the Warp Start and Warp End Smart Controls also provide AudioWarp functionality and could be all you need. As you make these edits, you see the underlying waveform being stretched/compressed and how any transients align with the Sample Editor’s musical grid. It’s powerful stuff and, once you’re familiar with how typical changes might affect the underlying audio, it’s an extremely easy way to tighten up vocal timing where required.
The AudioWarp algorithms are pretty robust, so the Warp Start and Warp End Smart Controls can be used for rather more than minor timing correction: you can also explore changing the underlying rhythmic phrasing of a vocal line. This might include shortening or extending a sustained note, compressing a phrase to fit a specific number of beats, or separating and shortening individual words to create a staccato‑style delivery. Yes, you can obviously push things to the point where the audible artefacts become obvious, but used with care it can be a great way to get creative with new phrasing ideas, and you can always undo the changes if something doesn’t quite work. The audio examples illustrate what might (and perhaps what should not!) be done.
Scaling New Heights
The pitch‑manipulation Smart Controls combine to make VariAudio a powerful tool for corrective and creative pitch editing, particularly if you learn to make best use of the Tilt/Rotate Anchor Point and the two Set Range For Straighten Pitch Curve controls; these allow you to finesse exactly which portions of the overall pitch curve your edits will be applied to. But in Cubase 12, VariAudio has been treated to the Scale Assistant system, which was previously only available in the MIDI Key Editor.
 Providing you know the key/scale of your project, the new Scale Assistant features within VariAudio – and the option to colour‑code the Segments by Scale/Chords – makes both corrective and creative pitch editing straightforward whatever your level of music theory.
The Scale Assistant won’t impact on your more detailed pitch‑curve edits, but when you’re editing the pitch of a whole Segment (manually, or via Snap or Quantize) you can now force those pitch changes to use only notes within a specific scale. You can configure this using the new Scale Assistant sub‑panel, where you can specify a scale or opt to follow the Chord Track. A couple of visual options can be enabled but perhaps the most useful is to select the Scale/Chords option in VariAudio’s Segment Colors drop‑down menu: Segments are colour‑coded (by default: grey in key, red out of key) so that anything initially lying out of key is really easy to spot. And if you enable Snap Pitch Editing in the Scale Assistant sub‑panel, when you move the pitch of any Segment only ‘in key’ notes are permitted. This combination makes pitch correcting your vocal parts quicker and, should you have a less‑than‑strong grasp of music theory, easier.
Scale Assistant isn’t useful only for pitch correction, though. It also makes it easy to experiment with creative pitch editing. For example, if you wish to re‑write the melody ‘after the fact’, you can explore moving Segments to different pitches, knowing that they’ll only snap to ‘in key’ notes. This can be a lot of fun to try and, while the results are obviously genre‑ and material‑dependent, it’s often surprising what you can get away with. Two things are worth noting. First, breaking a long Segment into multiple shorter Segments provides plenty more options for re‑working a melody. Second, I find that pitch‑shifting artefacts are often most easily noticed during the transitions between Segments. Adjustments to the pitch curve slope within the transition can improve the flow, and you can often achieve that by making slight timing changes to the Segments involved using the Warp Start and Warp End Smart Controls.
Ready, Steady, Mix
Cubase has various other options for making edits and polishing your vocal recordings, but sometimes it’s helpful to do as much as you can in one place — and VariAudio is an impressively flexible one‑stop shop for both corrective and creative editing. If this approach appeals to you, be sure to use the VariAudio Bypass button to check the edited version against your original starting point and, when you are finished, execute the Flatten Real Time option from the VariAudio panel’s Function drop‑down menu (located at the base of the panel), since this will avoid any possibility of your careful volume, timing and pitch edits getting accidentally lost. With that done, hopefully, your vocals will be ready for the typical mix processing that will make them the star of the show.
